System. Server Main Settings
VINTEO Server allows you to choose from various basic and minor settings. The transition to these settings is made from this section of the menu.
Содержание
Status
English / General Description / Status
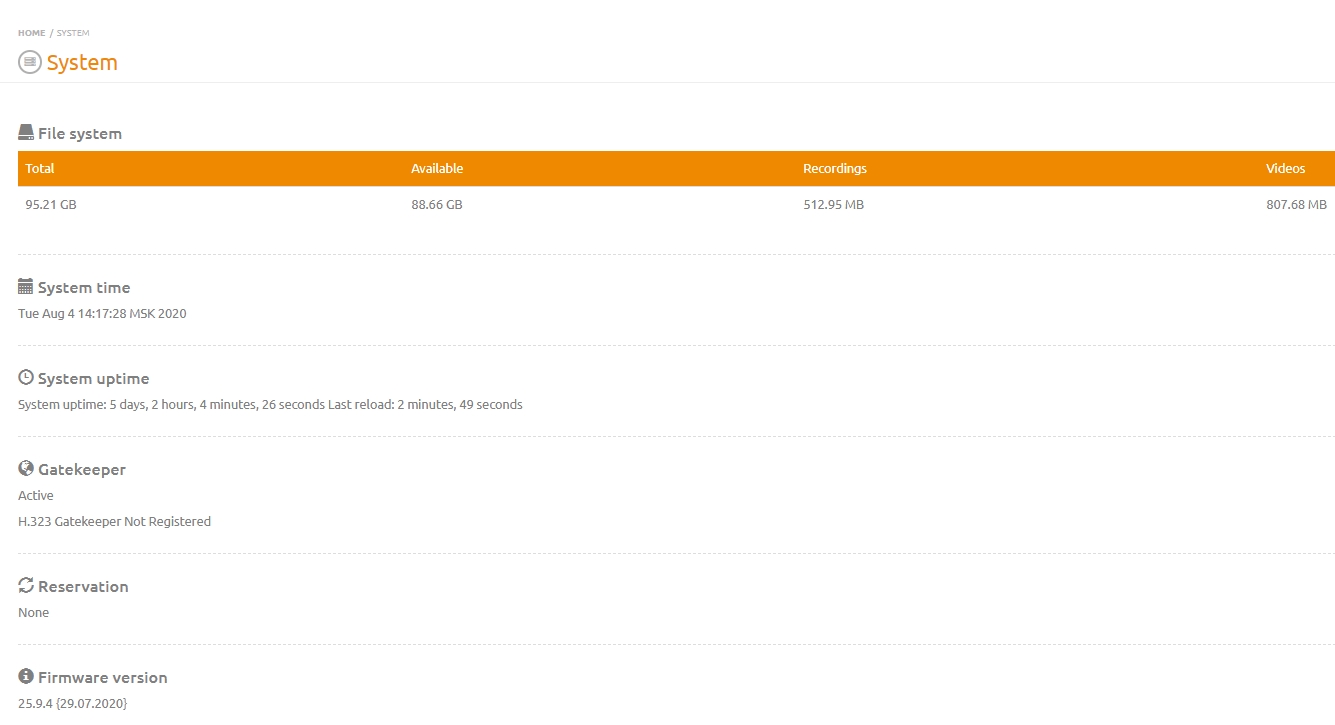
On this page you can view basic information about the server's space and used hard disk system time server uptime H.323 gatekeeper status backup status and current firmware version.
In the "Firmware version" block when you hover over "i" information about the version of system components (decoder, encoder, proxy, kernel) is displayed as well as the build date and time.
Gateways
English / General Description / Gateways
Gateways are network connections using SIP or H.323 protocols as well as digital PBXs, PBX servers and other media servers.
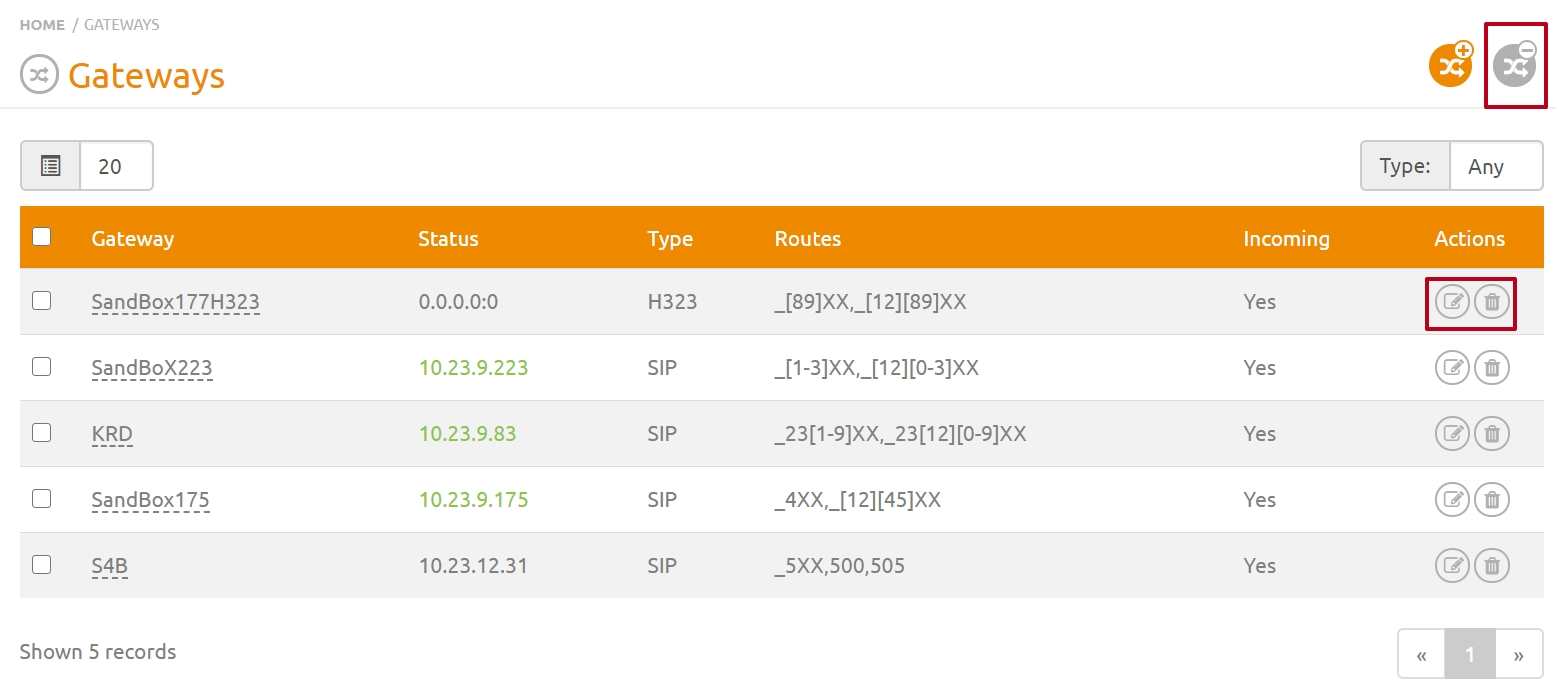
This page allows you to view all gateways added to the server.
Adding a gateway
How to add a gateway to the server
- Choose Gateways from the System drop-down list and the page will open
- Click on the Add Gateway button in the upper right corner
- Fill in the required parameters
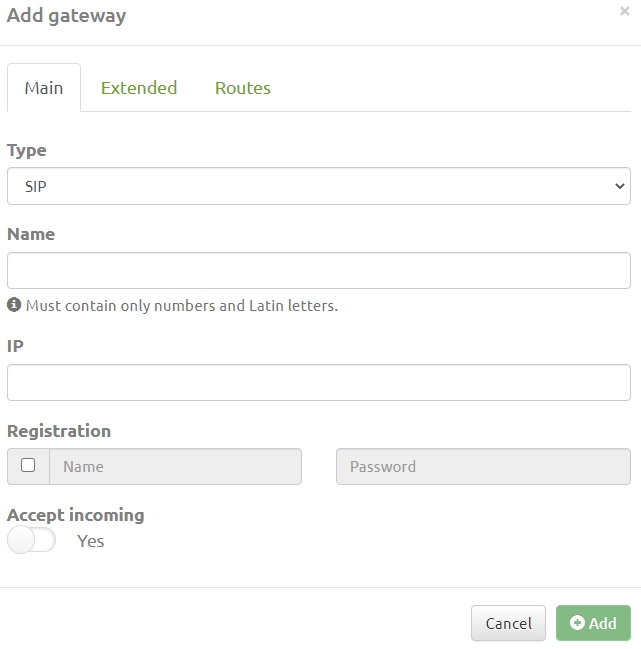
Main tab
- Type is the choice of the protocol for connecting to the gateway
- In the Name line enter a name consisting of Latin or digits
- In the IP string enter enter an IPv4 address
- In the Registration string enter a name and a password if you need
- The Accept Incoming switch enables/disables the ability to receive incoming calls from this gateway.
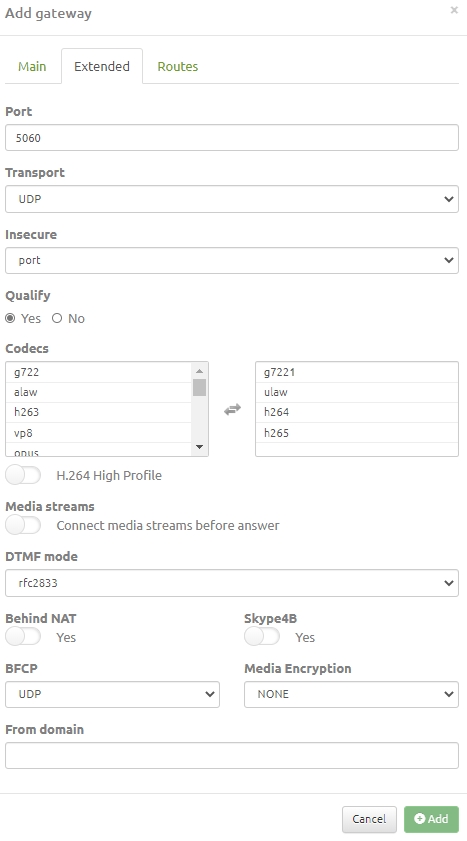
Extended Options Tab
- Port is the string where the gateway recognize incoming network packets
- Transport is the string with a drop-down list of types of data transfer protocols UDP, TCP, TLS
- Insecure is the string with a drop-down list to choice of the secure level
- Qualify is the option sends SIP messages of the OPTIONS type to check the availability of participant’s devices
- Codecs is the option defining a list of codecs that are supported by media servers
- H.264 High Profile is the video stream codec profile switcher for high definition images transmission
- DTMF mode is the mode that supports DTMF signal to a remote server
- Skype4B is the switcher that enables/disables of Lync/Skype for Business server recognition as a VIS server
- BFCP is the string with a drop-down list in which you can choose the type of content transfer protocol during a SIP call
- Media Encryption is the drop-down string that enables encryption of the media stream during a SIP call
- From Domain is the string to write SIP URI.
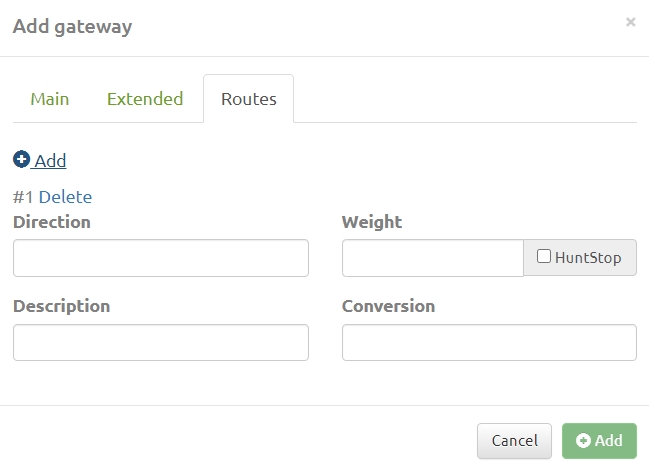
Routes tab
- Direction is the string that defines the mask of the route being created
- Weight is the string the numerical value of which affects of the rating of the created route
- Description is the string to add a description of the route
- Add is the button to save the set parameters
Format for the dial routes in Vinteo server gateways
Directions and prefixes can be both numeric and alphabetic and have the following structure:
- X is any digit from 0 till 9
- Z is any digit from 1 till 9
- N is any digit from 2 till 9
- [12345-9] - any digit below, for example 1,2,3,4,5,6,7,8,9
- any quantity of digits after the point. For example, _9011. This number will match 90112 and 90116789 and so on
- _ this sign indicates that the prefix is a regular expression. The structures mentioned above will be interpreted as it was described above.
Examples
- _8495XXXXXXX is a number consisting of 11 digits, necessarily starting with 8495 and then any digits from 0 till 9
- _8495XXXXXXX is a number consisting of any digits necessarily starting with 8495 and then any digits from 0 till 9
- _[012]4567 is the number consisting of 5 digits starting with 0, 1, 2 and ends on 4567
- _9 [45678] 43567 is a 7-digit number starting at 9, then it has 4, 5, 6, 7, 8 and ends on 43567
- _786124848440 is a necessarily 12-digit number that fully matches the regular expression.
Deleting and editing
Deleting and editing a gateway is performed using the buttons in the Actions column of the Gateways list.
Videos
English / General Description / Videos
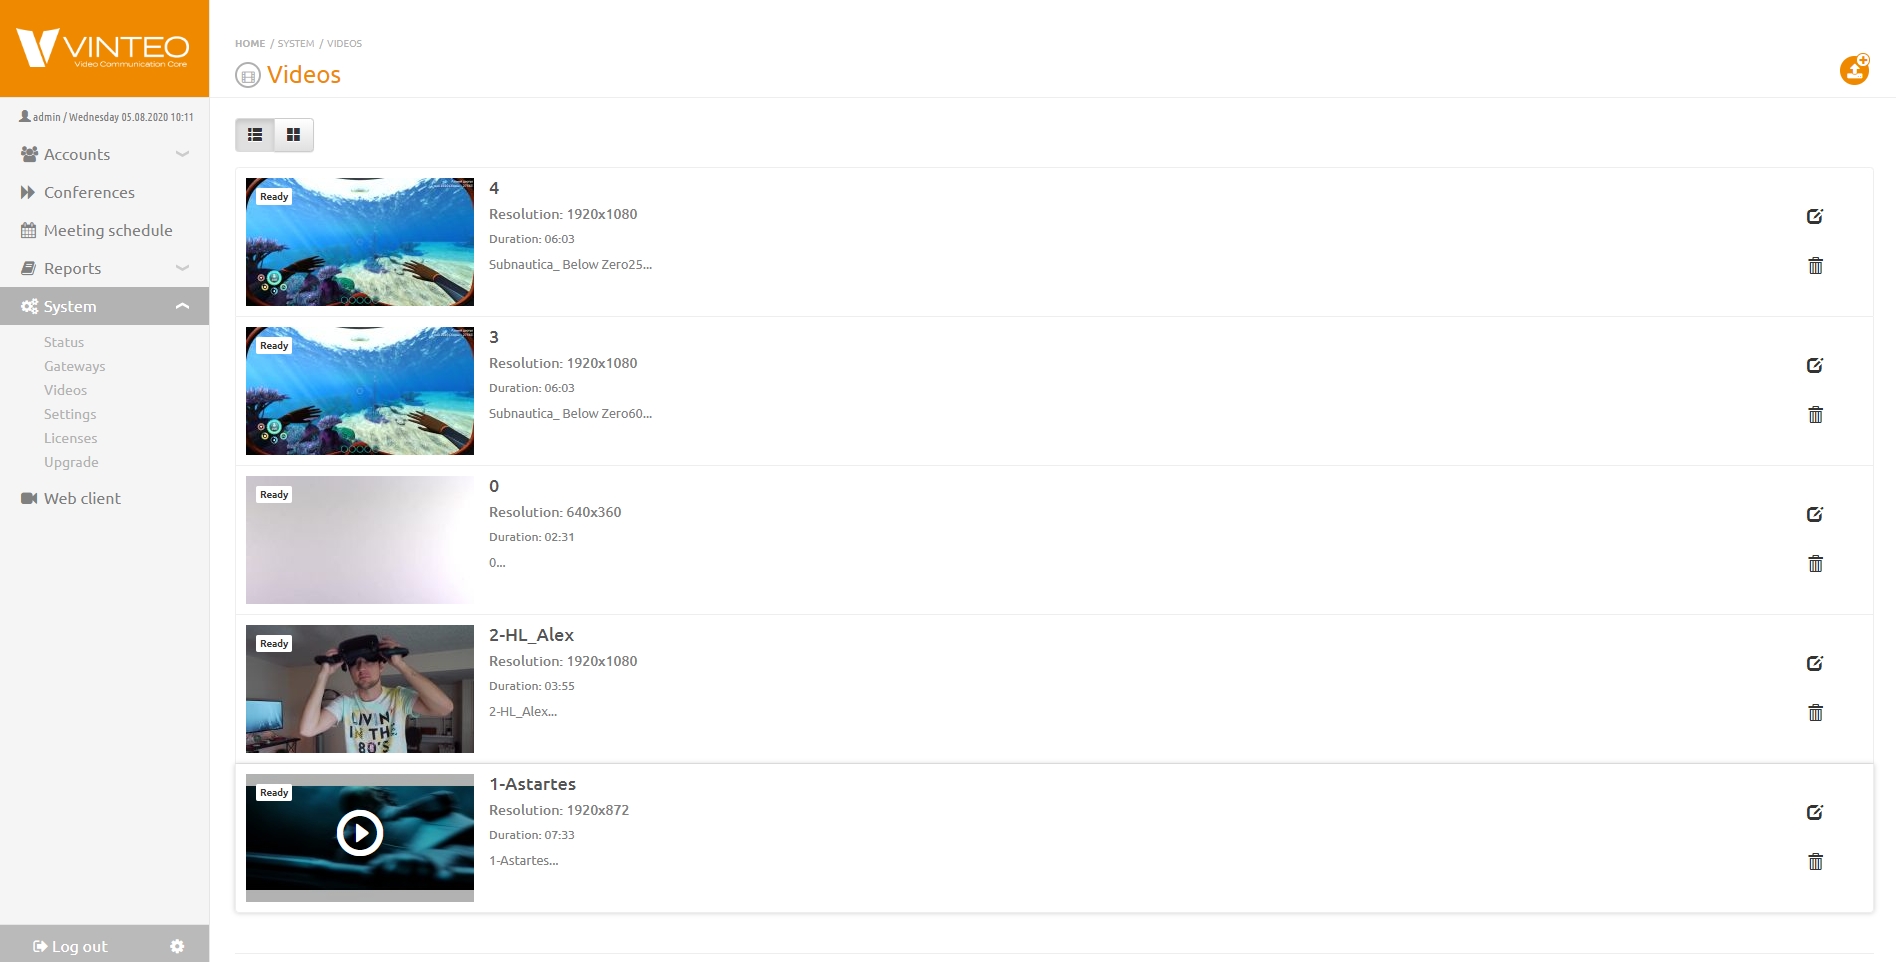
On the Videos page you can add a video in mp4 \ mov \ m4v \ mkv \ flv \ wmv \ avi formats to display it as an additional stream in the conference.
Note

The size of the uploaded video file must not exceed 512MB.
Larger videos are loaded using the Firefox browser.
Adding a video
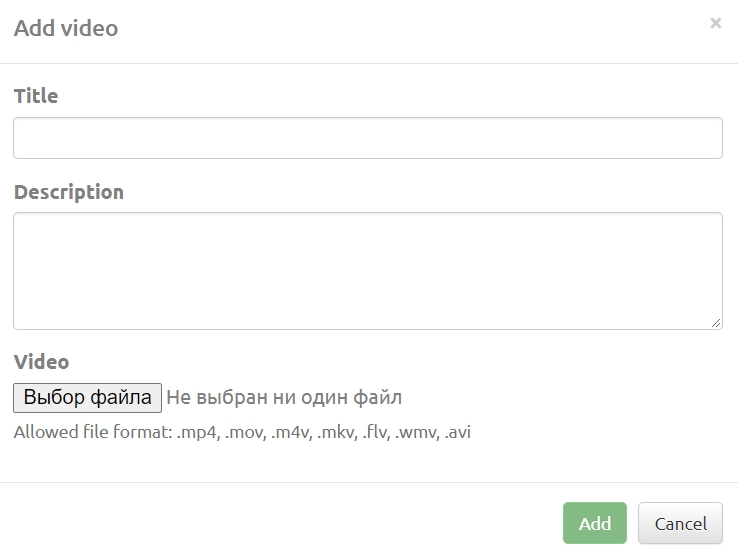
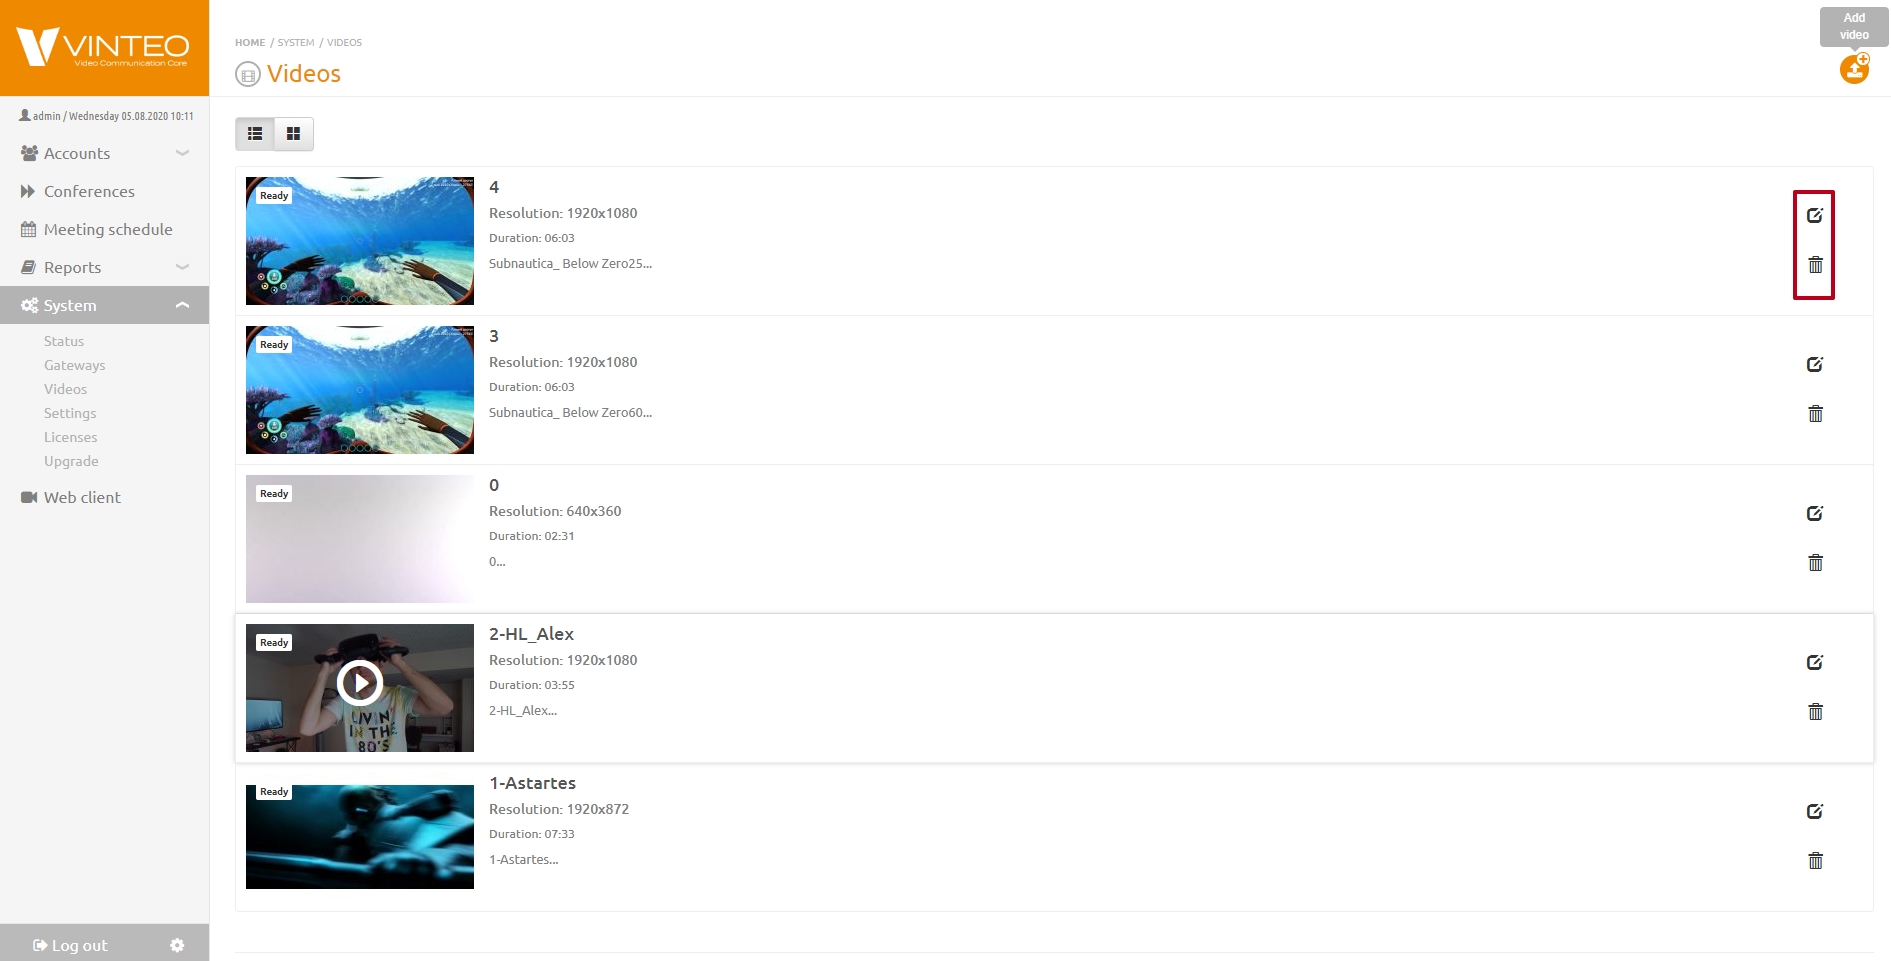
To add a video use the Add Video button then fill in the Title line and the Description field. Push the Select File button.
After selecting a video, the Add button will become active. Push this button.
Deleting a video and editing a title
The buttons opposite the title of the video allow you to edit the title and delete the video.
Settings
English / General Description / Settings
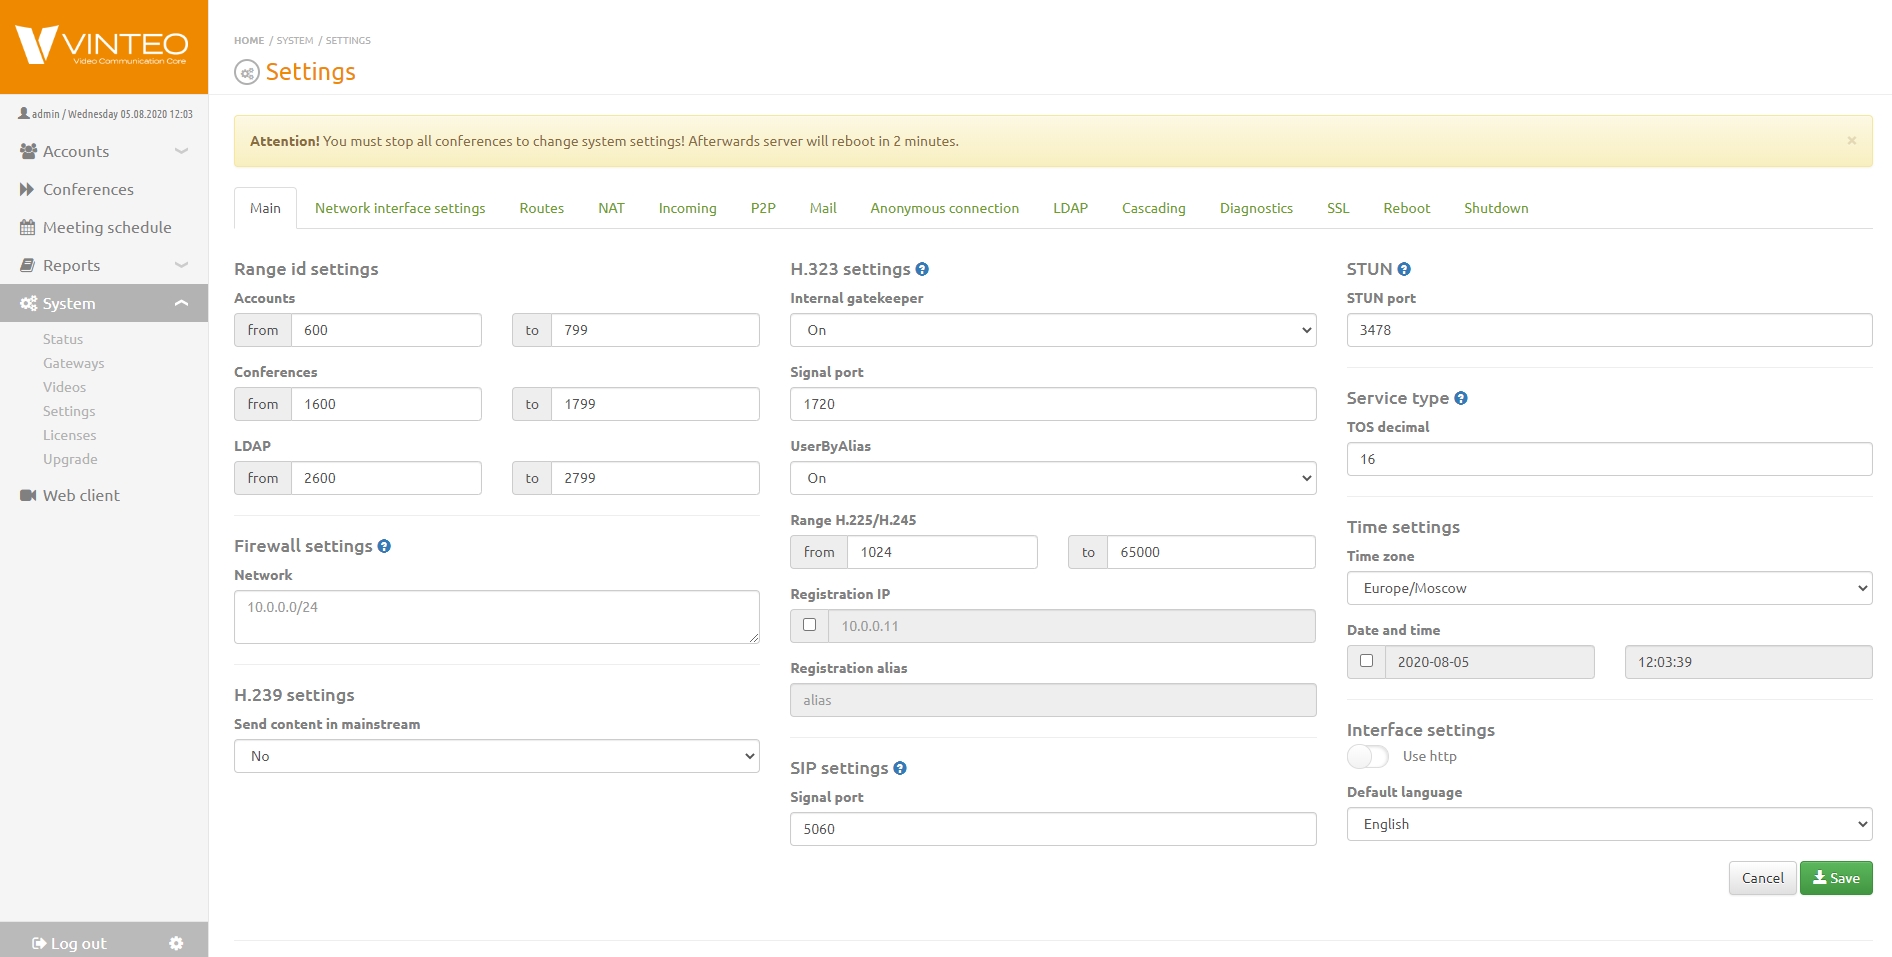
The settings page contains:
- Firewall settings to deny access to SIP and H.323 ports from the local network
- Network interface parameters and routing
- Anonymous users connection settings
- SIP and H.323 settings
- Address translation parameters
- Diagnostic utilities
- Server power management
Main settings tab
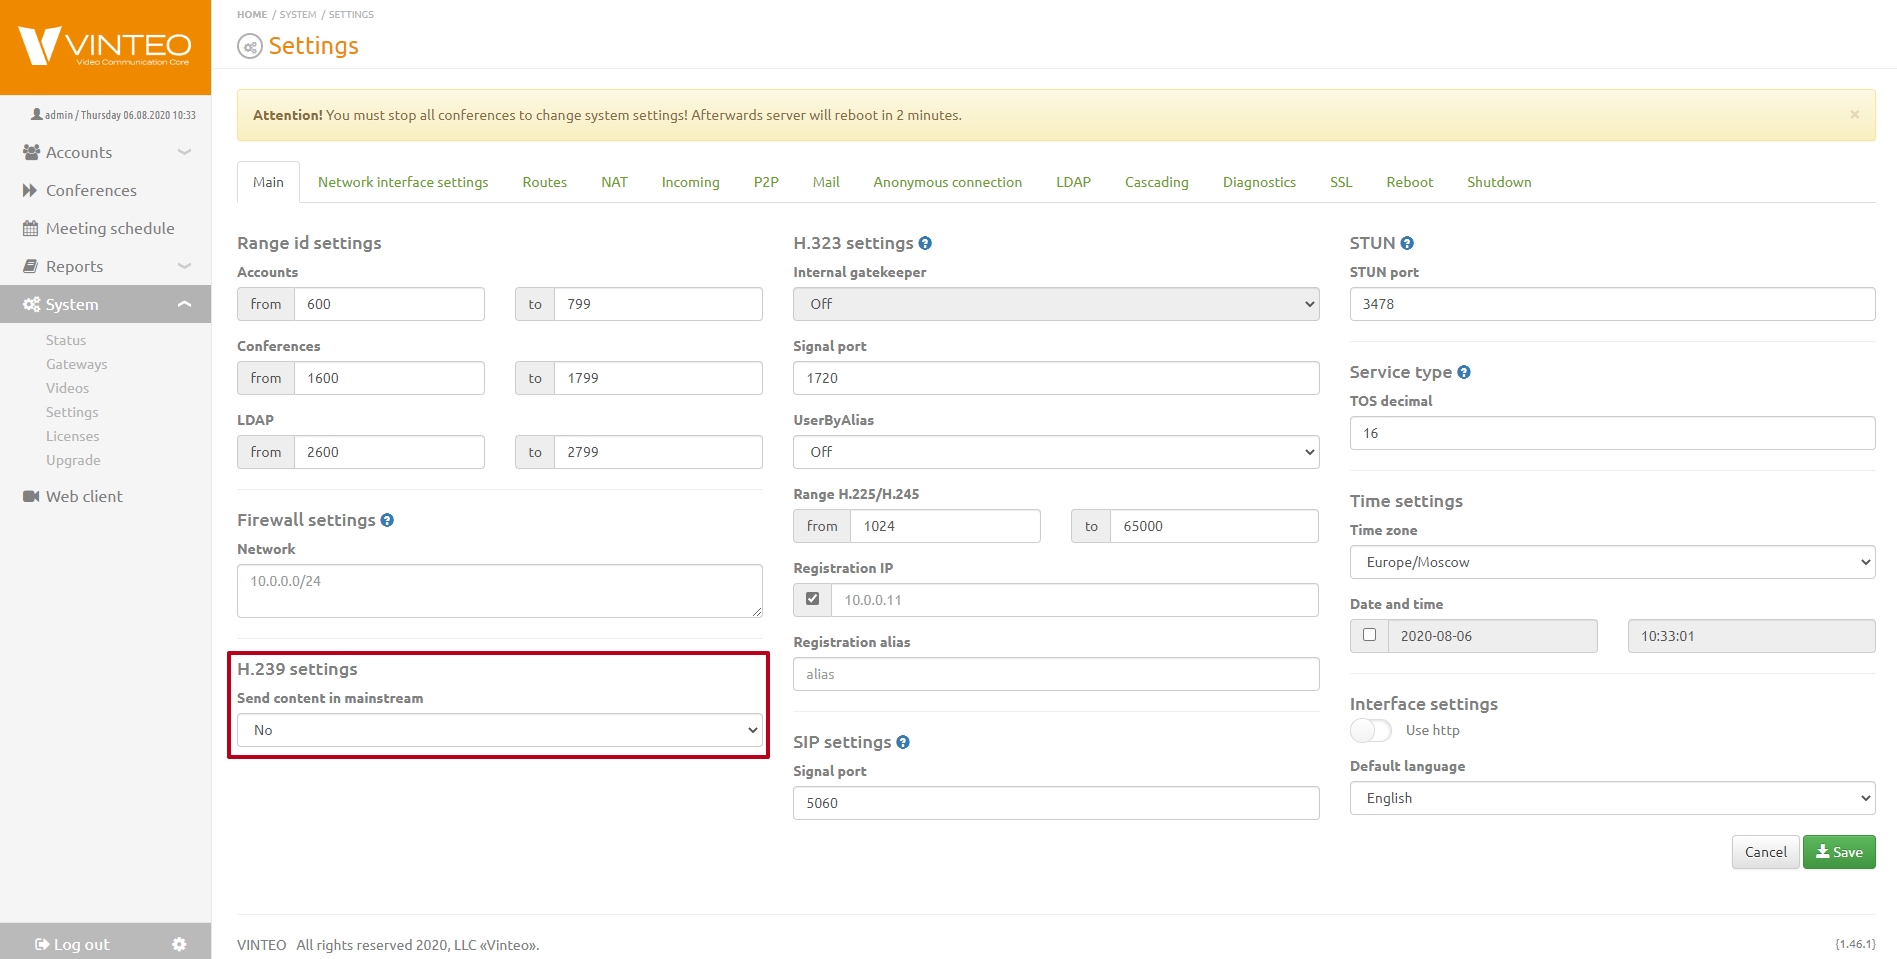
- On the main settings tab, you can change:
- Firewall settings to deny access to SIP and H.323 ports from the local network
- H.323 parameters: Signal port, Range port, authorization string by login and password
- SIP, STUN, ToS parameters: signal port, STUN port
- Time and interface settings: default language, usage of http protocol instead of https protocol
- The H.239 setting is a string that allows sent the content in the main stream as a common mode for the server.
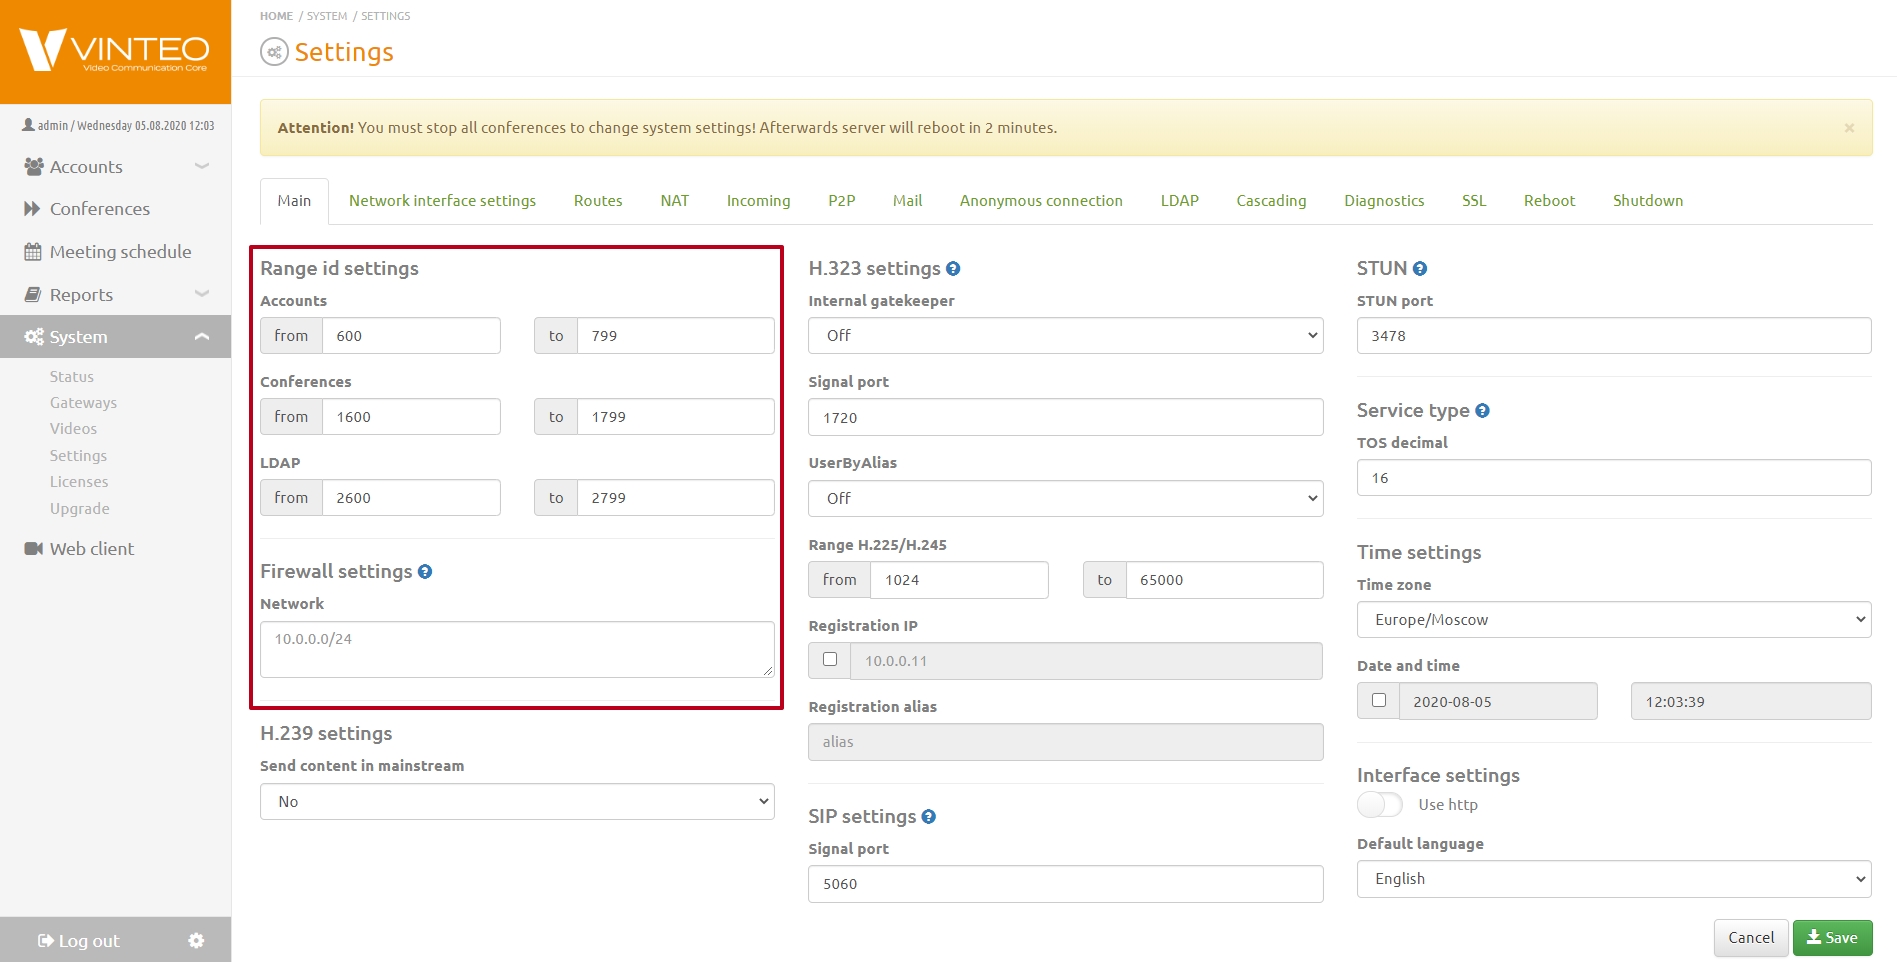
Range ID settings
- The number range settings are needed to establish and recognize the number base of the VINTEO server.
- If you try to call a number that is not in this setting, the call will not do.
Firewall settings
The Firewall settings work like an access whitelist. If the list is empty, access is allowed to all networks visible to the terminal. If the single address or subnet address are in the list, the access will be allowed only from addresses of that subnet.
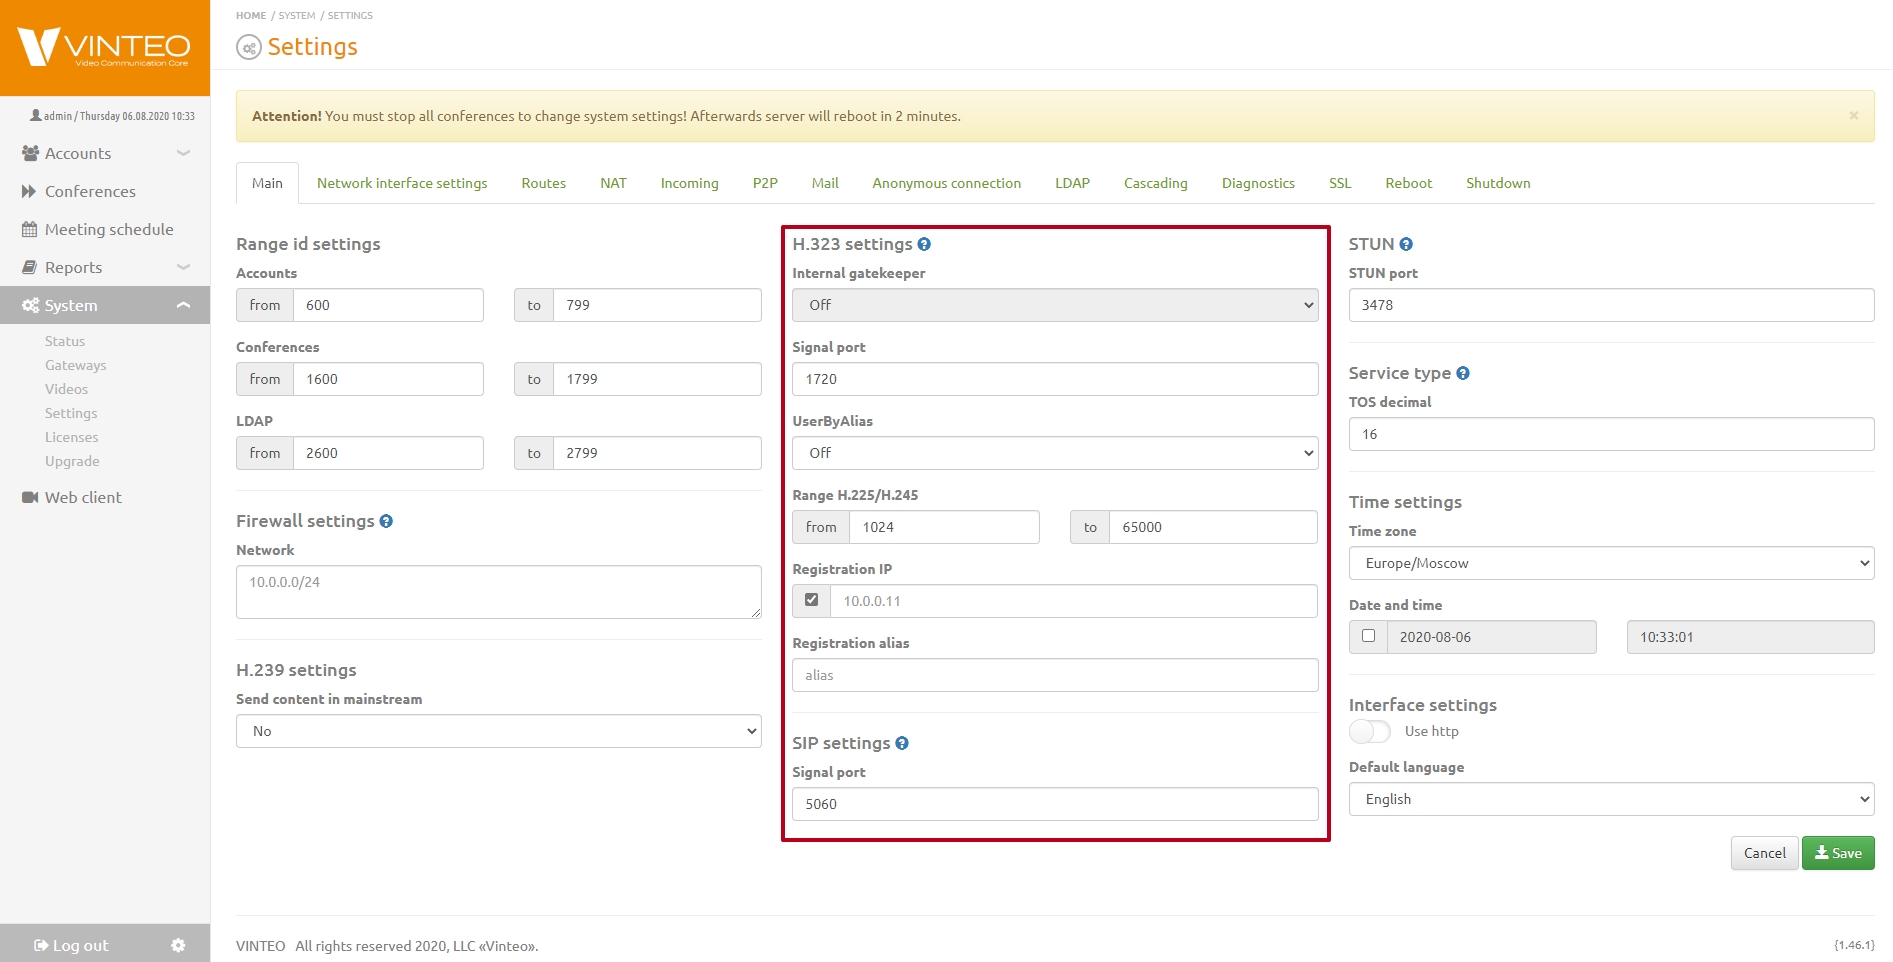
H.323 Settings
Changing the H.323 signal ports requires the same values to be configured on the other devices.
- Internal gatekeeper is the string that allows you enable / disable the internal gatekeeper.
- Signal port is the string that define H.323 signal port number.
- UserByAlias is the string that allows to dial participant with the own number in the list of participants.
- Range H.225/H.245 is the string that allows you to set the port range for H.225 / H.245 protocols.
- Registration IP and Registration alias strings are required to enter data for connecting to a remote gatekeeper. Registration IP is the string where you need to enter a login. Registration alias is the string for specifying a password, it becomes active after entering information in the Registration IP string.
SIP Settings
SIP Settings is the string to enter the SIP signal port.
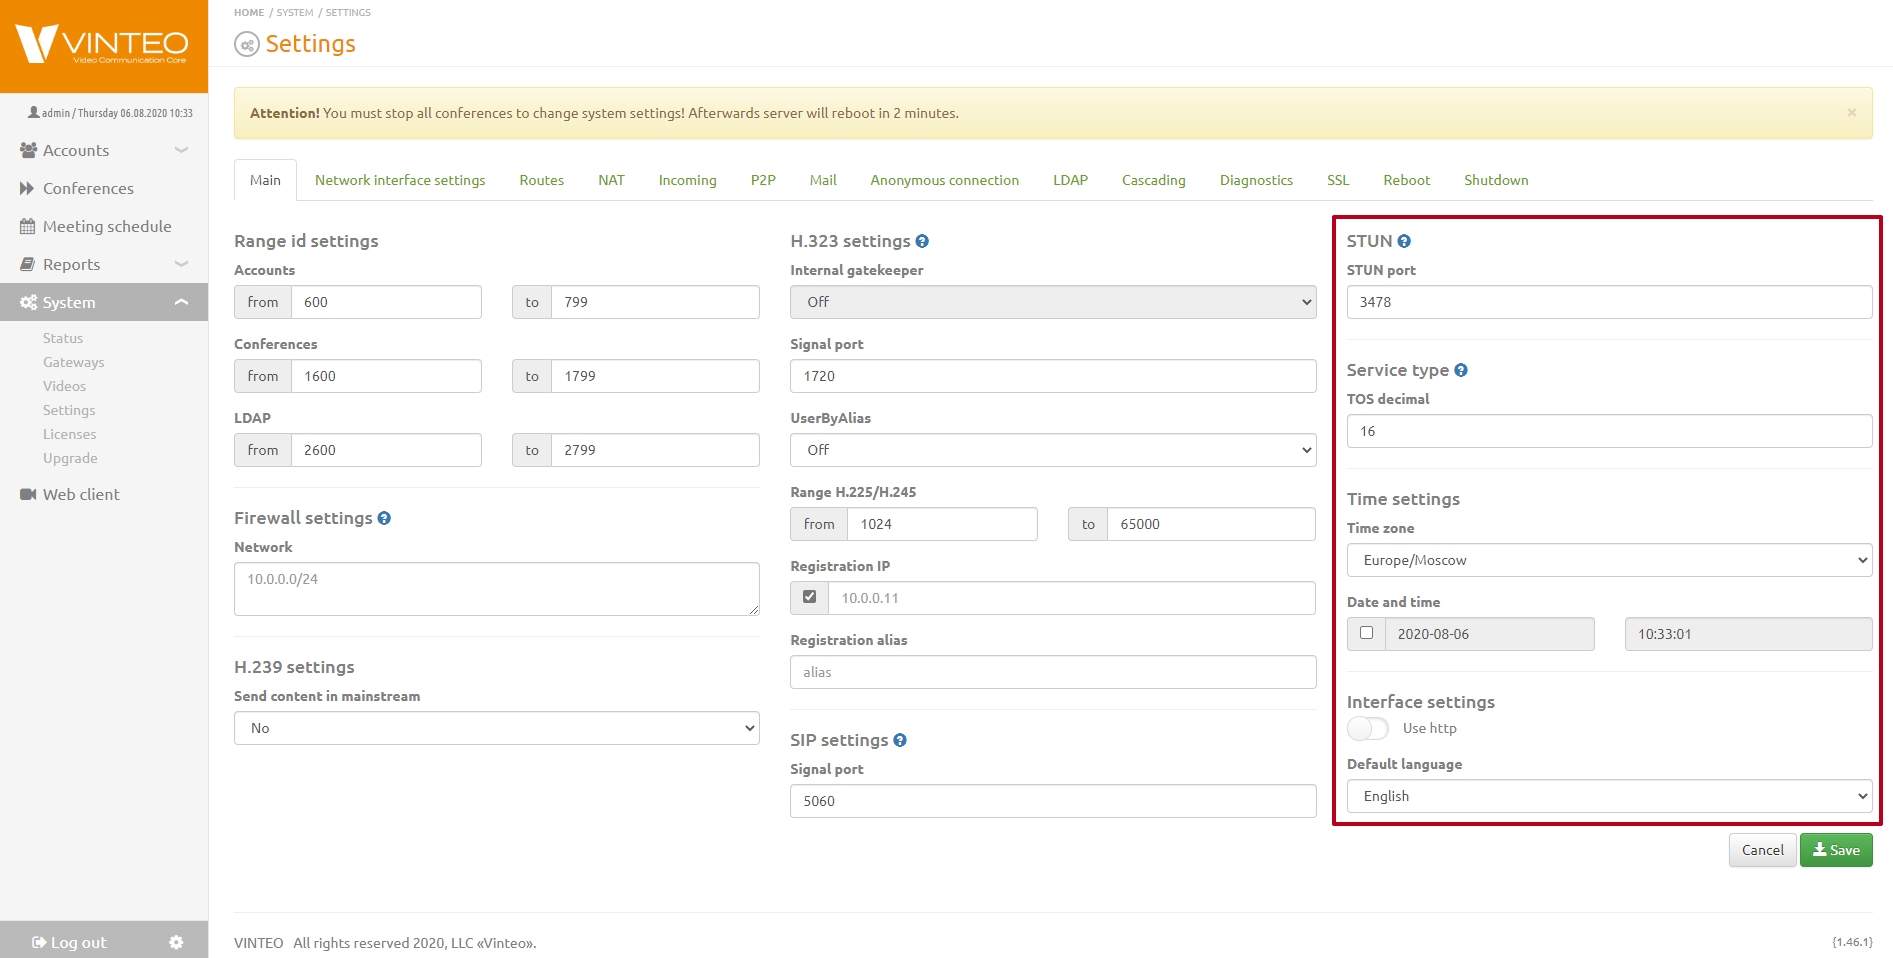
STUN
STUN settings are used to connect participants using WebRTC technology.
STUN technology will start working after specifying STUN port parameters.
Service Type
Service Type is the string that is used to determine the quality of service, even if the network is overloaded with an other traffic.
Interface Settings
This settings allow you to choose and set one of three options of language of the server interface:
- Russian
- Dutch
- English
The block contains a session switch for the secure HTTPS protocol and the insecure HTTP protocol
H.239 Settings
Send content in mainstream is the string that allows you to send the second stream you are receiving to the main stream.
Network Interface Settings
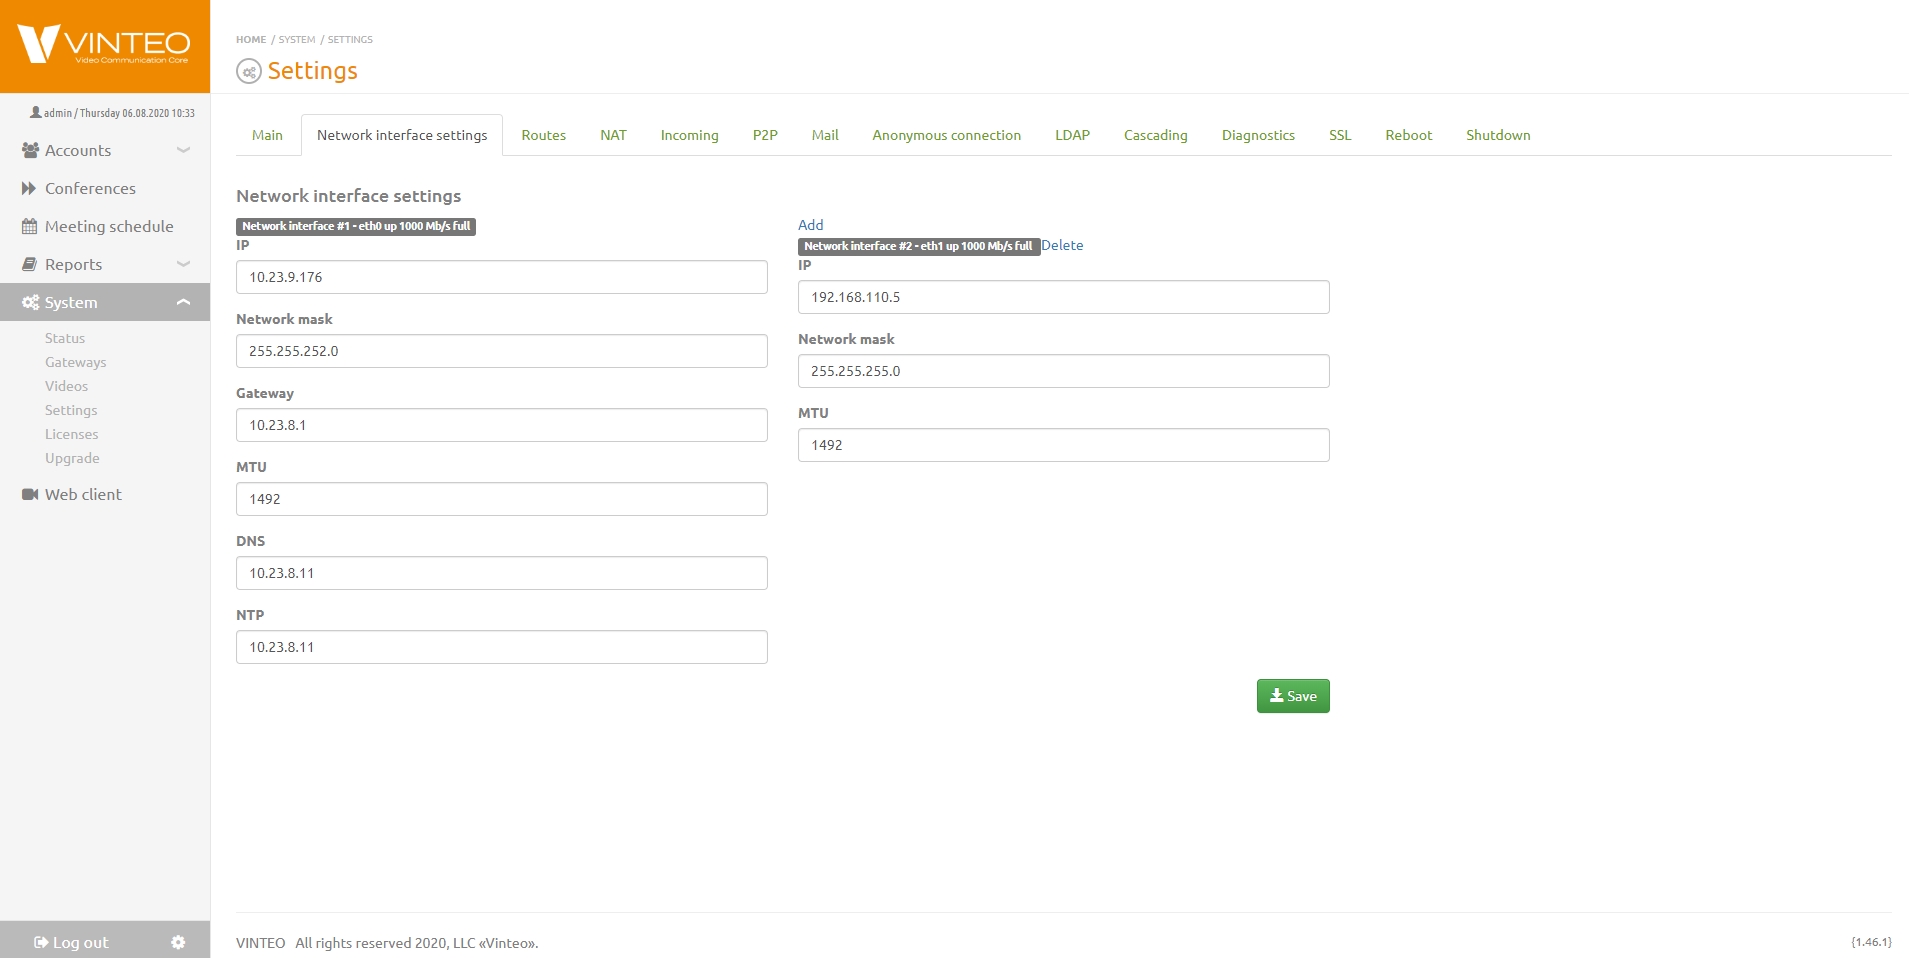
This tab on the Settings page contains interface parameters and configure in a typical way. Network interface #1 is external and configure by filling in strings shown below.
- IP is the string for entering an IP address in IPv4 format.
- Network mask is the string for entering a value XXX.XXX.XXX.XXX format
- Gateway is the string to enter network border gateway IPv4 format
- MTU is the string for specifying the maximum amount of data that can transfer by the protocol in one iteration
- DNS - the string in which contain the address of the name server in the IPv4 format
- NTP is the string for enter the address of the exact time server in IPv4 format.
- Interface number 2 has strings for the IP and Network mask settings.
If you have 2 or more network interfaces, we recommend using the first eth0 interface to access it from the external network, and the second interface for the local network clients. The routing of calls of the local network clients with external network clients and backward carry out on the Routs tab. After adding the interface and saving the settings, you need to restart the server. After restarting, the second interface should have the Up status.
Routes
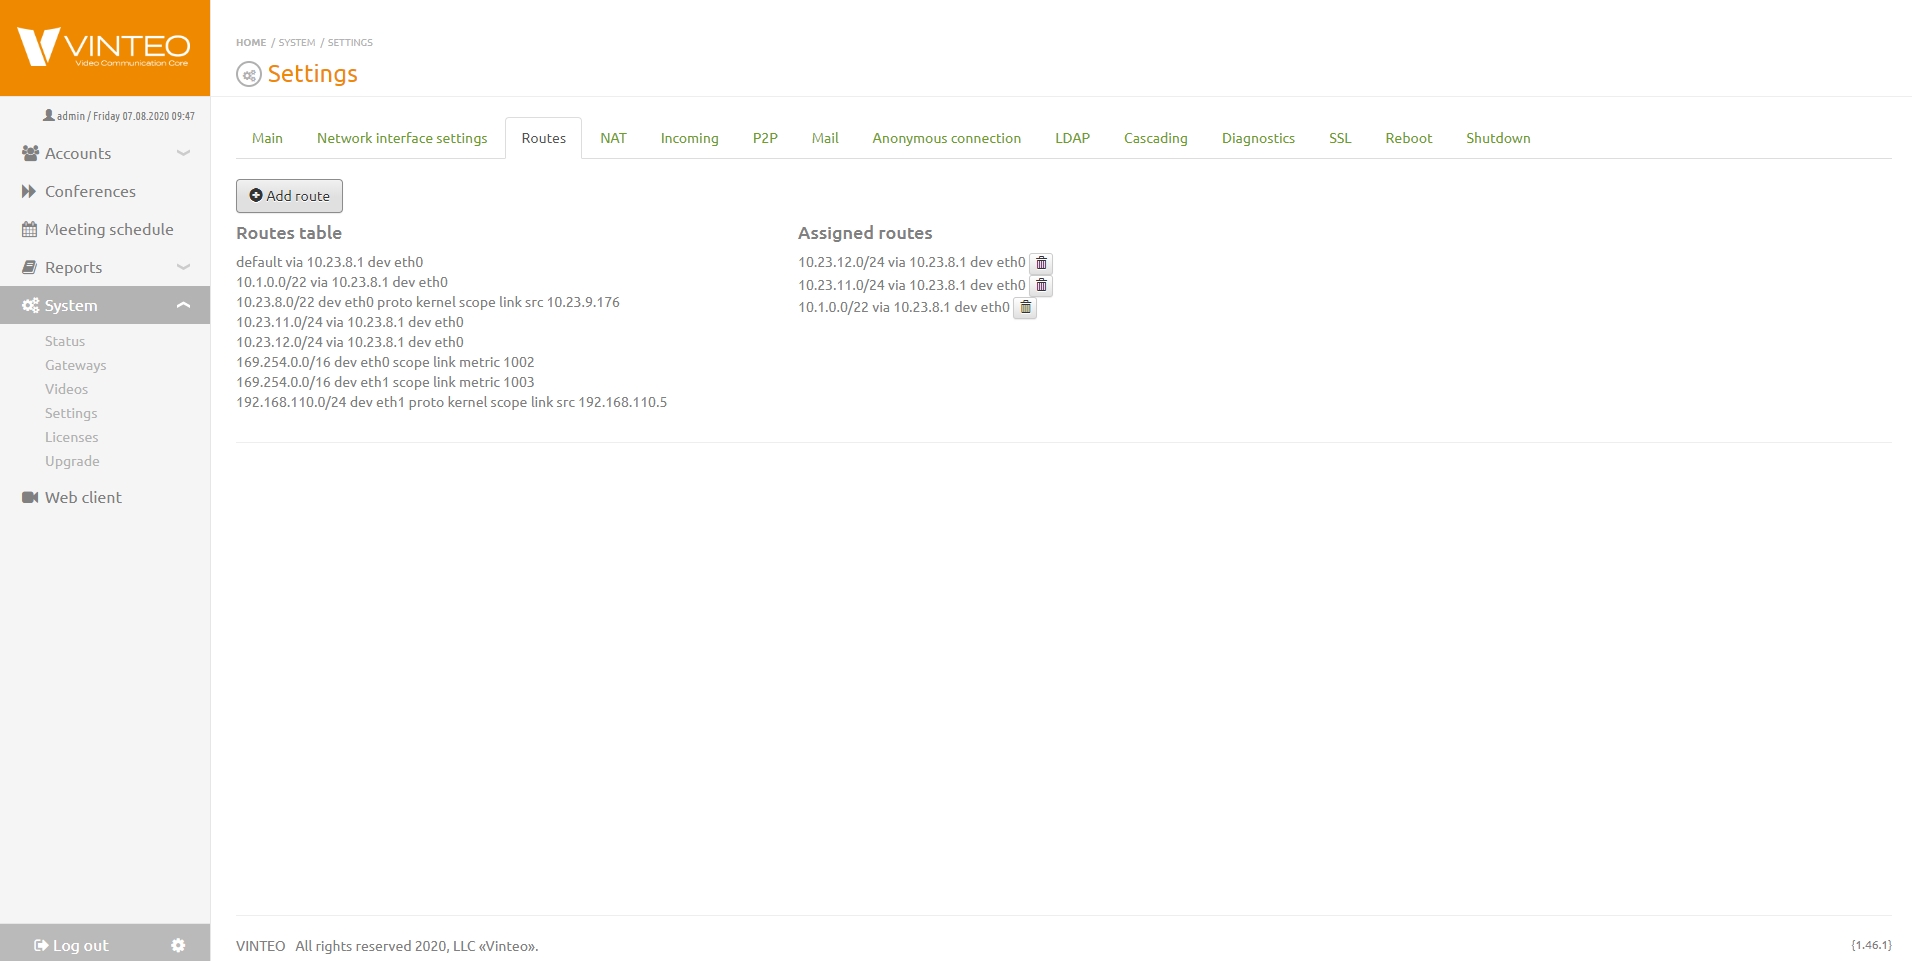
This tab contains of routes information for the server and allows to add static routes.
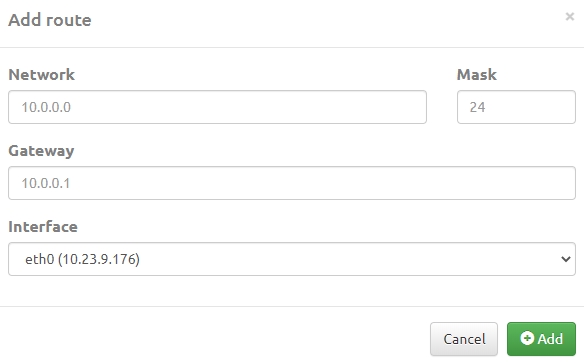
The adding of a new routes allows to find network interfaces for the route to specified networks. The Add route button on the Routes tab calls a modal window and you can create a new route.
Parameters you should set in the modal window.
- The Network is the string you must direction of the route.
- Mask is a string for entering information about the length of the prefix bits.
- Gateway - is the string for specifying the gateway address. IPv4 format direction is available for this address.
- Interface - is the string for selecting a network interface option. A network device with access to this network direction is physically connect to the network interface.
NAT tab
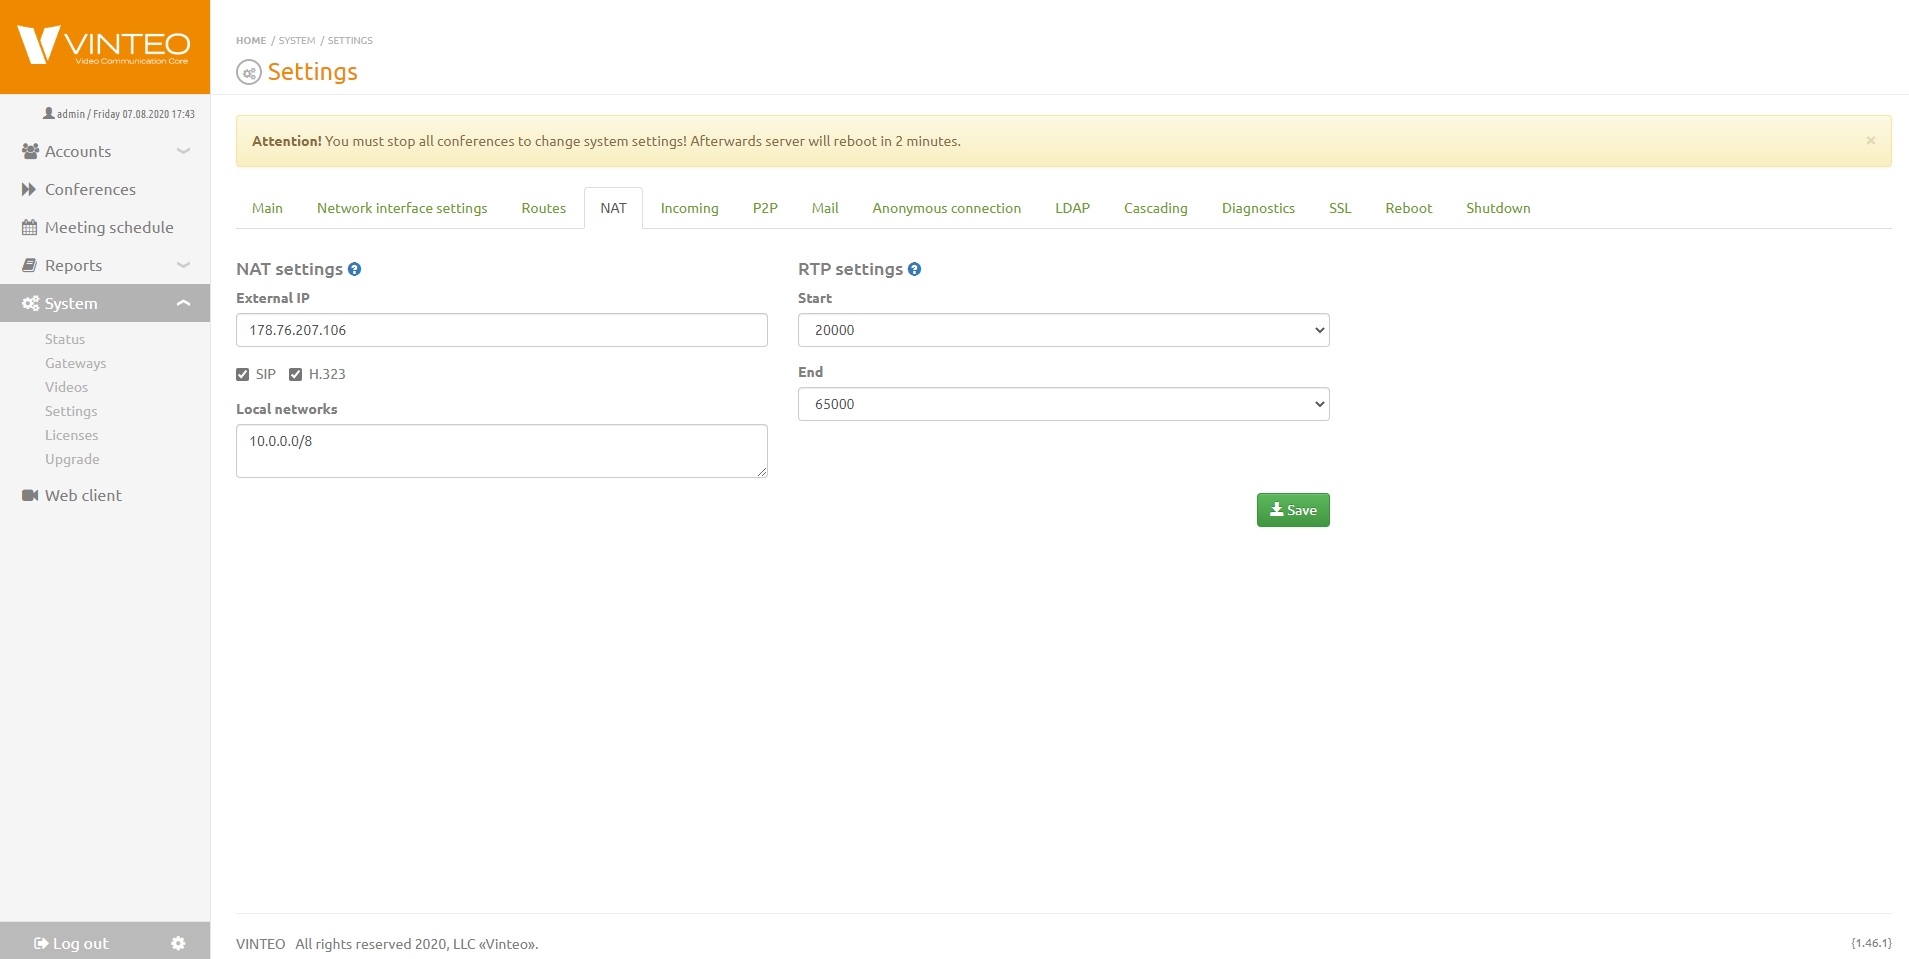
The NAT tab allows you to specify the network address translation parameters. This is necessary when the server is installed behind a network edge device and does not have its own external address.
Nat settings block
The NAT settings block allows you to change the following parameters
External IP is the string for specify the network address of network edge device. It allows to transport of network addresses into the local network. Local networks is the field for forming a list of network addresses or subnets that are local to the server.
Attention! If information about an external network device is entered in the "External IP" string, then in the Local networks field, you must enter the addresses of your local networks, for which the external IP address will not be substituted, as in the example. Only one network per line or field can be specified.
SIP and H.323 checkboxes define protocols to be used when connecting remote participants.
RTP settings
Start and End are strings where you can specify a port range.
"Incoming calls"
The page contains 3 tabs:
- "Incoming calls settings";
- "Blacklist";
- "Whitelist".
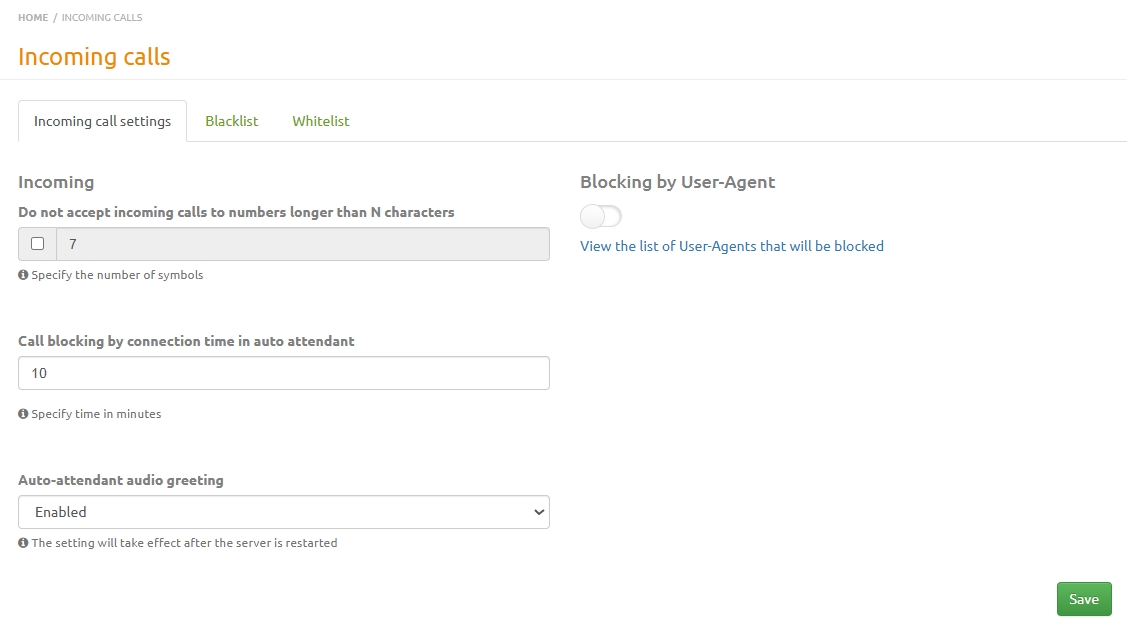
The "Incoming call settings" tab contains rules for blocking incoming numbers as well as calls on the time they are in the auto attendant.
Many of our customers are familiar with the fact that if the server is located in the Internet space then the server receives multiple calls via the SIP protocol from unknown accounts who occupy licenses and simply put spam. To avoid problems related to this the Vinteo VCS server has an anti-spam system.
This tab contains the following parameters that you can set:
1. "Do not accept incoming calls to numbers longer than N characters" is the parameter that allows the server to automatically reject incoming calls to numbers longer than the specified value. We recommend you specify the number 7 since international numbers that spammers call usually have ten or more characters in the number.
2. "Call blocking by connection time in auto attendant" is the parameter that allows you to disable an incoming call if the connection is in the auto attendant (IVR) for longer than the specified time. If the blacklist is enabled this address will be added to it. The signature of the IP address in the blacklist will say "blackhole".
3. "Auto-attendant audio greeting" is the setting that allows you to turn on, turn off the audio greeting and you can also set a parameter in which the audio greeting will be turned off for video calls. By default the audio greeting is on.
4. "Block by User-Agent" is the switch that allows you to block connections by User-Agent. Below is the link with a list of blocked User-Agents.
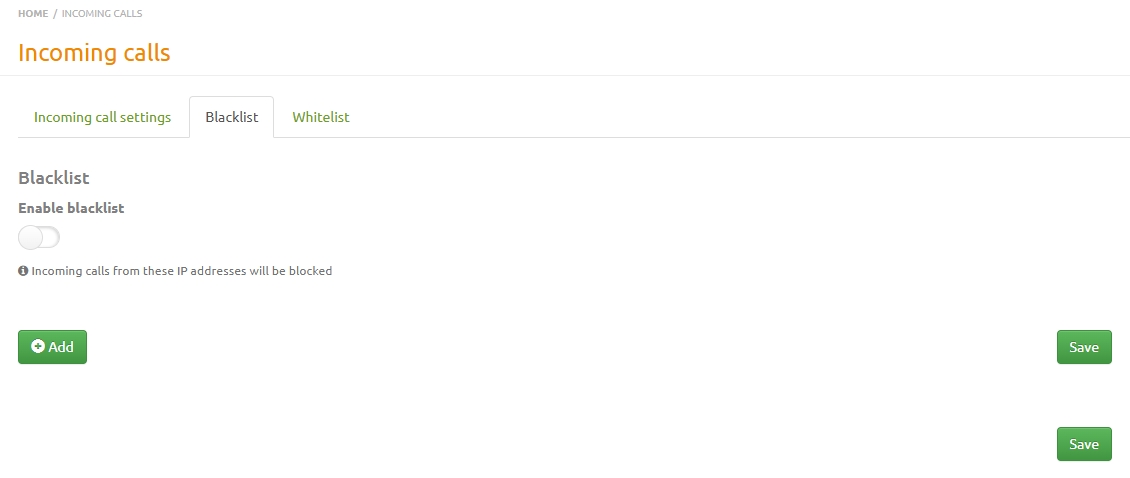
On the "Blacklist" tab there is the switch "Enable blacklist" - this controls the built-in firewall on the server. The server will automatically drop packets from all IP addresses on the blacklist. When the blacklist is enabled all calls related to the first parameter ("Do not accept incoming calls to numbers longer than N characters") will be added to the blacklist.
The blacklist is displayed below and contains information about the blocked IP address and the reason for the blocking (as a signature under the IP address).
If a participant cannot connect to a conference or cannot make a call to the server then perhaps this participant could be blacklisted. You can find its IP address in the blacklist and click the remove from blacklist button. Then you should click the "Save" button.
The blacklist does not include IP addresses of registered accounts and IP addresses of gateways from the "System" - "Gateways" section.
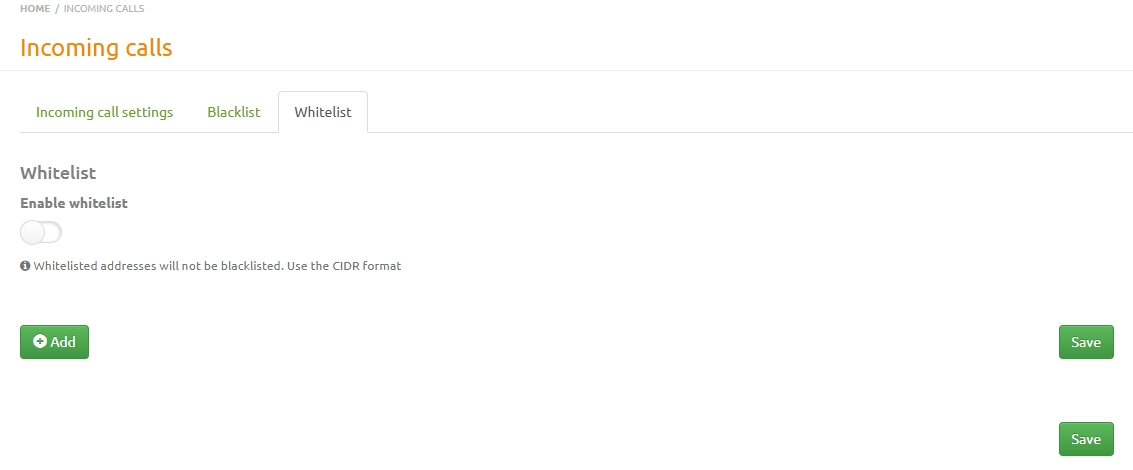
The "Whitelist" tab allows you to define IP addresses that will not be blacklisted. This functionality is activated by the "Enable whitelist" switch.
P2P tab
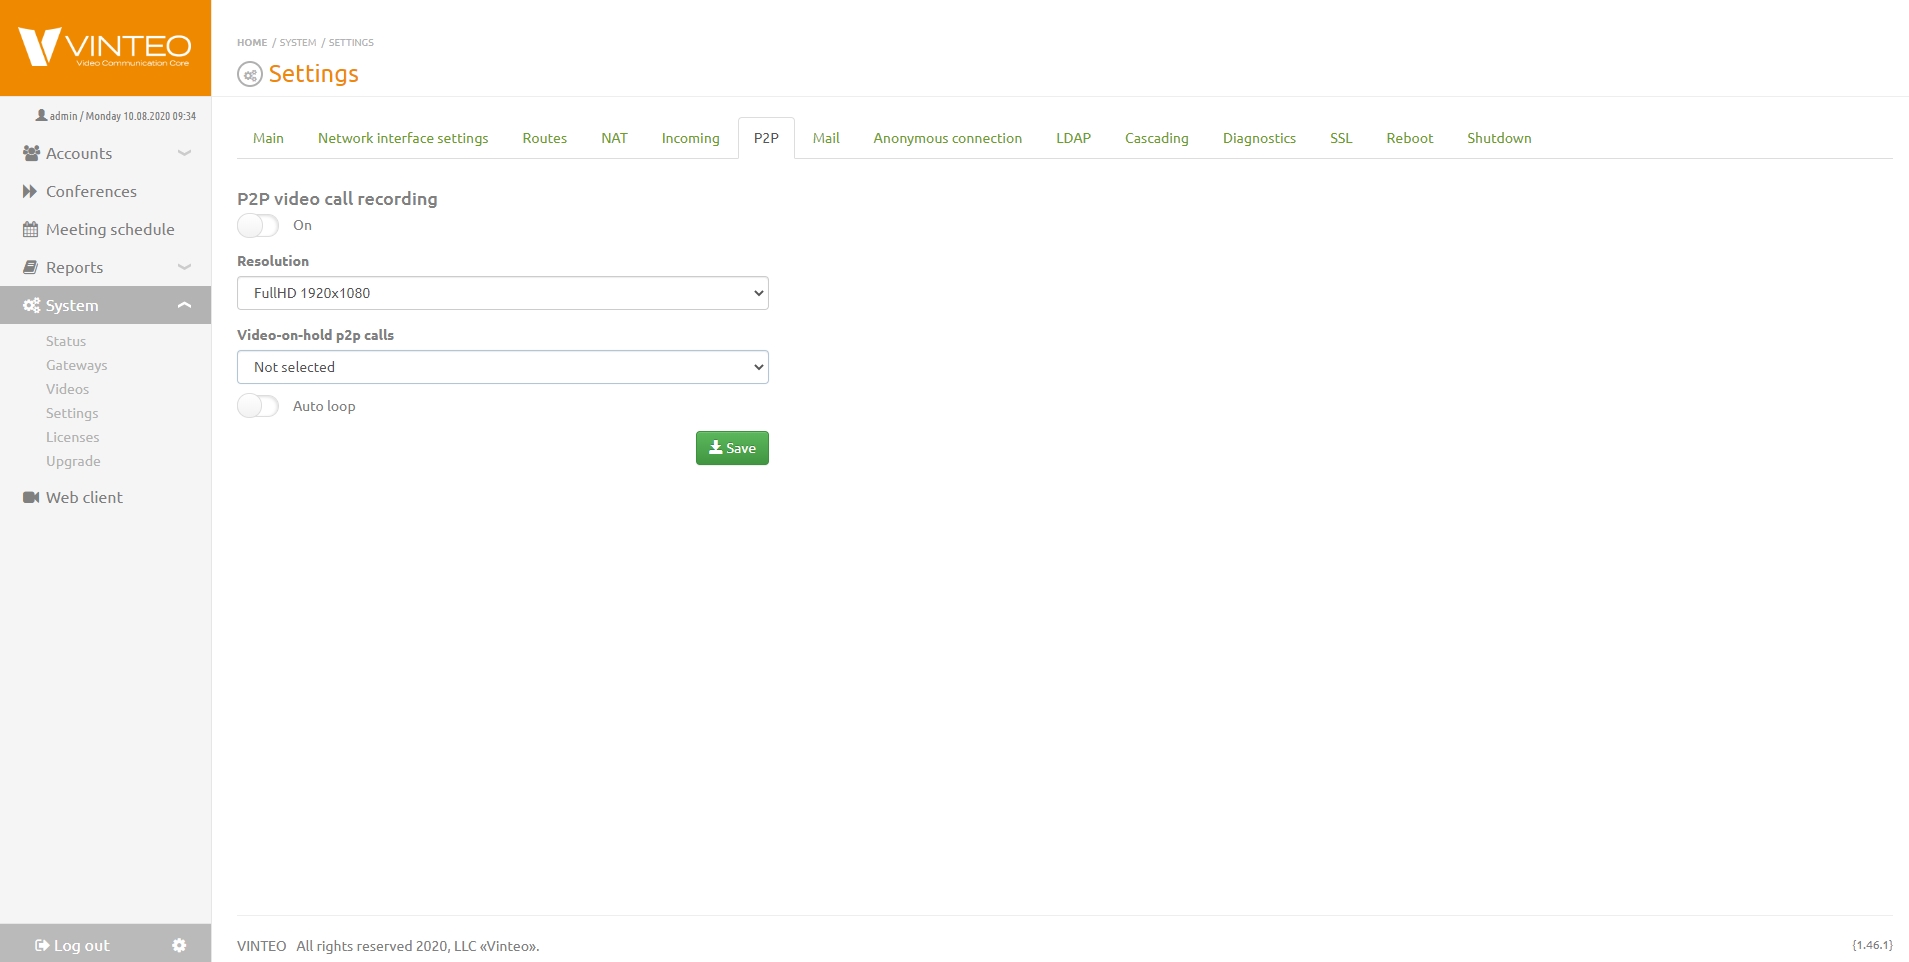
Point-to-point calls are recorded on this tab.
P2P tab contains:
- the switcher to turn on / off the video
- the resolution string of video
- the video-on-hold string for selection the video to show to a participants waiting for an answer
- the auto loop switcher to turn on / off a video if waiting for response is long or a video is short
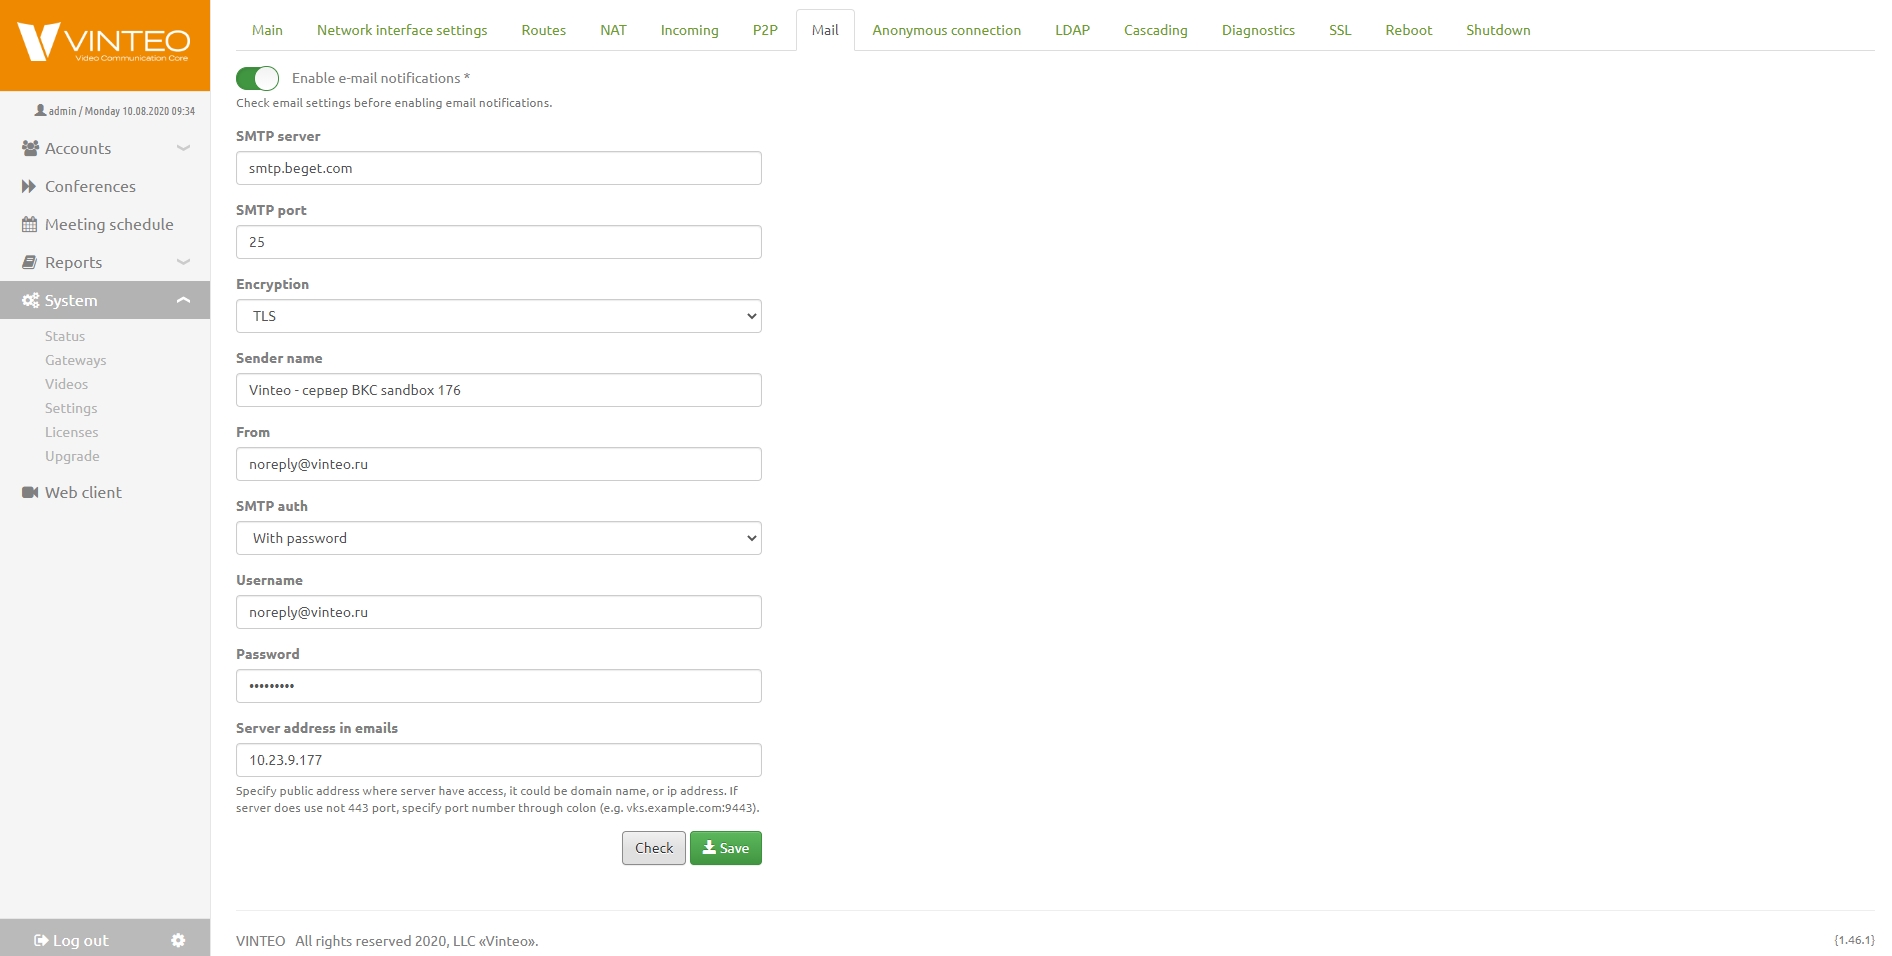
Mail tab
The Mail tab contains settings for the mail used by the server to send notifications to participants about scheduled conferences. After filling out the form, you must push the Save button. Then push the Check button write your e-mail and push the Send button in the window. The switcher Enable E-mail Notifications switch on automatically If the sending was successful. Push the Save button to save all settings.
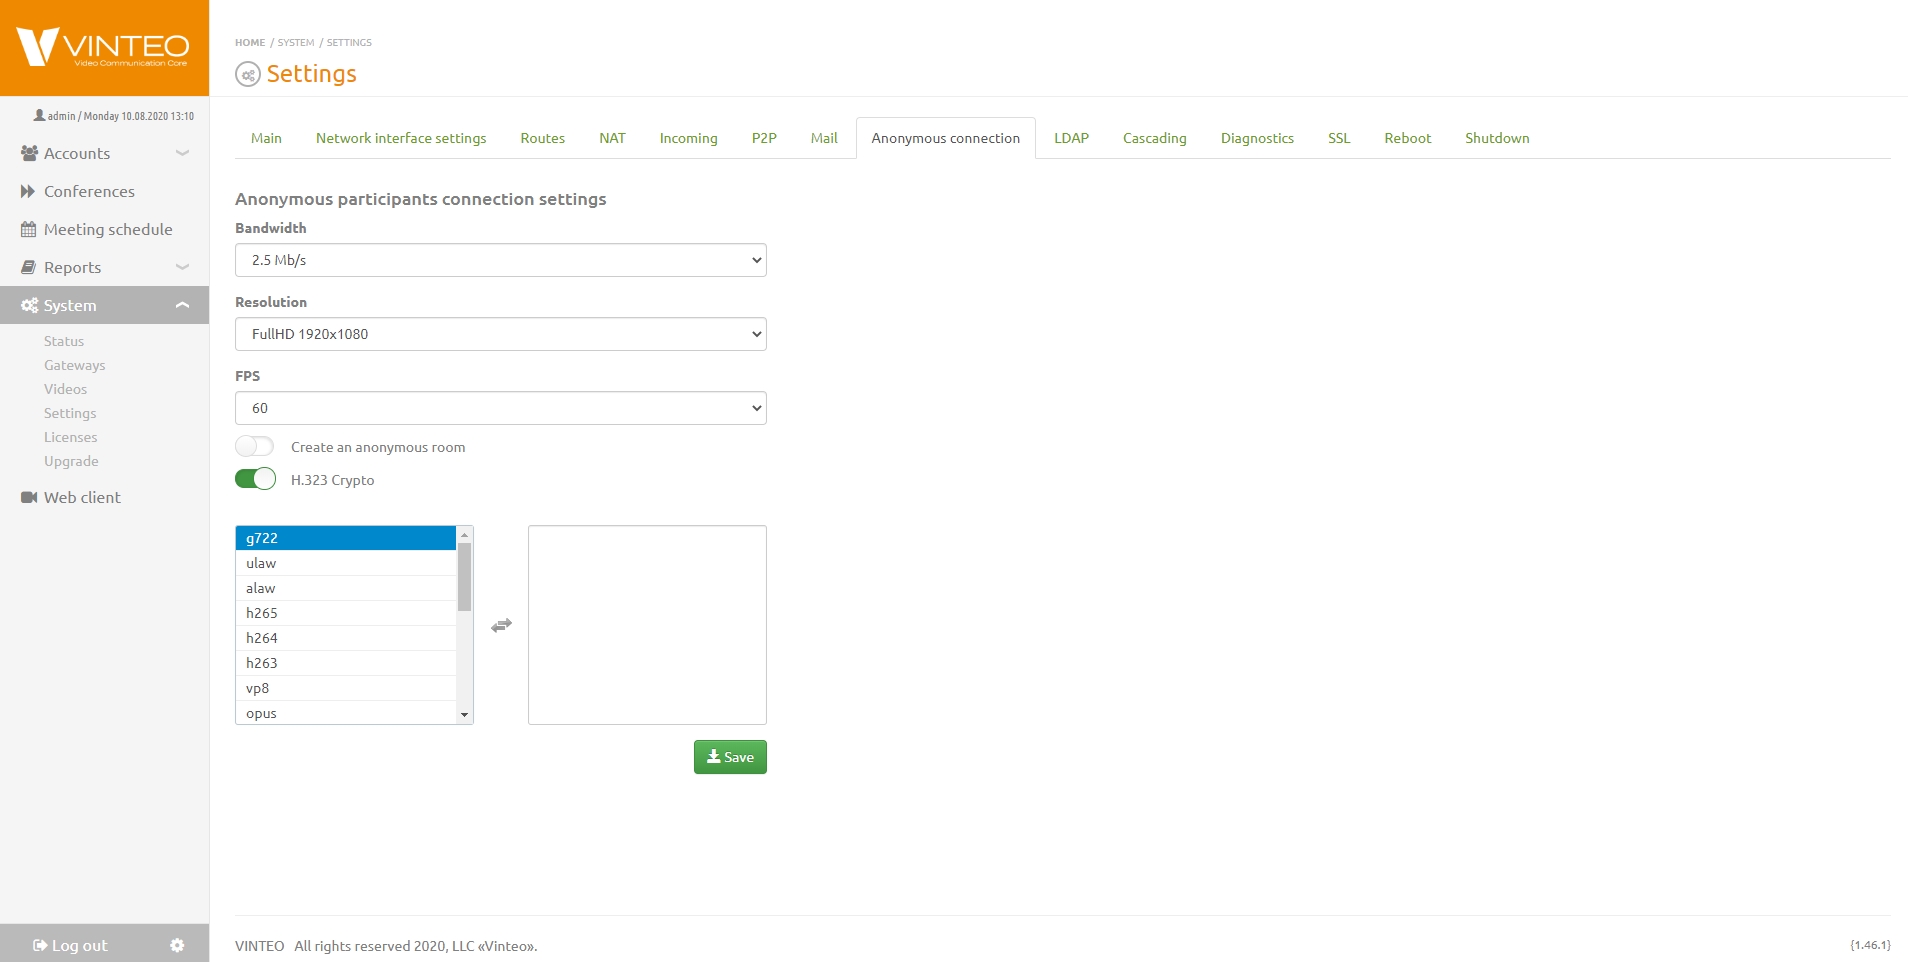
Anonymous connection tab
Anonymous connection tab contains settings to connect anonymous participants to the conference:
- Bandwidth is the string for selecting the data transfer rate
- Resolution is the string for selecting the video resolution connecting
- FPS is the string for selecting of the number of frames per second
- Codecs is the list of codecs that may be allowed
If all the codecs in the list on the left are allowed, then the list on the right is not generated.
- Create Anonymous Room is a switch to create a temporary conference room automatically if it does not exist. There is no control for this room.
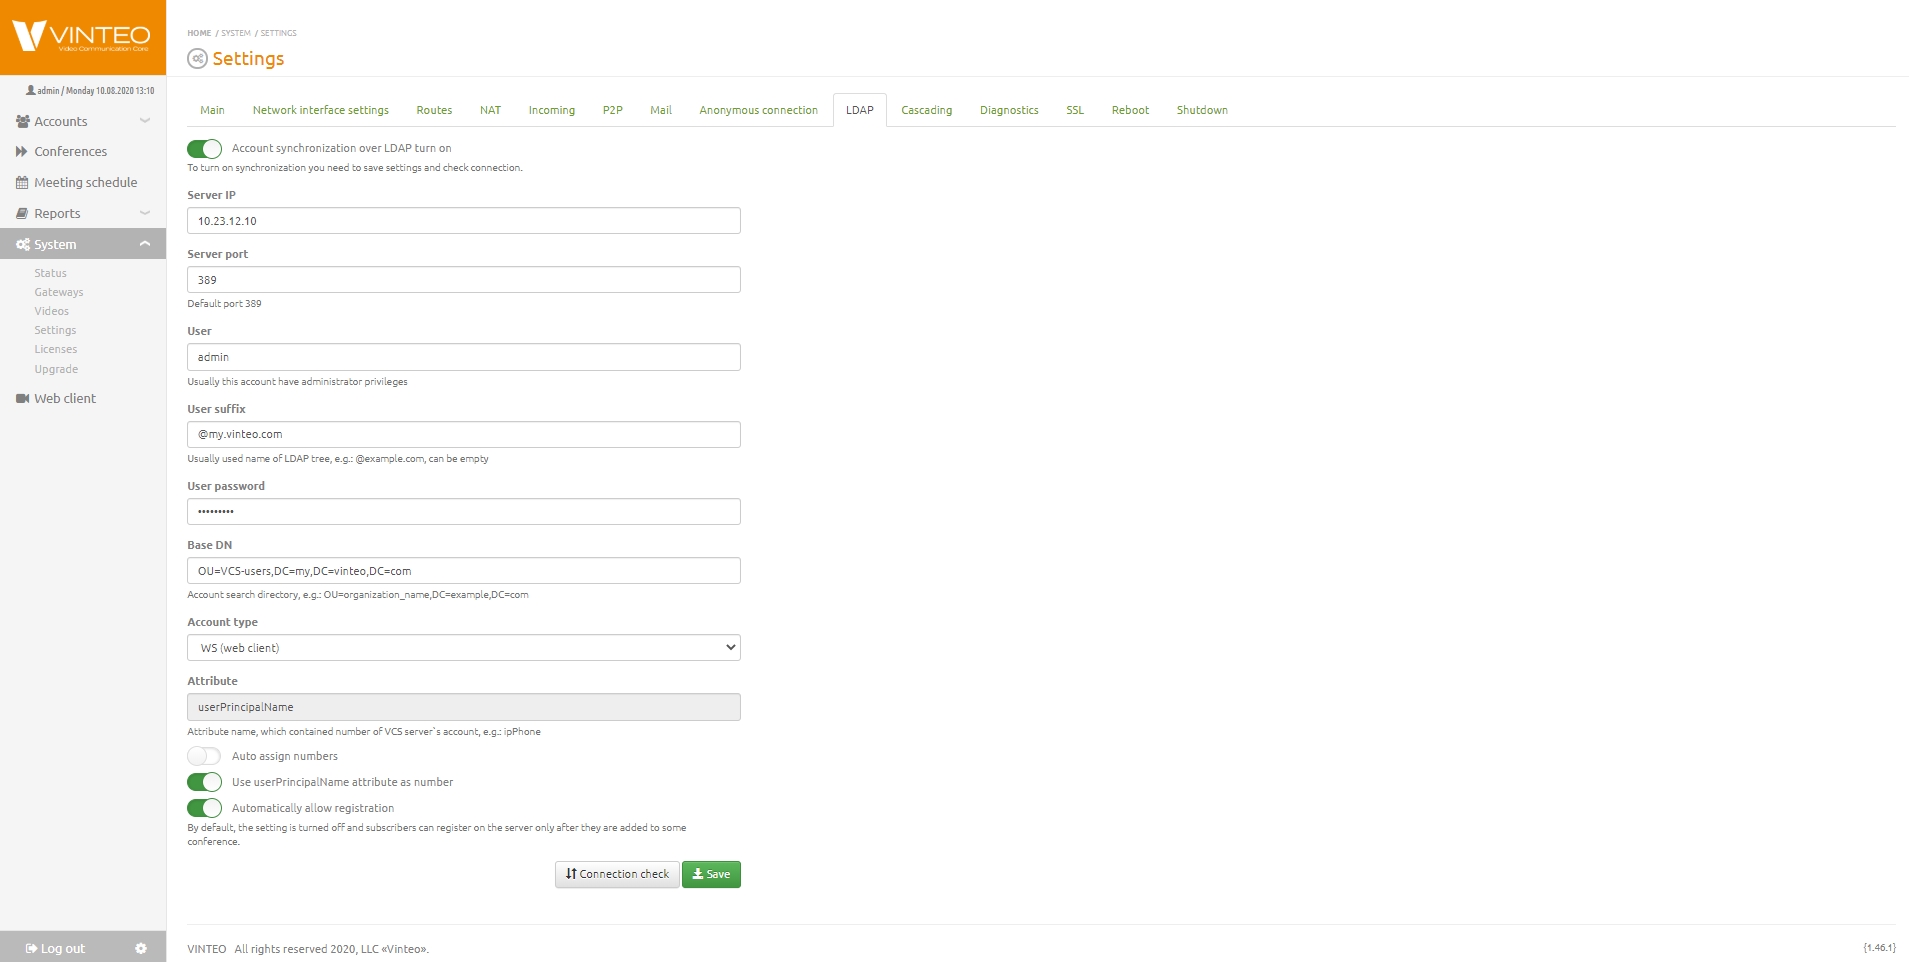
LDAP tab
The LDAP tab contains the parameters for connecting to the LDAP server and allows add participants by taking their details from the LDAP directory structure automatically.
After entering the connection parameters, click the "Check connection" button. Algorithm for the server to select "WS" type users
(&(objectCategory=person)(!(useraccountcontrol=514))(!(useraccountcontrol=66050))(mail=*))
Cascading tab
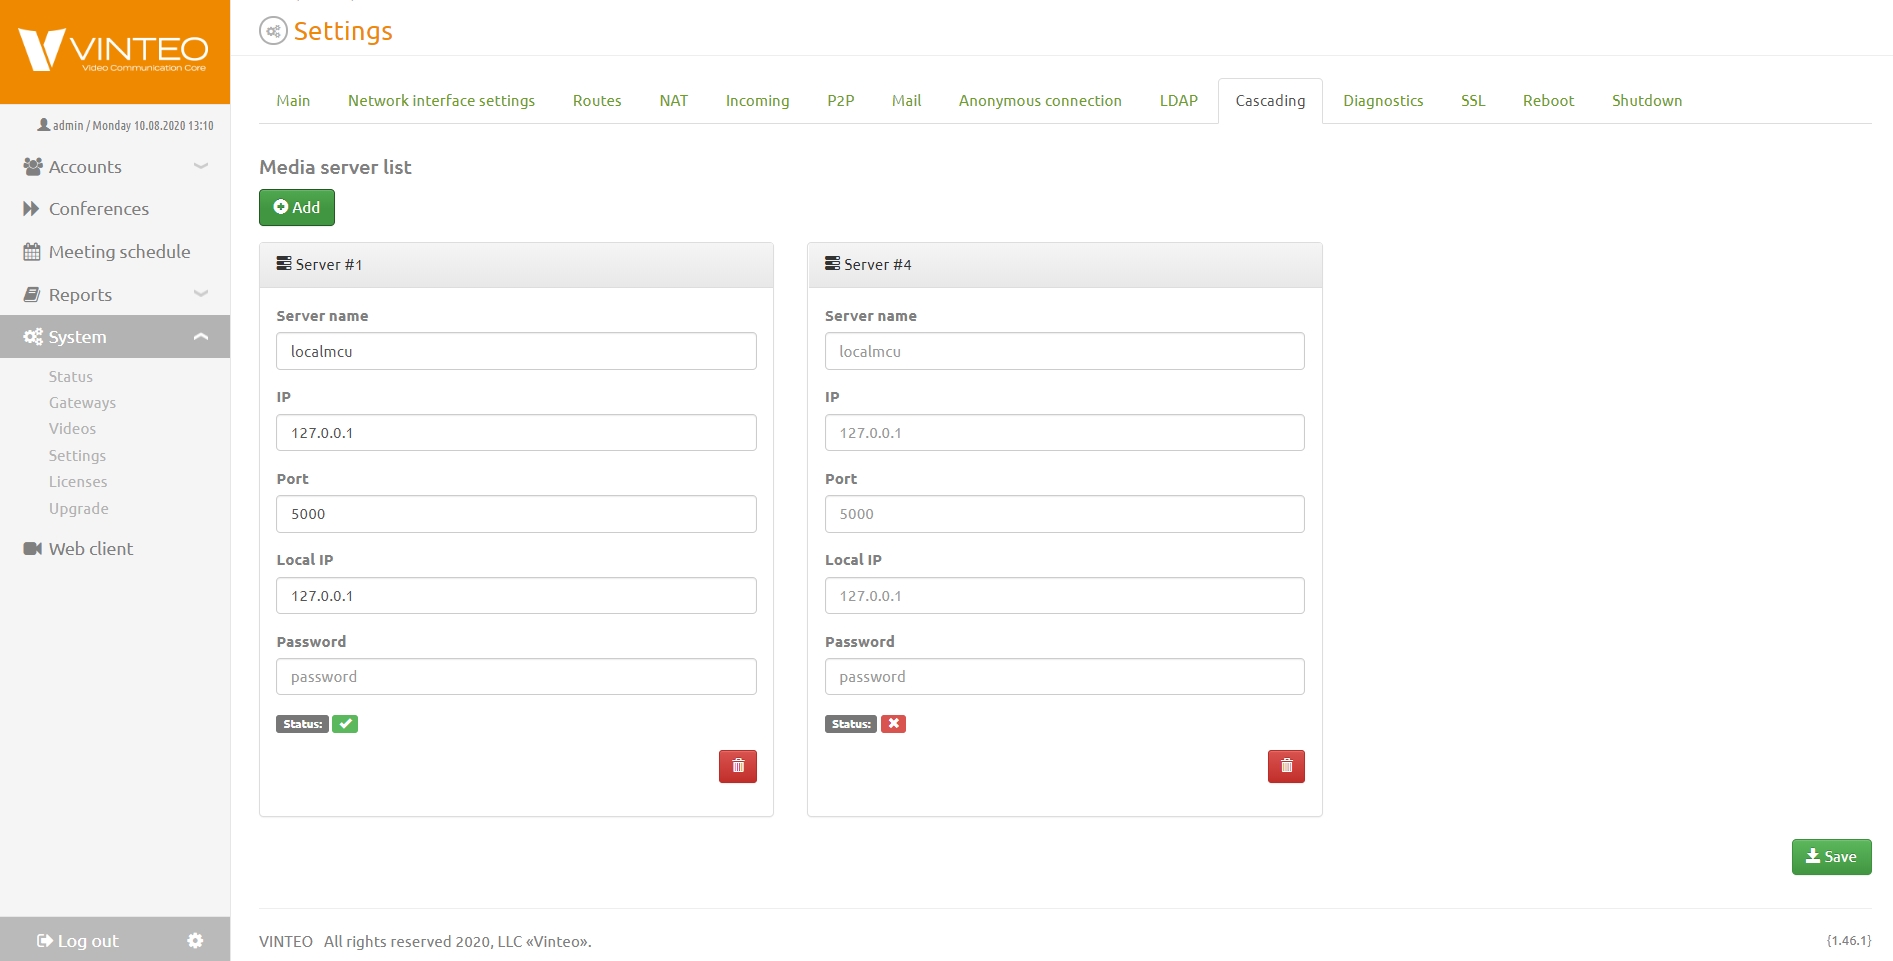
Cascading is the tab for expanding video conferencing capabilities by expanding port capacity, the number of communication channels, load balancing across multiple servers. This requires several Vinteo servers with the same software version.
The current server is identified as Server # 1. If you delete it, the media server role will be removed. Click the Add button and fill in the parameters of the remote server to add a cascade of servers.
- Server name - a the string for recognizing the server in Latin
- IP is the string of server address IPv4 format
- Port is the string for entering information to listen connections from the remote server
- Local IP is the string for entering the address of the main IPv4 format server
- Password is the remote server administrator password string
The correctness of the settings and the operability of the cascade can be checked by going to the main server configuration window. Additional statistics tabs with the names of the connected servers will be shown. How it works:
- The main server is the central gateway for connecting conference participants.
- Then the participants are distributed along the cascade. 'Localmcu' in the Server name string means the connection to the main server.
- The main server creates the layout. If a participant was assigned from a secondary server, he will automatically move to the primary server.
- The main server distributes the participants between the servers according to the number, the total load on all servers.
Diagnostics tab
Diagnostics tab contains different network tools using in checking and diagnostics network faults and issues of participant’s calls.
Field for specifying the IP address of the server to check the speed and quality of the connection and to obtain information about lost packets.
Field for receiving trace data.
Connection problem diagnostics tab. To correctly get the dump a problematic call:
Stop all extraneous running conferences; there should be as few calls as possible on the server!
- press the "Start" button;
- make a call to the server/from the server from/to the account's terminal or a neighboring server within a minute;
- end the call;
- finish recording by pressing the "Stop" button;
- download and save the dump to your PC by clicking the "Export" button.
After that you can send it to the support service at their request or analyze it yourself.
Tab for recording and saving logs.
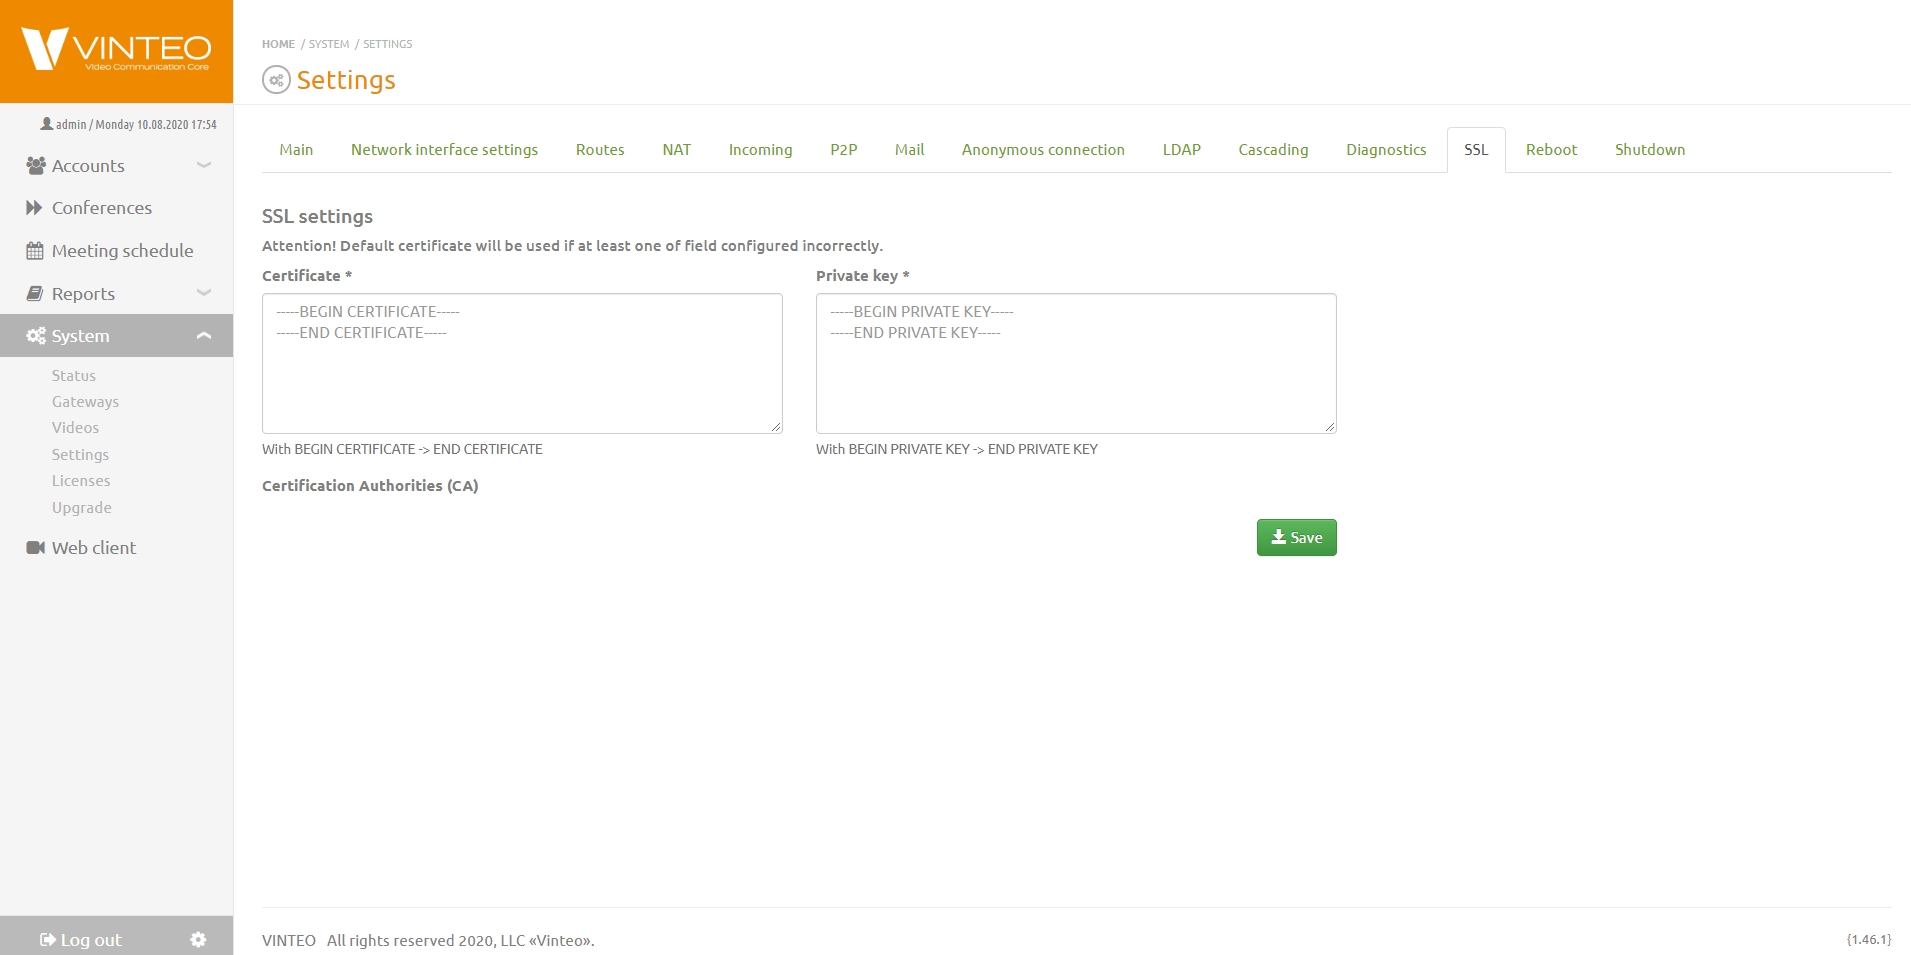
SSL tab
VINTEO has implemented the ability to install a certificate from a domain certification authority, a self-signed certificate, a certificate from a host provider.
Reboot tab
Click the Reboot button in the modal window to confirm the server reboot.
Shutdown tab
Click the Shutdown button in the modal window to confirm the server shutdown.
Licenses
English / General Description / Licenses
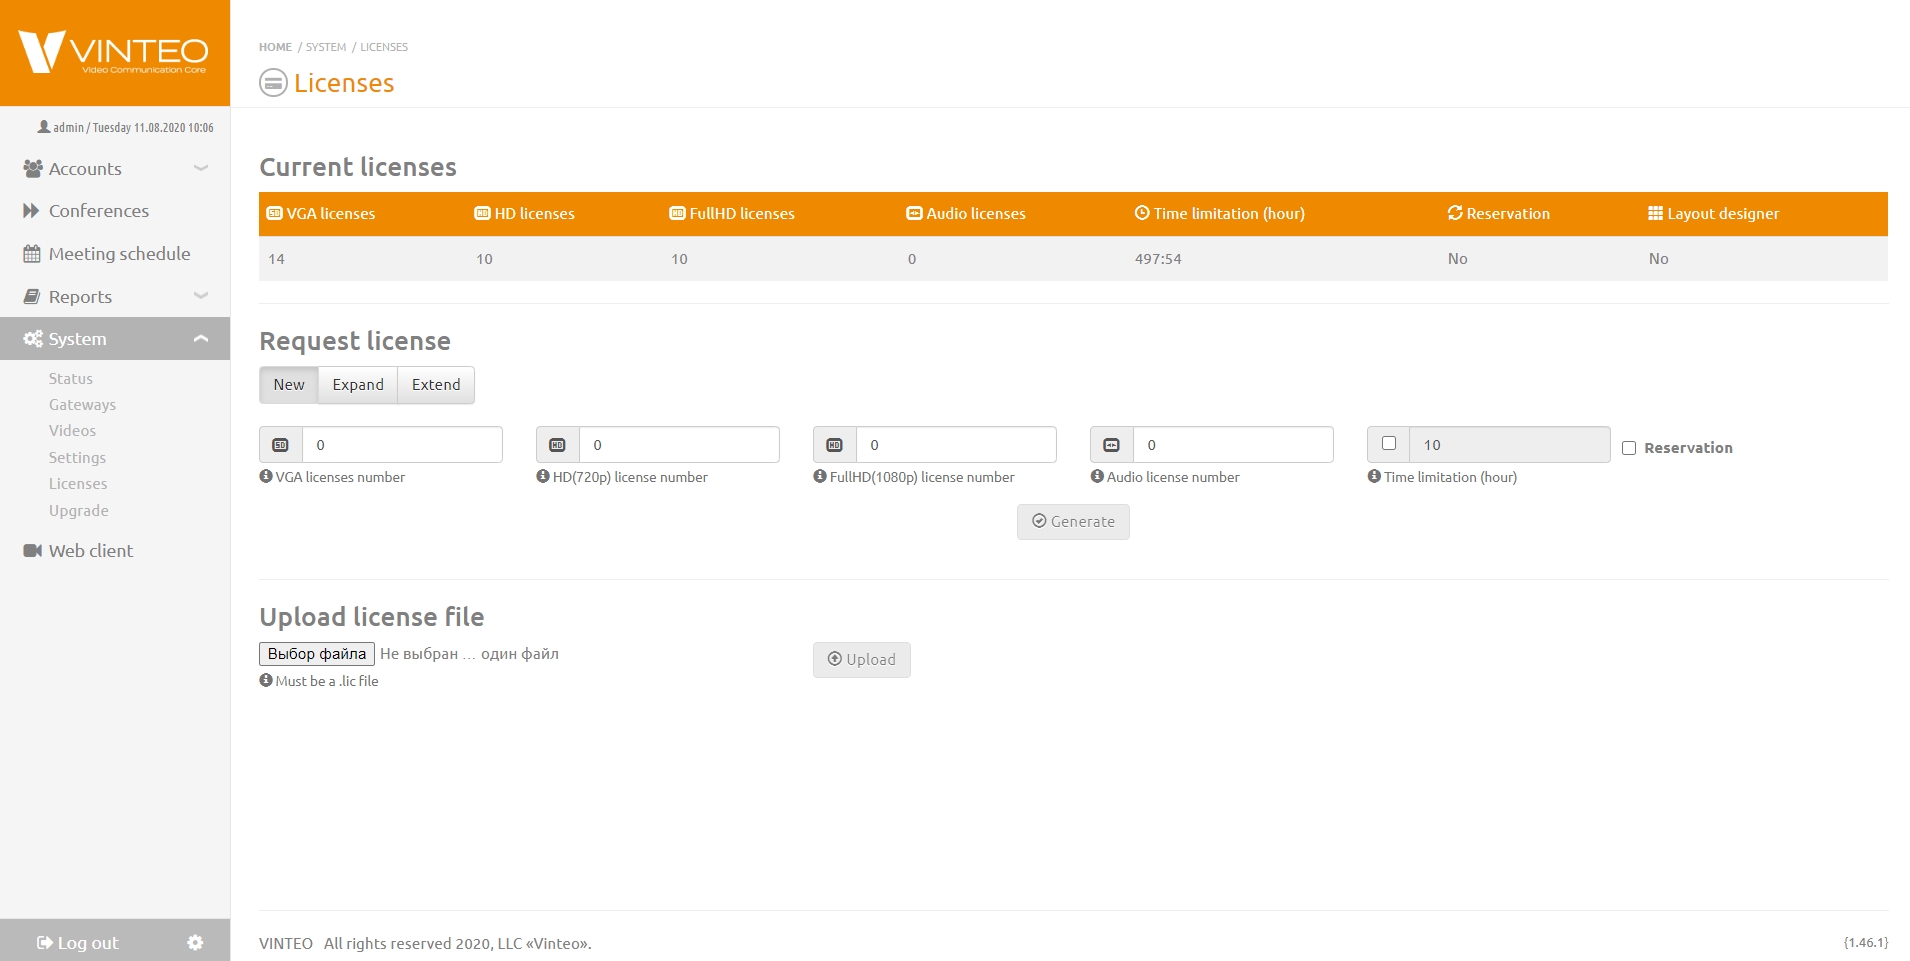
The VINTEO server is distributed under a license purchased from official partners VINTEO LLC. Licenses section allows you to request and install a license on the server, as well as view previously installed licenses. Licenses are limited and unlimited in time.There are 4 types of licenses for conference participants:
- License to connect conference participants with standard resolution up to VGA.
- License to connect conference participants with standard resolution up to HD.
- License to connect conference participants with quality up to FullHD and higher.
- License for connecting conference participants with audio stream only.
The distribution kit of the server uses licensing by ports, i.e. if a client with VGA resolution does not have enough license to resolve it, then it occupies a higher unoccupied license in the resolution.
Request and upload of license
Specify the number of licenses in the strings, click the Generate button. Send the licrequest.lic file by e-mail to VINTEO LLC to receive the newlic.lic license file. Click the Choose File button and the Upload button to upload the newlic.lic file. The license will appear in the list of licenses at the top of the page.
Changing the number of conference participants for the current license
If the license has installed on the server, but there is a need to increase the number of concurrently connected conference participants with VGA / HD / FHD resolution and the power of the hardware platform allows this, then you must ckick the Expand button in the Request License block, specify the number of ports that need to be added to the main license and click on the Generate button. Upload the file that was sent to you in the same way as when requesting a new license.
Expanding the server uptime for a license with a temporary parameter.
If you need to extend your licenses, click the Extend button in the Request license block. Specify the required number of hours or click on the arrow buttons, decreasing / increasing the number of hours in the Time Limitation string. The default value in the string is 10. Click the Generate button. Upload the file that was sent to you in the same way as when requesting a new license.
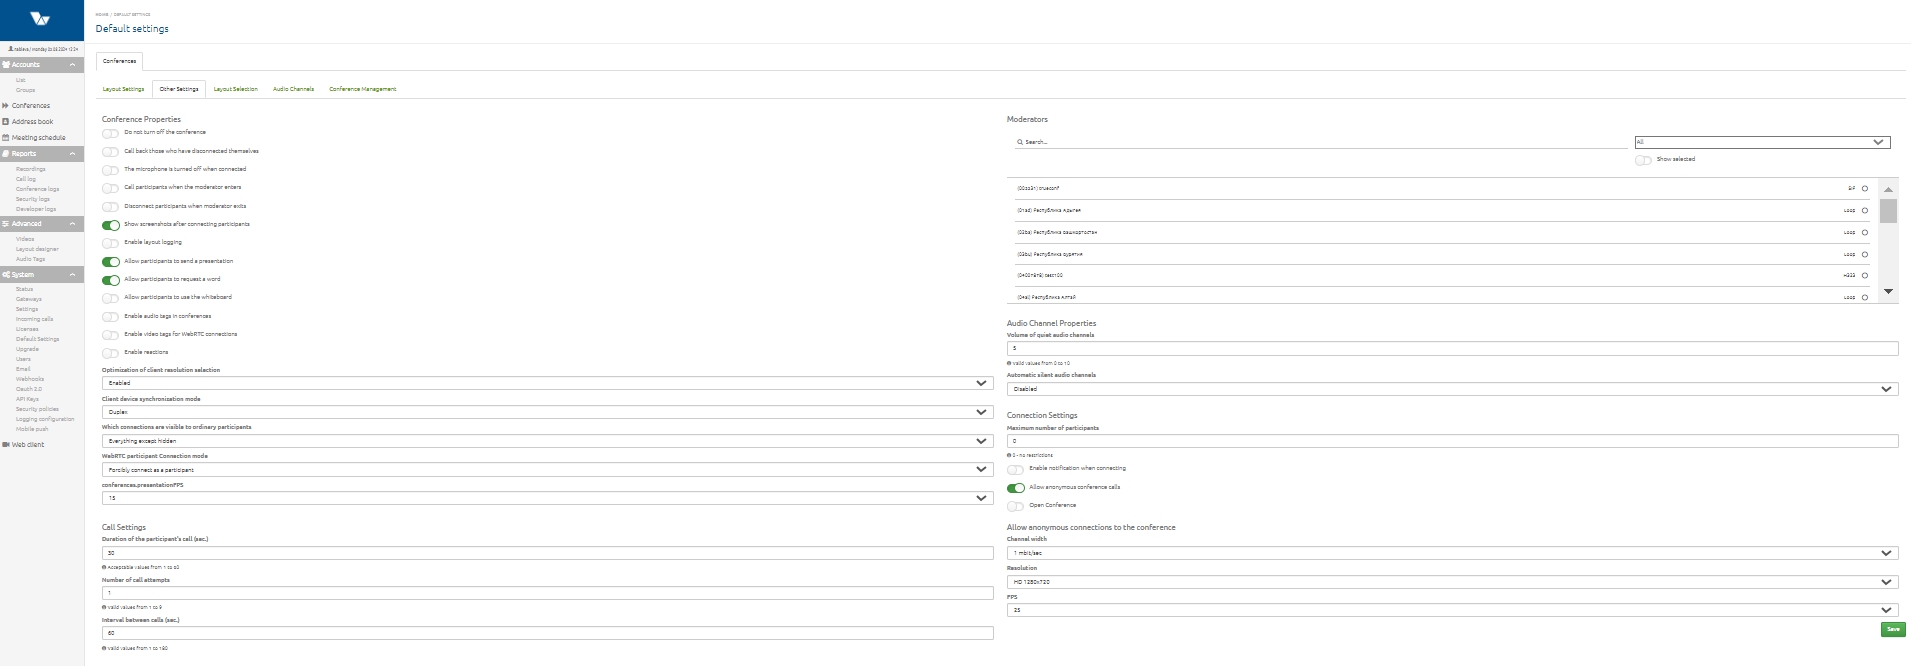
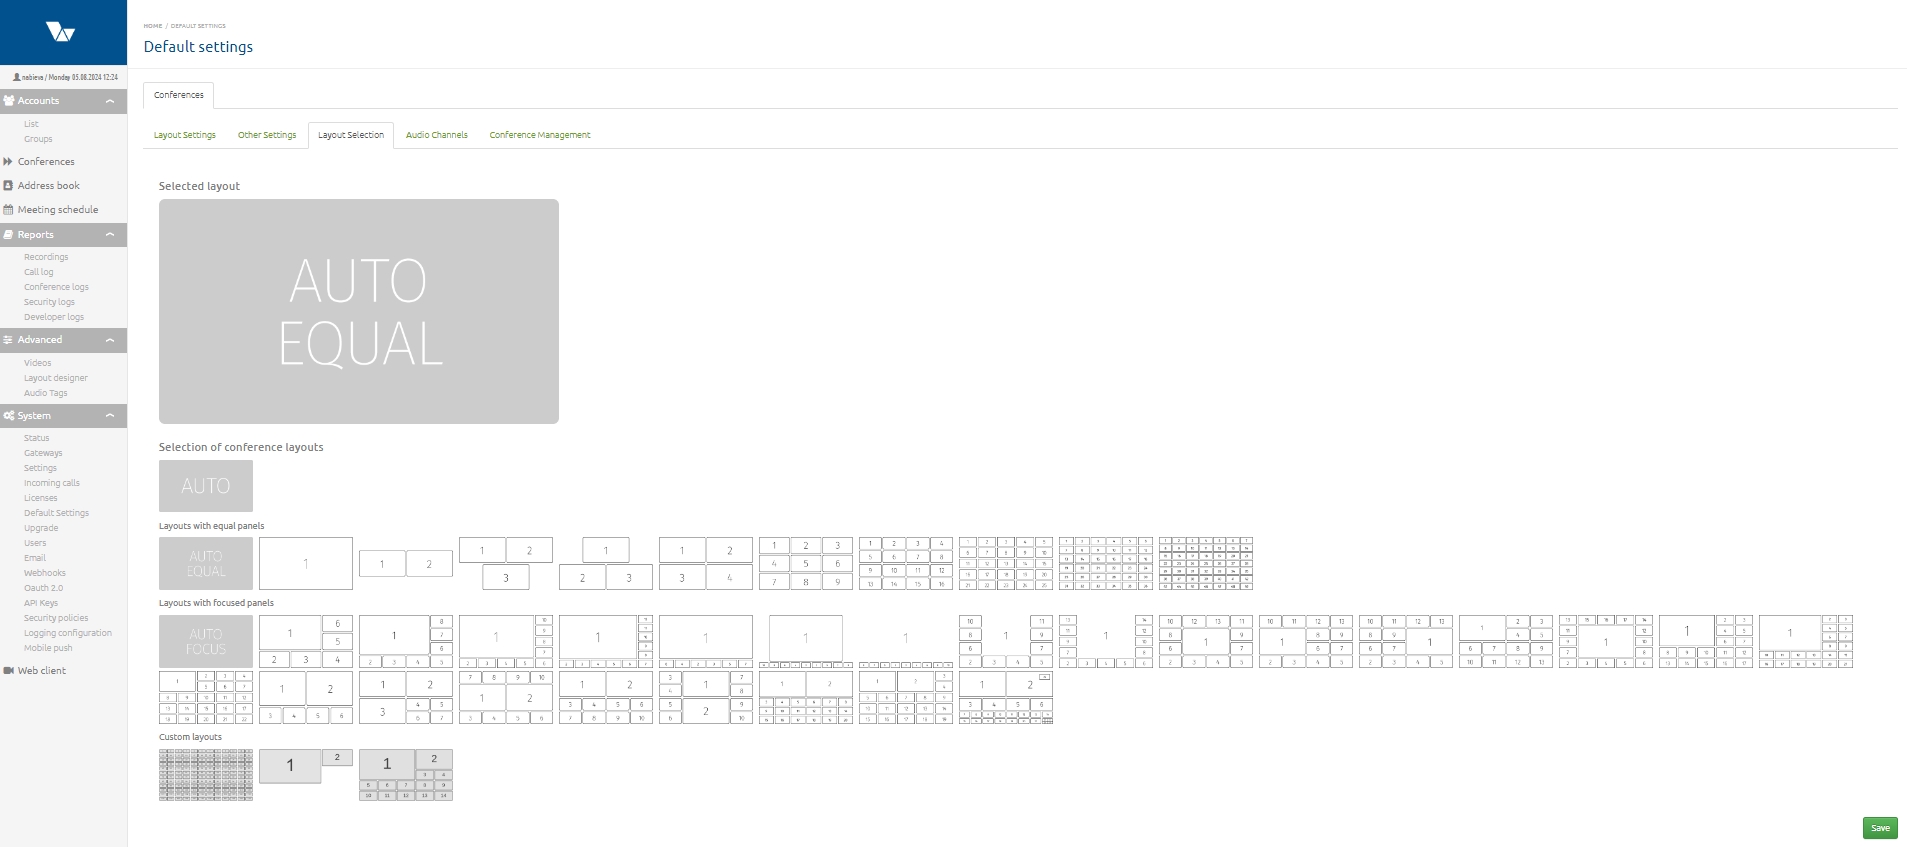
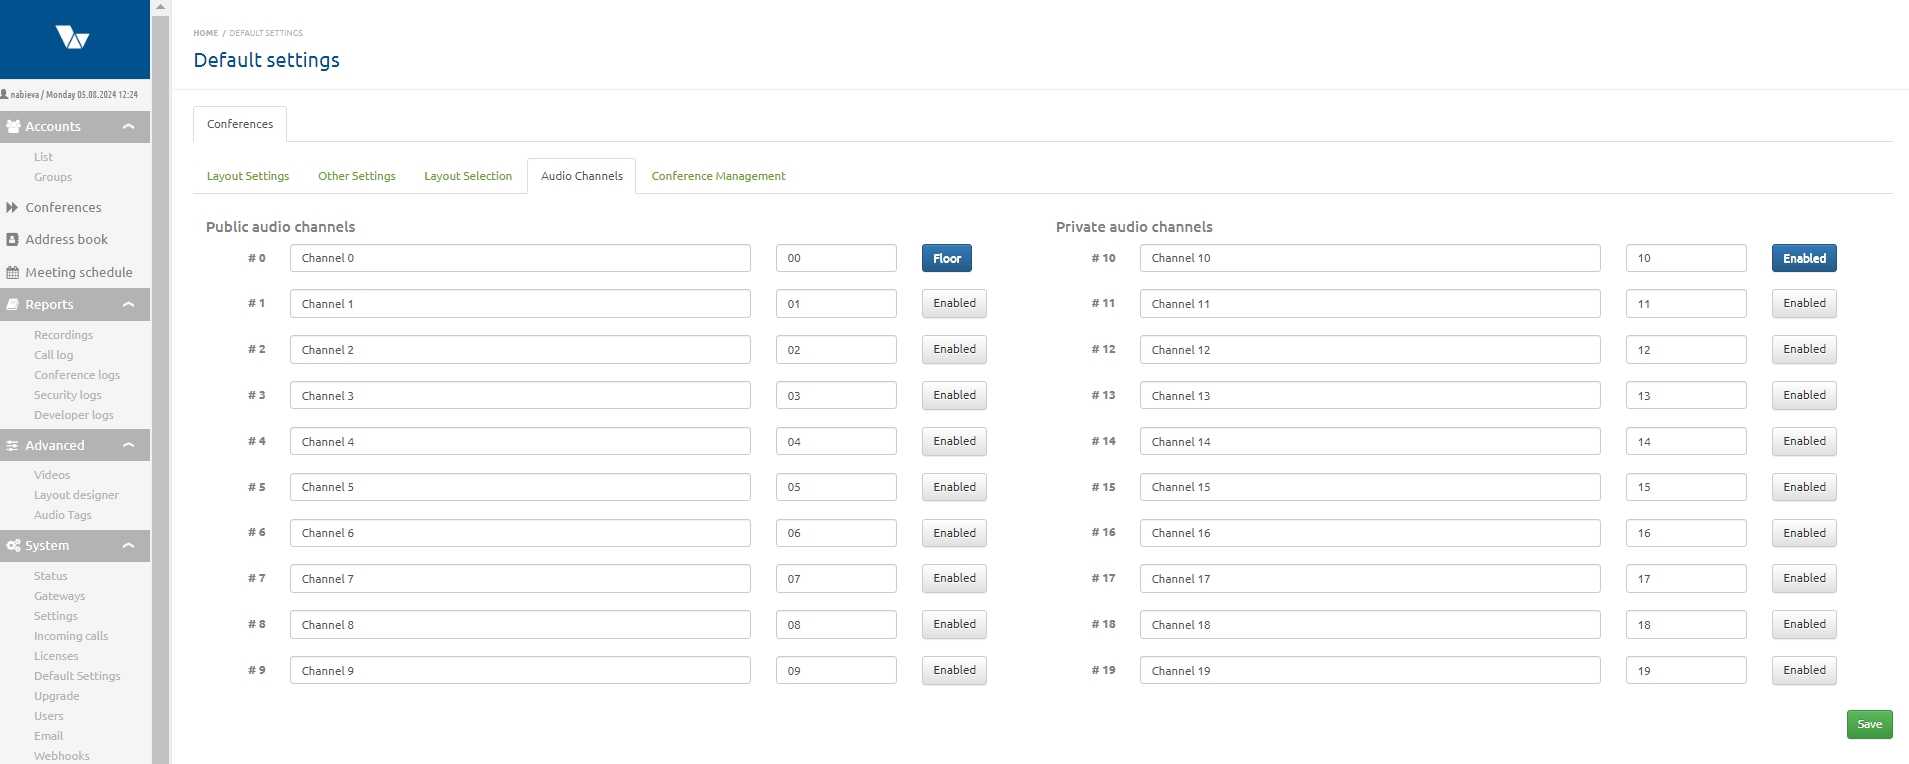
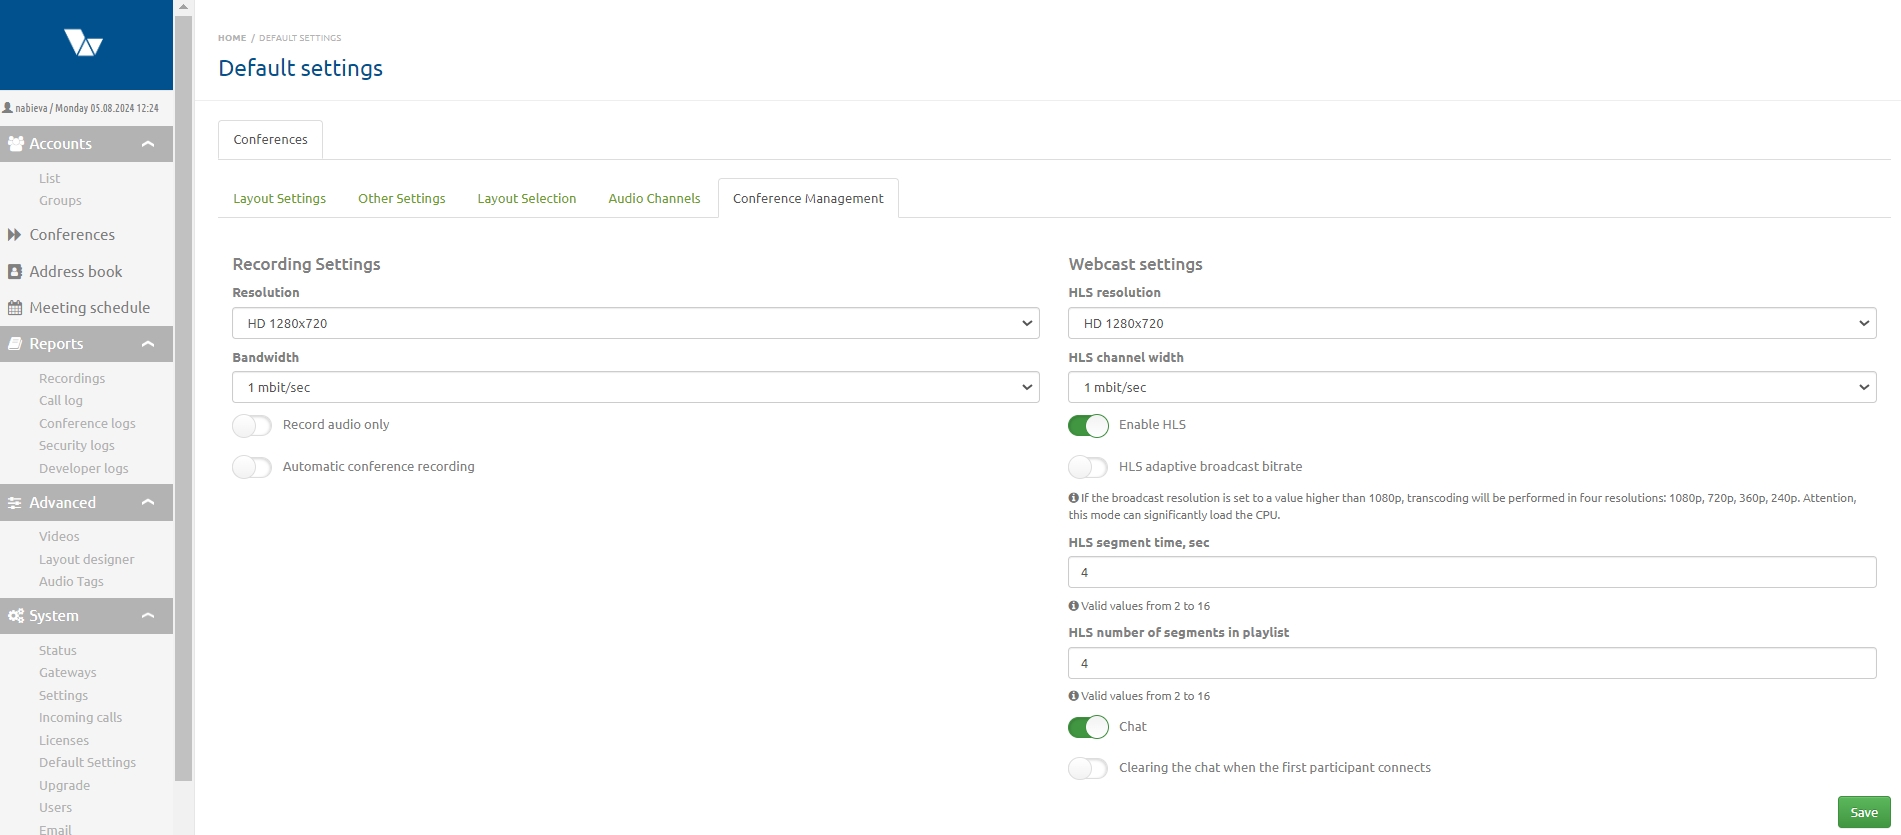
Default Settings
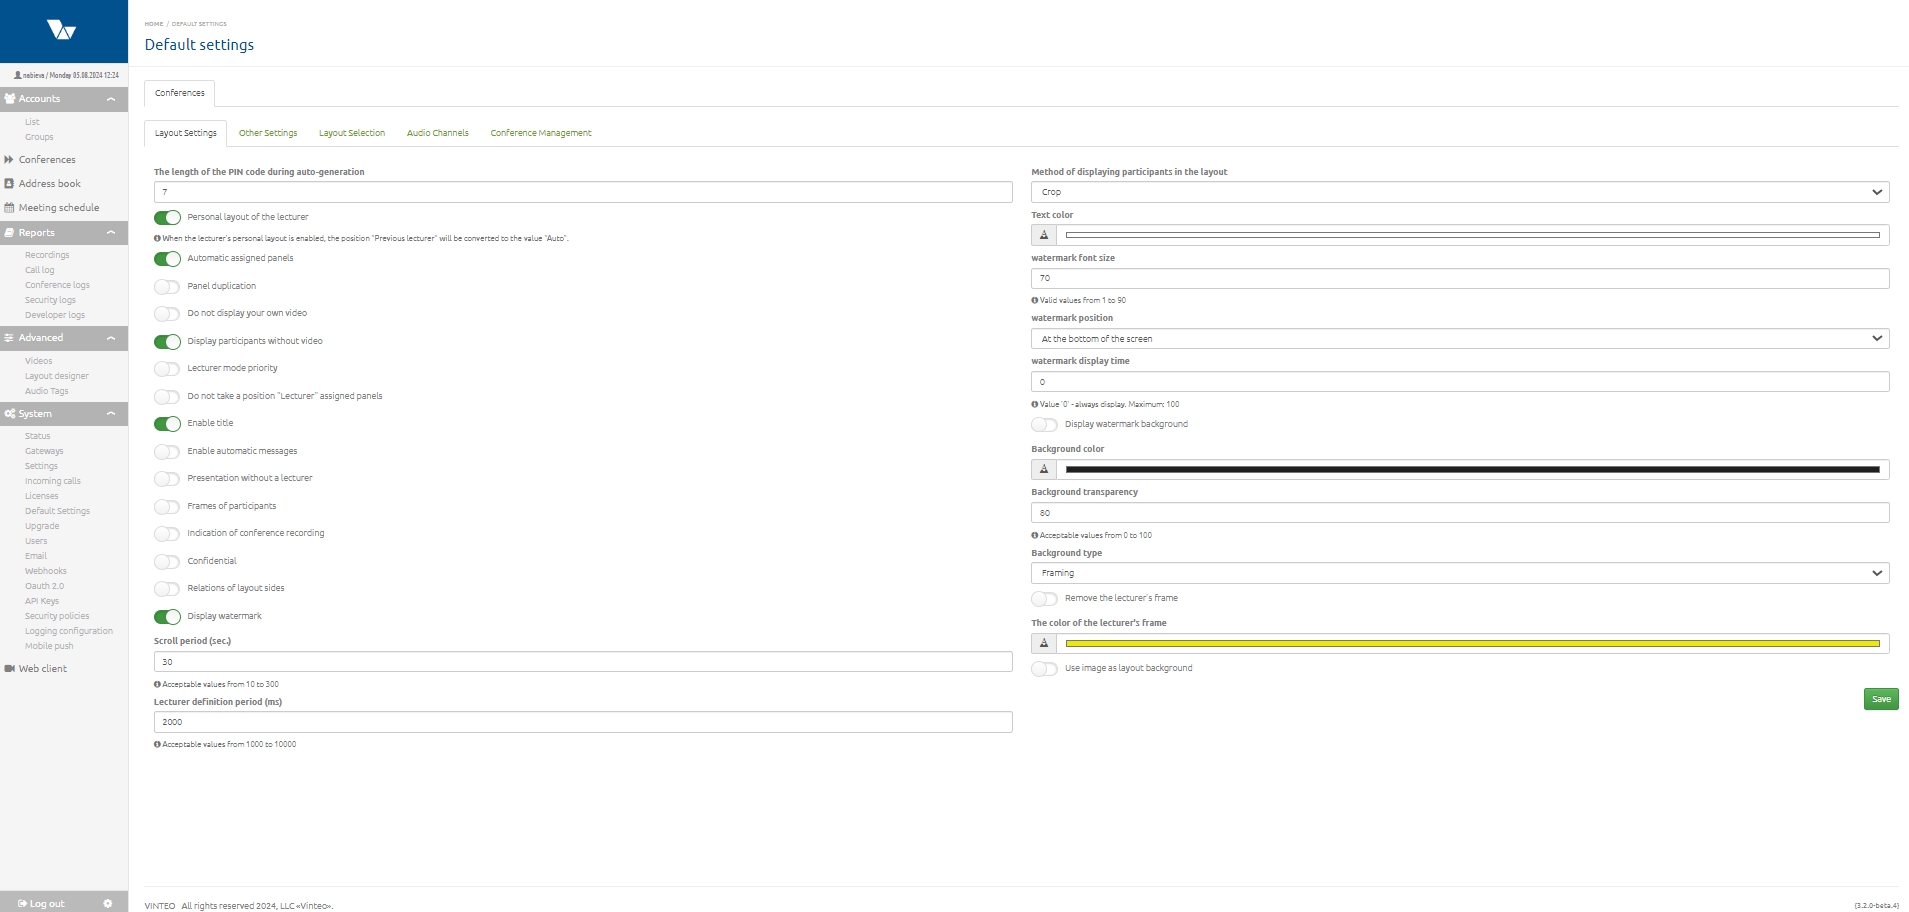
New conferences will be created with the default settings set on this page.
There are 5 tabs on the page:
1. "Layout settings" (these settings are duplicated from the configuration page; the detailed description of the settings is given in the article "Layout properties");
2. "Other settings" (these settings are also duplicated from the configuration page, a detailed description of the settings is given in the article "Conference properties");
3. "Layout Selection" (the list of available layouts is described in "Appendix 1");
4. "Audio channels" (the detailed description of setting up audio channels is given in this article);
5. "Conference Management" is the tab that contains the recording settings described in this article and the webcast settings described in this article.
Upgrade
English / General Description / Upgrade
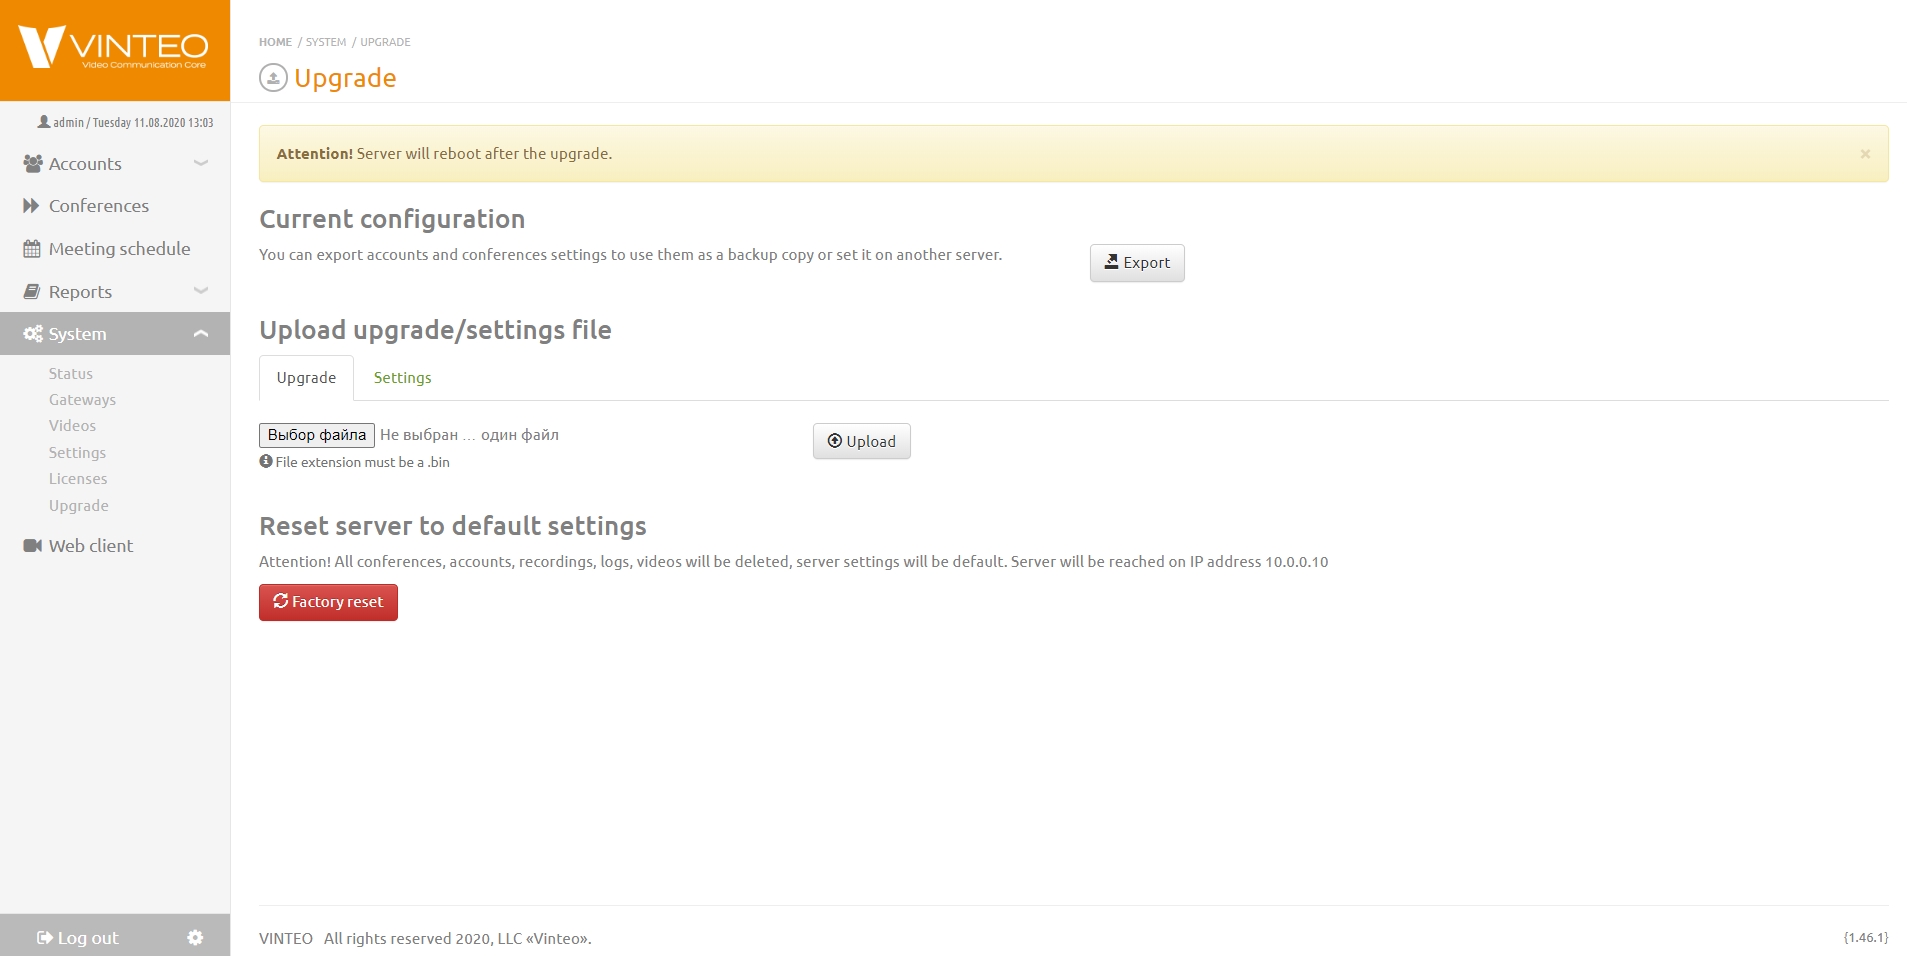
The Upgrade page allows you to download a firmware update, export the current configuration to a file and reset the server to default settings.
Attention! The server will reboot the system twice when it will install updates. Do not disconnect power or manually restart the system between the first and second automatic reboots!
Current configuration
This block is designed to save the current server configuration. Click the Export button and save the configuration.bin file to a safe location. This file contains the current server configuration and will help you restore server settings.
Upload upgrade/settings file
Click the Choose the file and Upload button on the Upgrade or Settings tab. The upgrade or saved server configuration file will be uploaded.
Reset server to default settings
The Reset server to default settings button resets all previously made server settings and returns them to their original state.
Layout Designer
English / General Description / Layout Designer
Layout Designer page is available if you activate the Vinteo Layout Designer license. Layout Designer allows you to create a unique layout with specified properties / roles. They can define the location of the lecturer, the previous lecturer, scroll positions, blank screen display or auto-select positions, that is, settings with a default value.
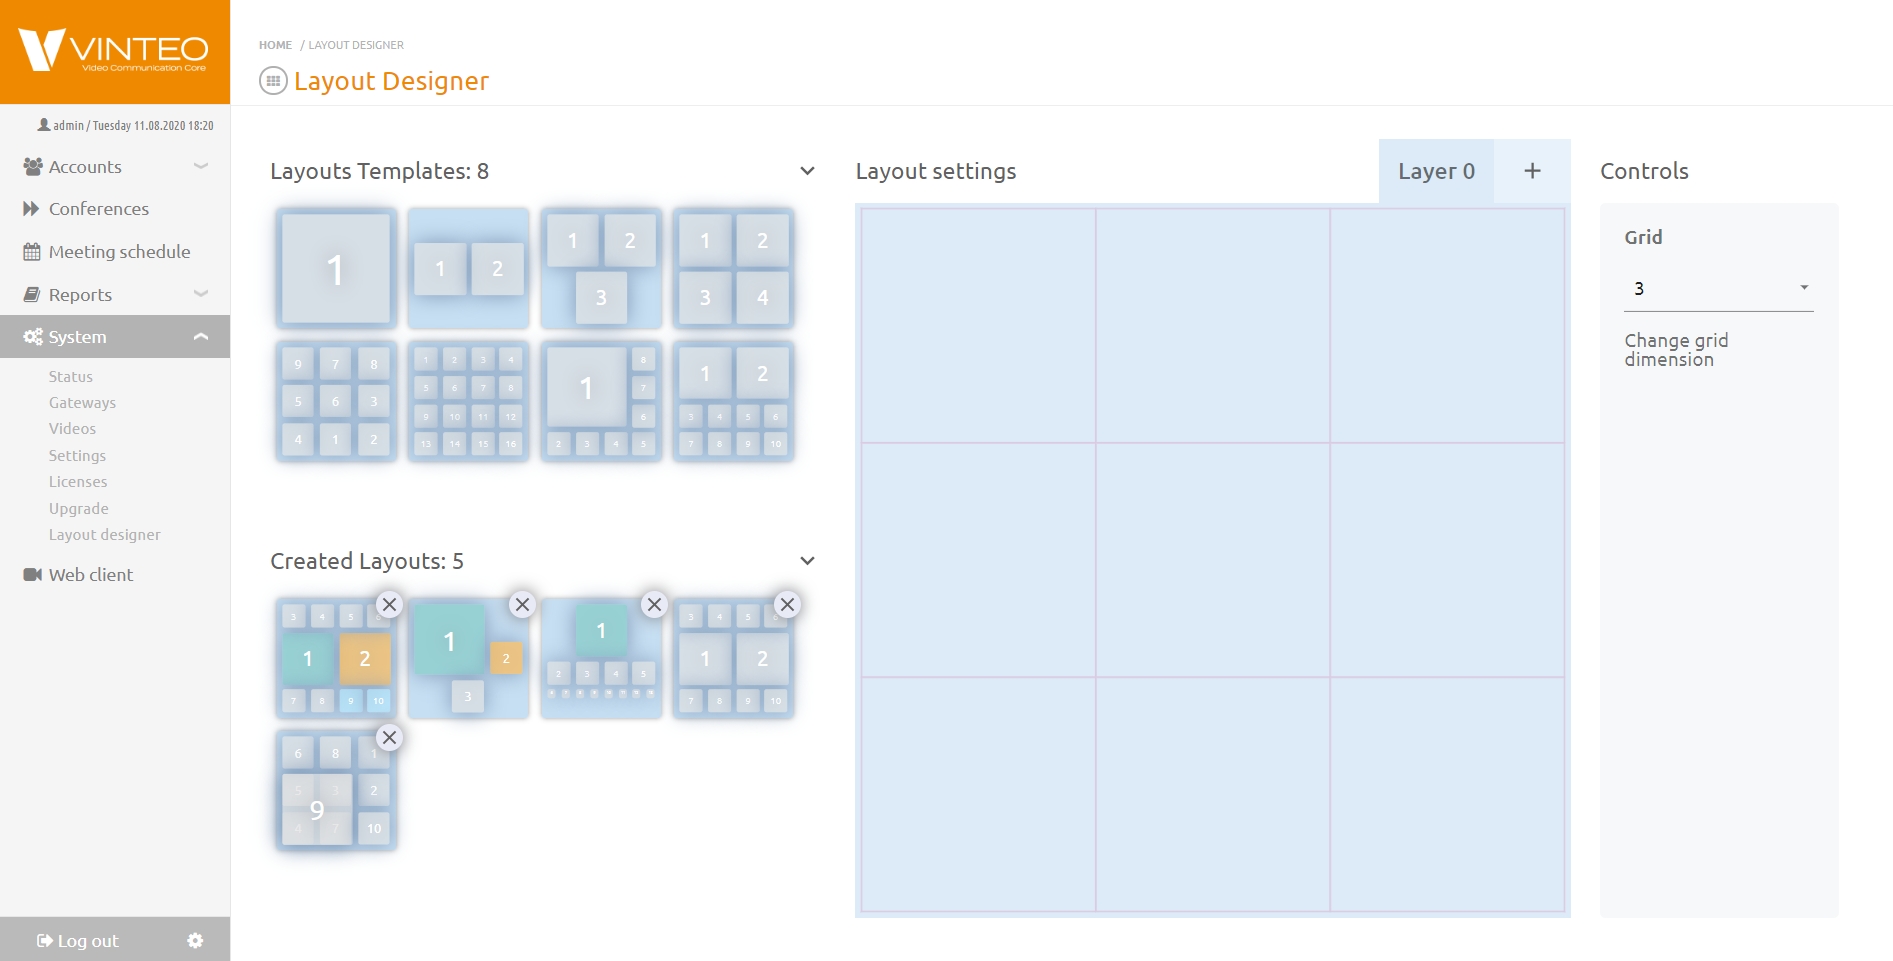
Layout Designer page consists of:
- Layout Templates is the block that contains a set of default layouts. You can edit these layouts in the Layout Settings block.
- Created Layouts is the block that displays the layouts you created earlier.
- Layout Settings is the block where layouts are created or edited.
- Controls is a block in which you can change a quantity of layout positions, a layer number, clear a layout from positions and save the created layout.
New layout creation
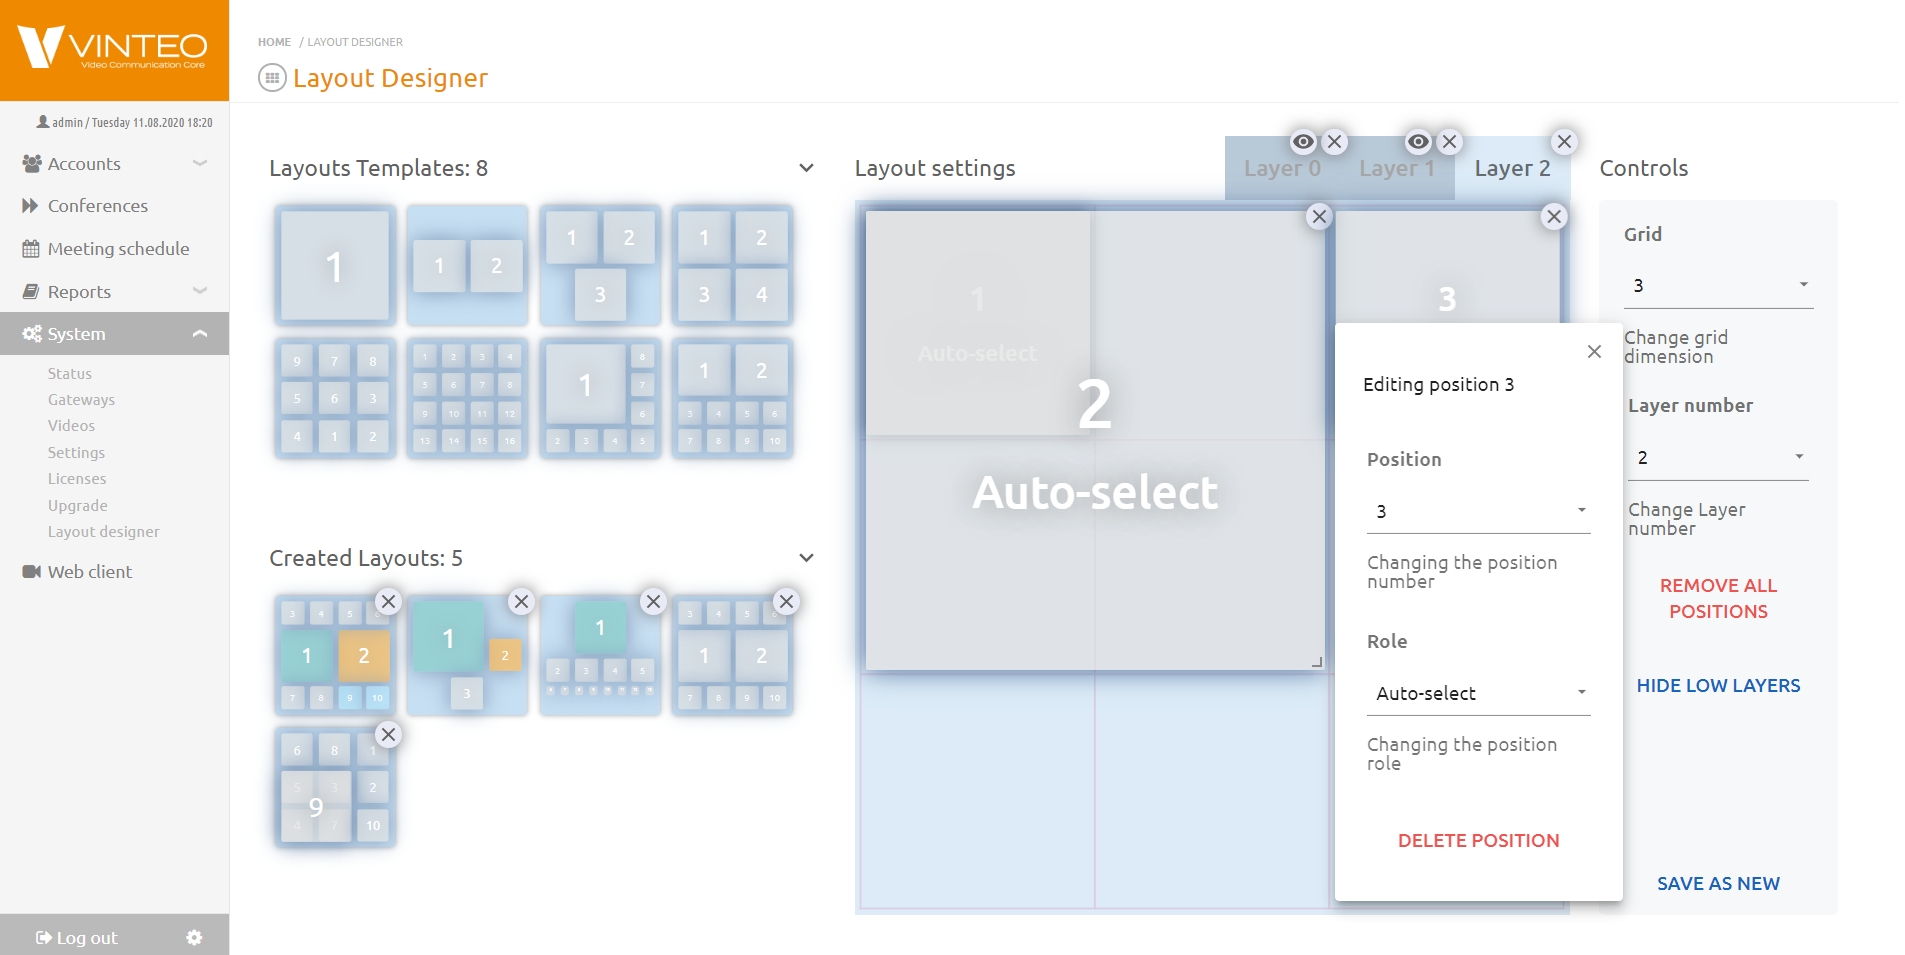
Determine the number of layout layers and the size of each layer. Each layout can have up to three layers. The size of each layer depends on the number of positions: from 1 till 12 * 12 positions. Position in the layout is a panel where conference participants are displayed in the layout. Click + in the Layout Settings block to add positions. You can stretch positions. If you drag the bottom corner of the position to the right, then the position can be stretched several cells in the layout. You can move positions around the layout. Hover your mouse over, click the button on the left and hold the position. All positions are numbered in order. This order will be preserved when conference participants take these positions, if these positions have the autoselect role. After you create positions, you can change the number of the created position or the role of the position in the Editing position window. To do this, click on the created position with the mouse button on the left.
Roles and locations:
- Lecturer is a position for displaying an actively speaking conference participant or a participant designated as a lecturer. It colored in bright turquoise in the layout designer.
- Previous lecturer - the position to display the participant who was a lecturer before the current lecturer. It colored orange in the layout constructor.
- Autoselection is the default position, it allows the connected participant to occupy unoccupied positions, if he is not assigned to other positions. It colored light gray in the layout constructor.
- Empty screen - layout position, which remains always unoccupied. It colored dark gray in the layout constructor.
- Scrolling - the position for rotating conference participants who did not have enough space on the layout, they will appear in the layout according to the Scrolling Period defined in the conference settings. It colored light blue in the layout constructor.
The order of the arrangement and display of participants on layers: layer 0 is the bottom layer, layer 1 positions will be displayed on top of layer 0 positions. The positions of layer 2 will be displayed on top of layer 1, which will be displayed on top of layer 0, so you can create a layout in which the images of the participants will overlap each other in three layers.
You can save the created layout by clicking the Save as new button in the Controlls block. After saving, the layout will appear in the Created Layouts block, as well as on the Conference Management page in the Mosaic Choise window in the Custom Layouts section.
Note:
#Layered layouts will not be available in Do not show your own video conference mode.
#The roles assigned in the layout will work, provided that the location of the participants in the conference is not defined by the conference administrator.
Users (Administrators)
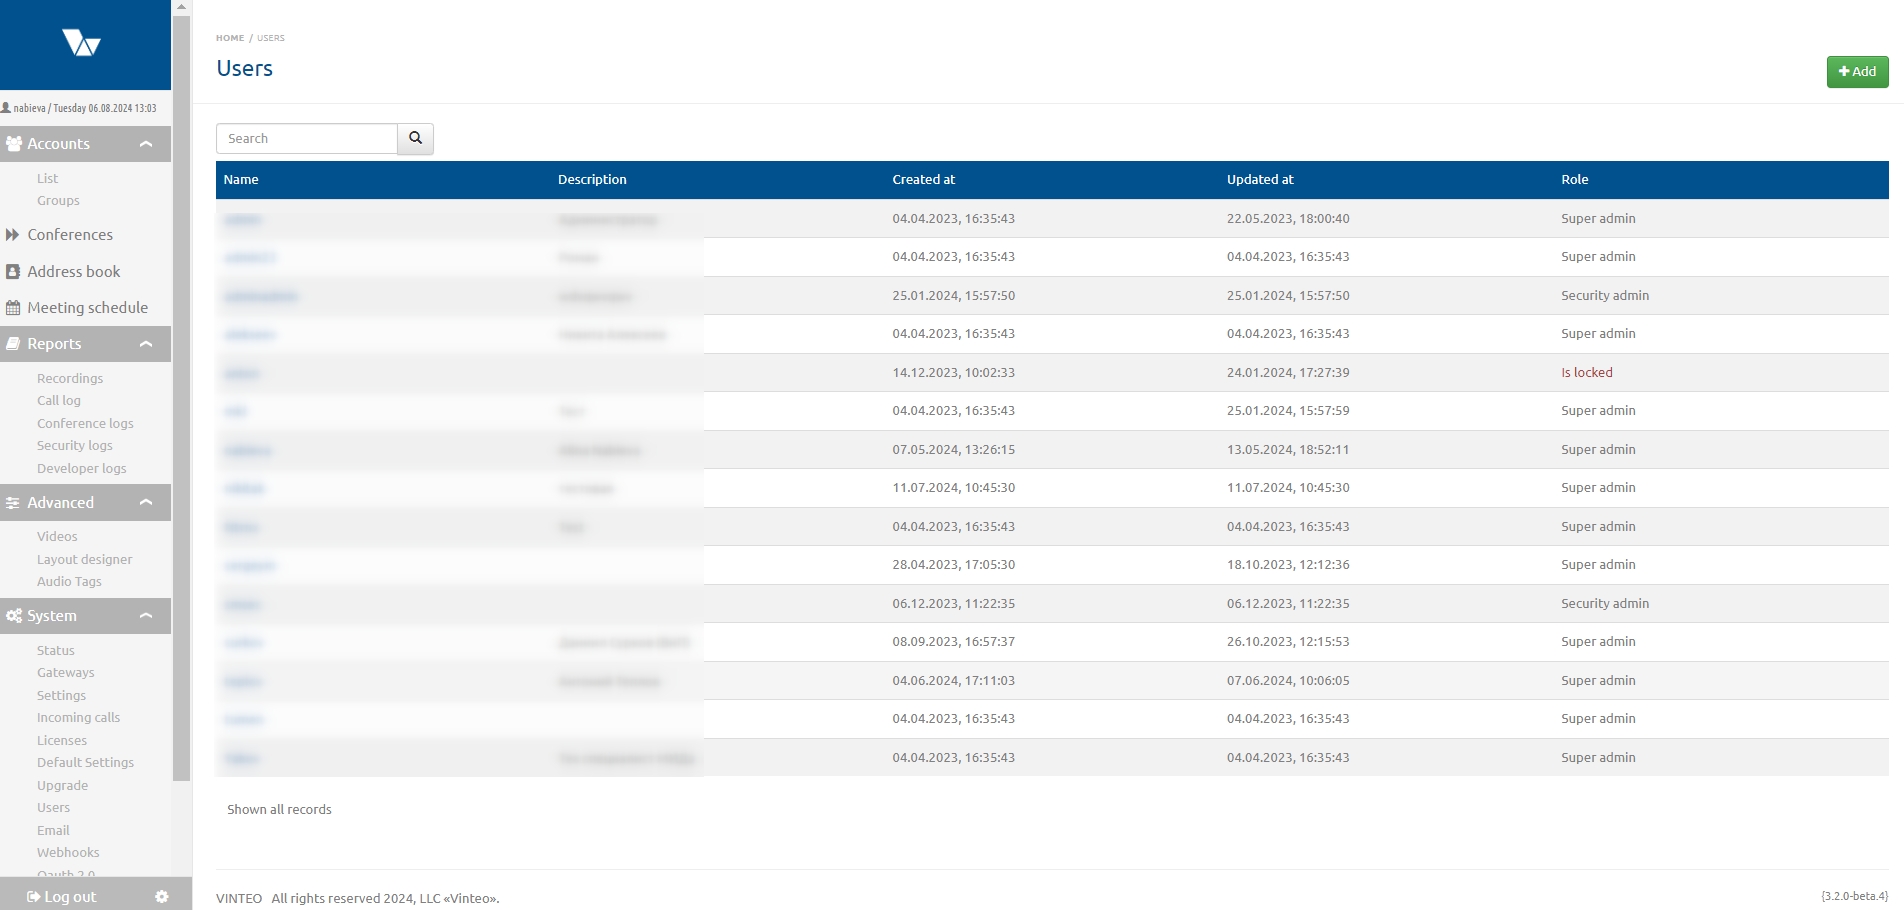
On this page you can add, delete and edit user accounts that have administrative rights on the server (available in server versions starting from 26.0.7).
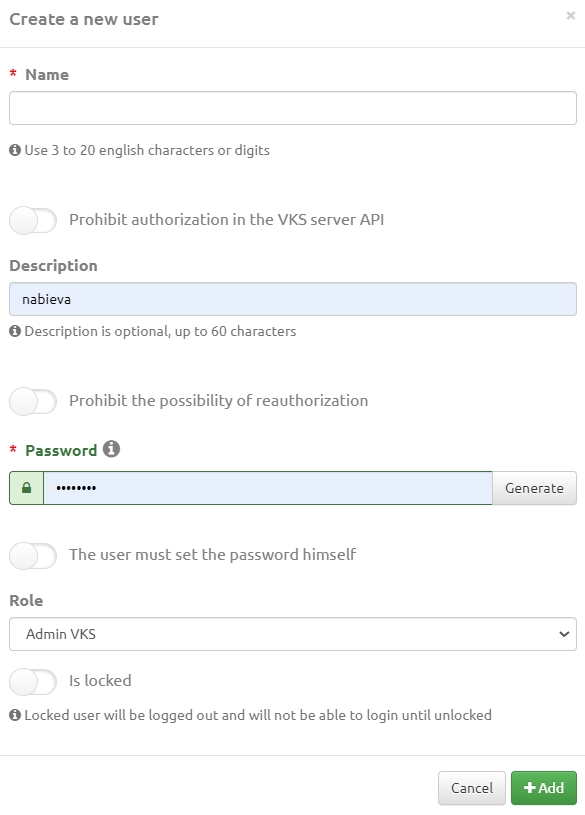
You can add a new user by clicking the button in the upper right corner of the page. The following fields are available in the modal window that opens:
- "Login" used for authorization on the server with a password;
- the switch which will prohibit authorization in the VKS server API;
- "Description" is the name of the responsible administrator or other comment;
- the switch which will prohibit the possibility of re-authorization;
- "Password" which can be generated or set your own;
- the switch which requires the user to set a password independently;
- "Tenant" is the field for specifying the name of the tenant;
- "Role" is the field for selecting a user role in the drop-down list: VCS administrator, superadmin or security administrator;
- the switch that will prevent the user from logging in until this user is unlocked.
The security administrator has access only to security-related functionality on the server.
Reports on the actions of each such user are recorded in system reports and conference reports.
Email - mailing server setup
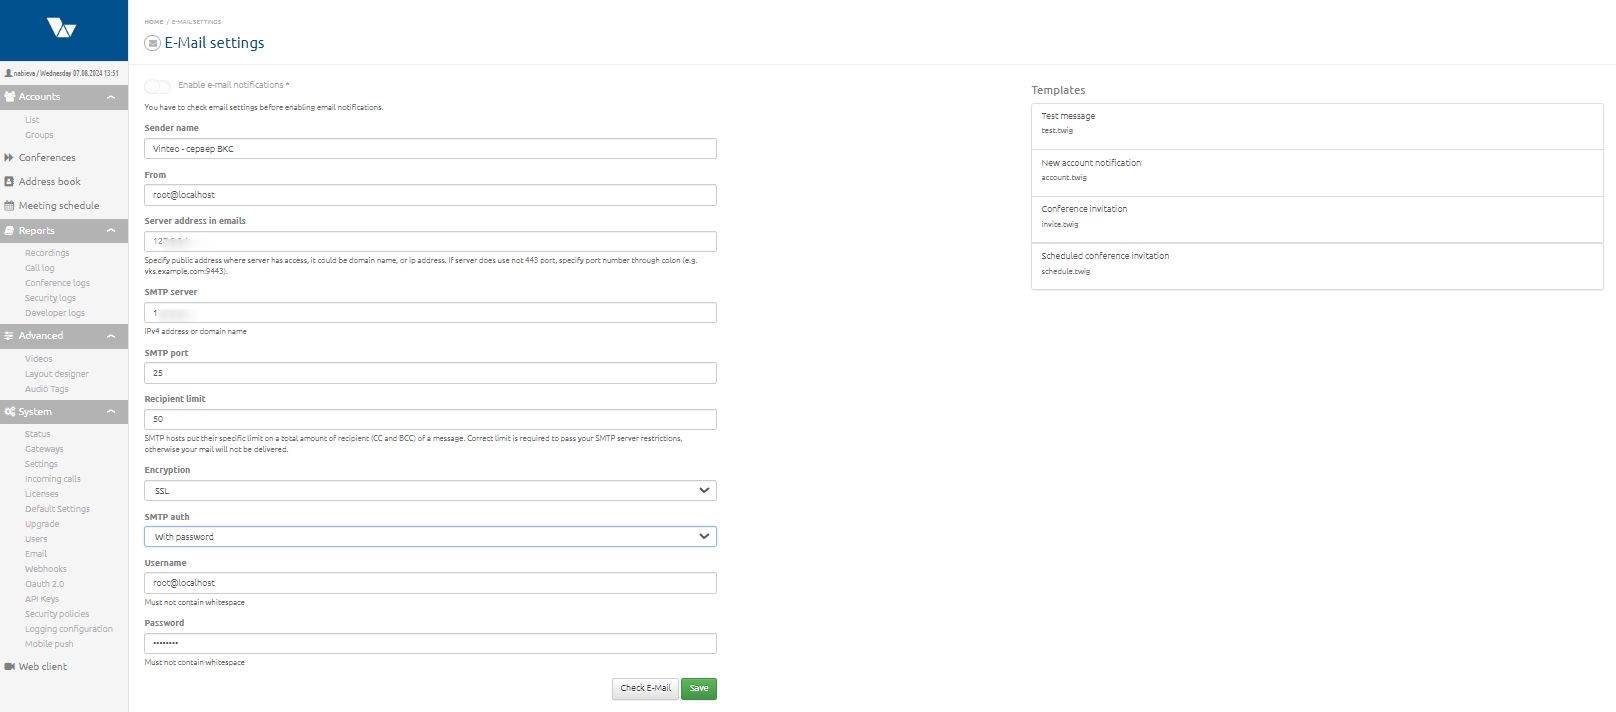
The functionality of this section allows you to set up email notifications for conference participants, as well as edit templates of letters that will be sent to conference participants: test message; notification about creating a new account; invitation to a conference that requires a PIN code to connect to; notification about a scheduled conference with links to connect.
To create a letter template fill in the following fields:
- "Sender name" is the field where you must specify a name that is understandable to the account which will be displayed in the subject of the letter;
- "From" is the field where you need specify the sender email;
- "Server address in emails" -is the field you must specify the IP address or domain name to which the server has access. If the server does not use port 443 specify the port number after a colon (for example, vks.example.com:9443);
- "SMTP server" is the field you must specify an IPv4 address or domain name;
- "SMTP port" is specified using the buttons on the right side of the field;
- "Recipient limit" is the field where you must be specified since SMTP servers have restrictions on the number of message recipients; to prevent the SMTP server from blocking mailings you must configure this value in accordance with the recommendations of the mail service used;
- "Encryption" allows you to select the encryption protocol: SSL, TLS or no encryption;
- "SMTP auth" is the field authentication is set: with a password or anonymous.
The "Username" and "Password" fields are filled in if the "With password" authentication option is selected. Click the "Save" button below the email settings form. Next you can check whether the SMTP server will receive messages. To do this click the "Check email" button and enter the email address to which the letter should be sent.
Webhooks
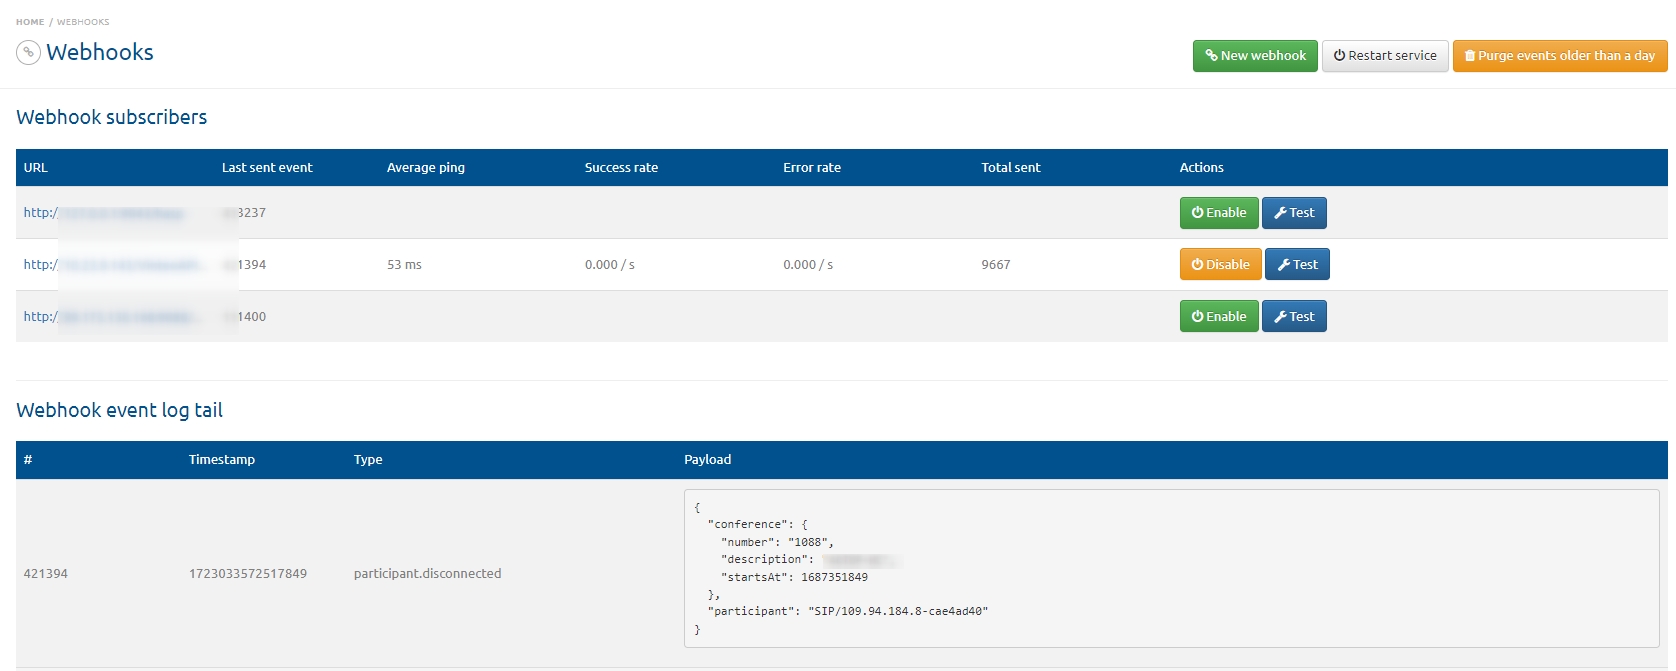
The Webhooks section allows you to configure sending VCS server events to external systems via HTTP/HTTPS protocols.
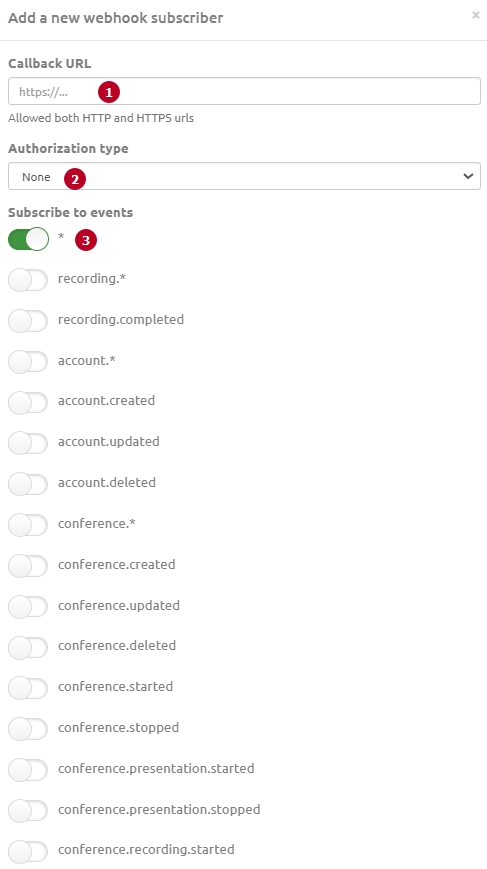
To configure sending VCS events click the "New webhook" button.
1. in the modal window specify the HTTP/HTTPS callback address;
2. select the authorization type;
3. use the radio buttons to select specific events or all VCS events.
This way notifications about the selected events will be sent to the address specified above. After setting up Webhooks save the changes.
Oath 2.0
The functionality is intended for integrators and allows you to configure the ability to authorize on the server using accounts from a third-party authorization server (for example, from a corporate portal) using the protocol OAth 2.0.
API keys
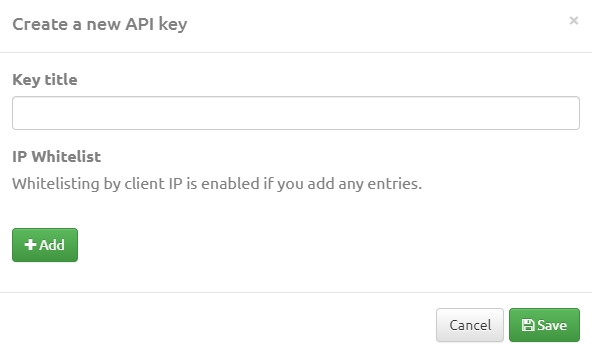
This section is for creating keys for working with the server API. The functionality is convenient for integration projects since now there is no need to send the account's login and password to receive the key. Permanent key with administrator rights is created.
To generate an API key click the button at the top right of the page.
We need to specify the name of the key. You can also add the account's IP address to the white list by clicking the "Add" button. Then you need to save the data.
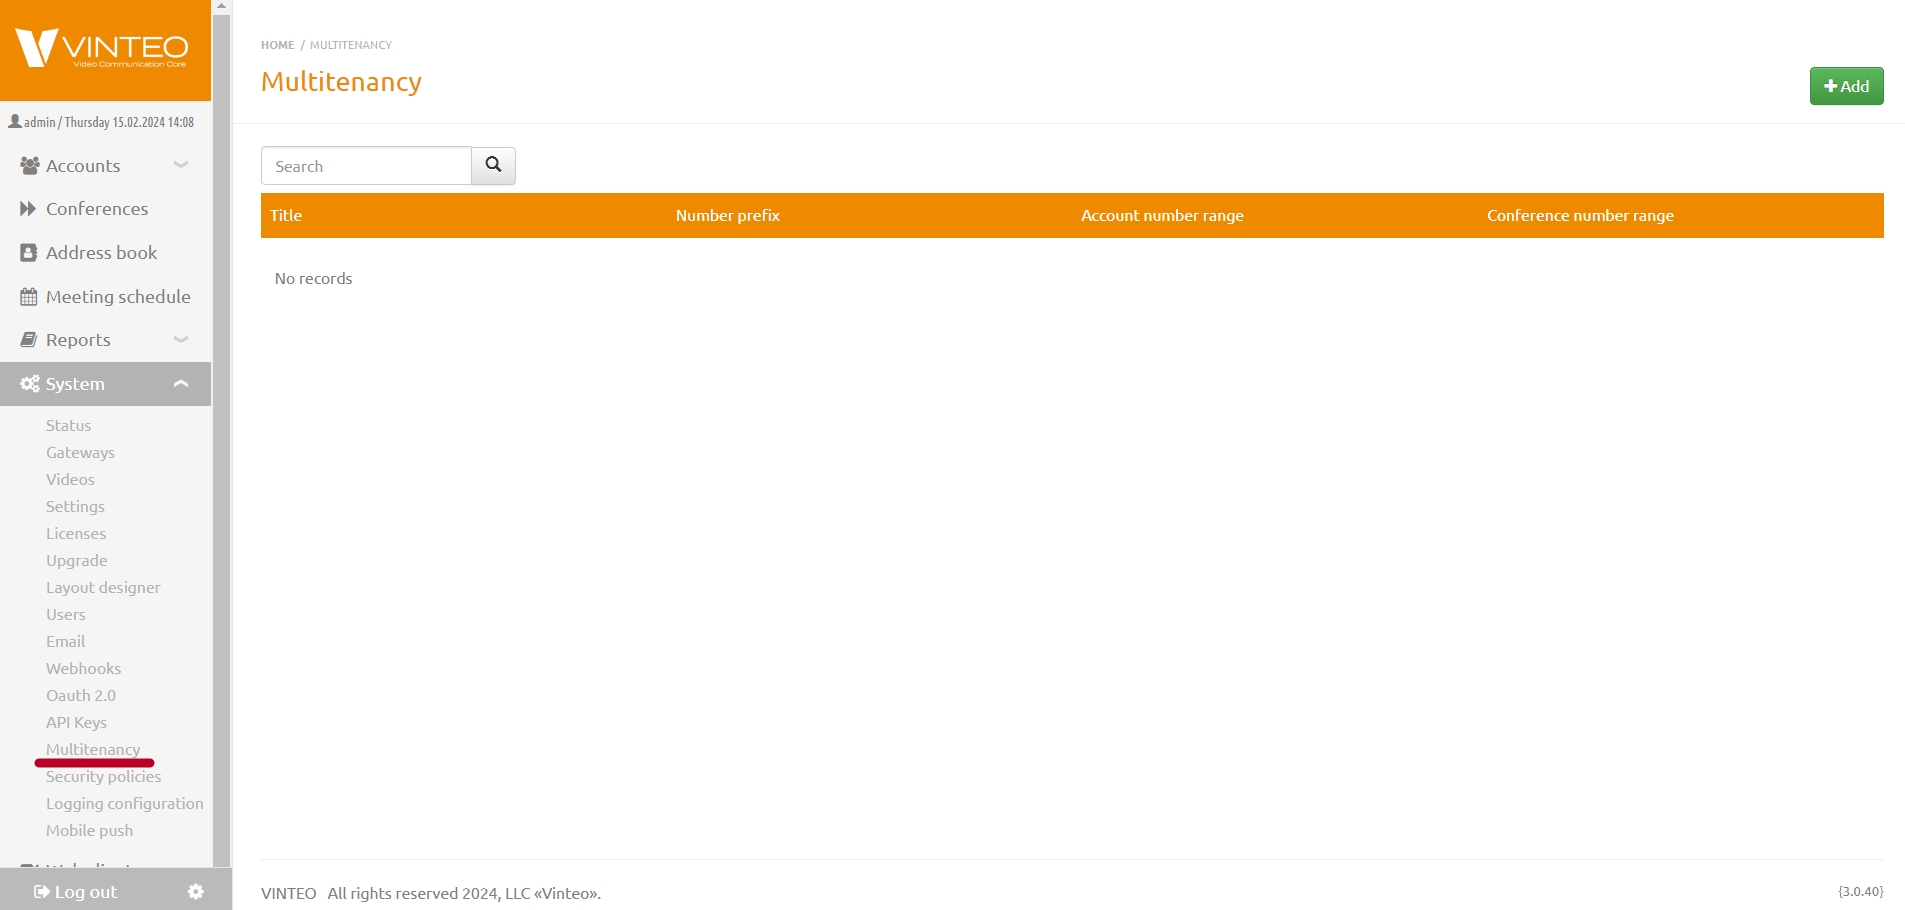
Multitenancy
Multitenancy is the system for separating video conferencing users within one server. Using a multitenancy you can divide the server into several clusters. Users and conferences united by one cluster (company) are called tenants.
Each cluster is managed by its own administrator who does not have access to other tenants. Only the server administrator has access to all tenants.
Multi-tenancy may be necessary when several separate departments use the same server. It is also needed for large departments with a complex structure, when each department must have its own administrator, conferences, accounts.
The multitenancy is located in the "System" section. The list in the form of a table will be formed from the created tenants.
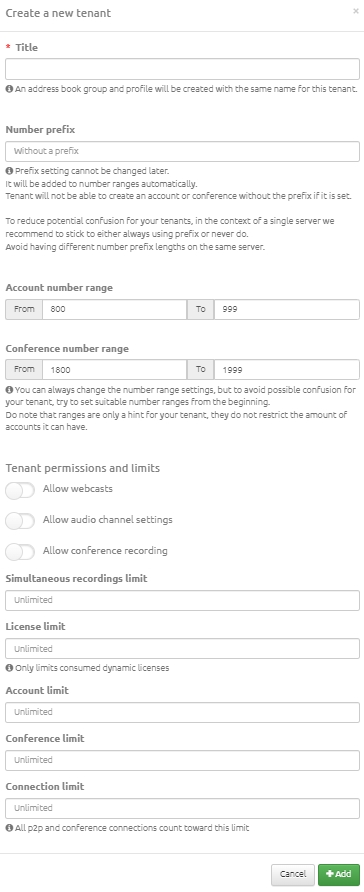
To add a tenant click the button at the top of the page. In the window that appears specify the following parameters:
- title of the tenant;
- in the "Number prefix" field a unique tenant identifier is assigned which is then displayed in the "Number Prefix" column on the page. Number prefixes should not be duplicated, as they are automatically substituted for the selected range of accounts and conferences. The added prefix will be displayed in the table columns "Account number range" and "Conference number range";
- in the tenant permissions and limitations settings you can select additional options that allow webcasting, setting up audio channels and recording a conference;
- in the "Record Limit" field you can set the number of records that will be stored on the server. If the number of records is limited then it will be impossible to make a new record without deleting at least one existing record;
- "License limit" determines how much of the total number of licenses on the server will be allocated to this tenant.
Attention! The multitenancy works with a dynamic licensing system.
- in the “Account limit” and “Conference limit” fields you can set a limit that will be allowed to be created in this tenant;
- "Conferences limit" - the field in which you can determine the number of simultaneous conferences that can be held in this tenant;
- "Connection limit" - the field for setting a connection limit;
- click the "Add" button.
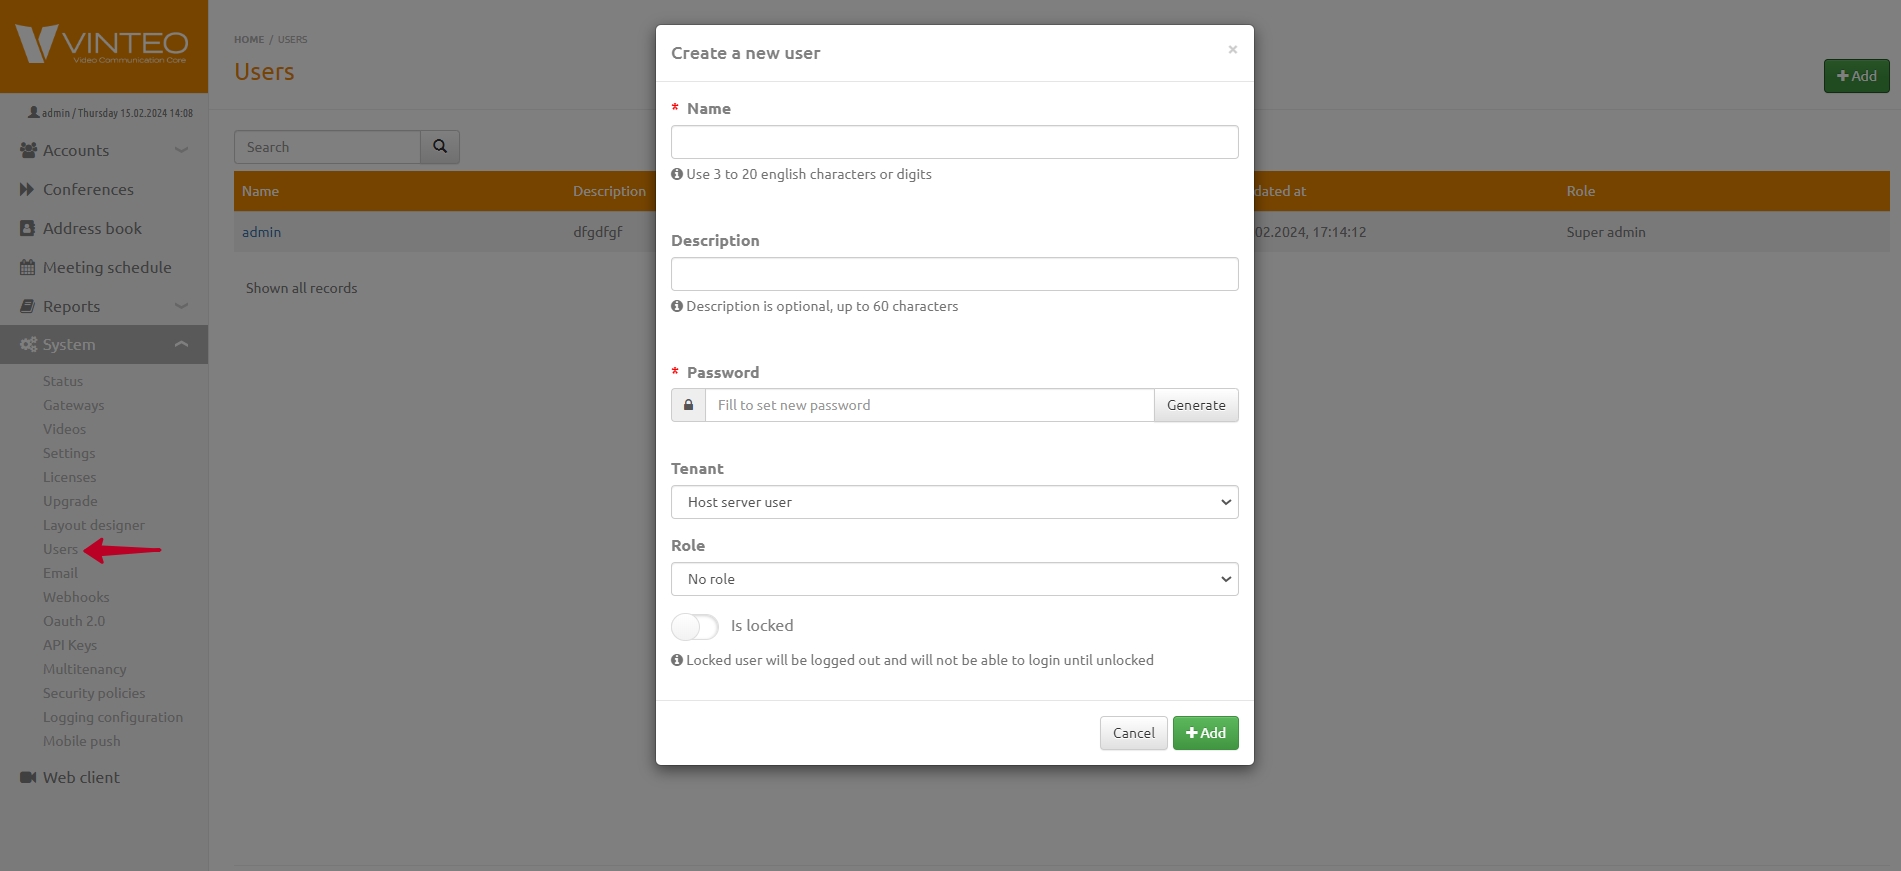
Then you need to go to the "Users" section and create a user (tenant administrator) by clicking the "Add" button.
In the window that appears you need to specify your login and password; select the desired tenant by name from the list; set the administrator setting and click the “Add” button. You can add multiple administrators for one tenant.
Security policies
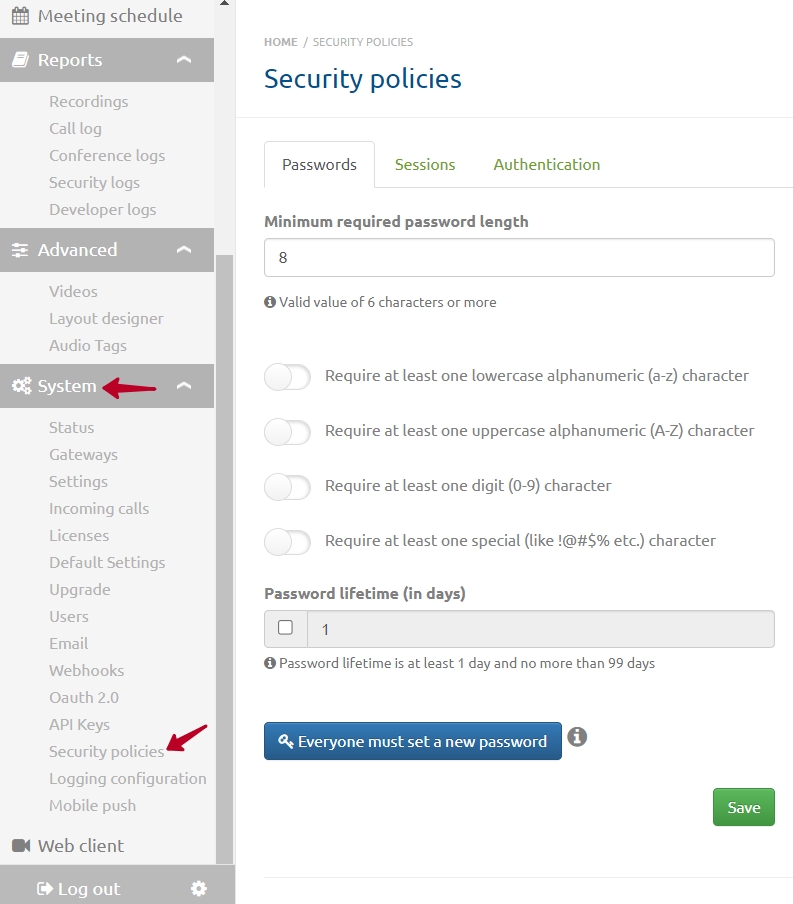
In the list of the "System" section there is an item "Security policies" which provides access to the page of the same name.
On the "Security policies" page there are 3 tabs where you can set up settings with security requirements:
- Passwords;
- Sessions;
- Authentication.
Passwords
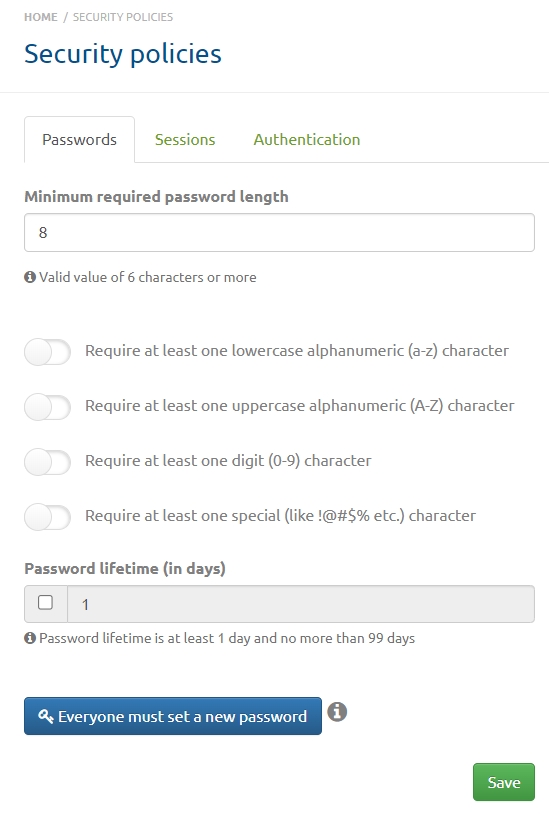
This tab contains settings that allow you to set requirements for the passwords you specify.
The "Minimum required password length" field allows you to set the minimum required number of characters for a password.
Below are 4 switches:
- "Require at least one lowercase alphanumeric (a-z) character";
- "Require at least one uppercase alphanumeric (A-Z) character";
- "Require at least one digit (0-9) character";
- "Require at least one special (like !@#$% etc.) character".
You can also set the password lifetime in days: the minimum is 1 day and the maximum is 99 days.
By clicking the button at the bottom of the page all users and accounts of the server will be required to set a new password upon the next successful authorization.
After setting the necessary settings click the "Save" button.
Sessions
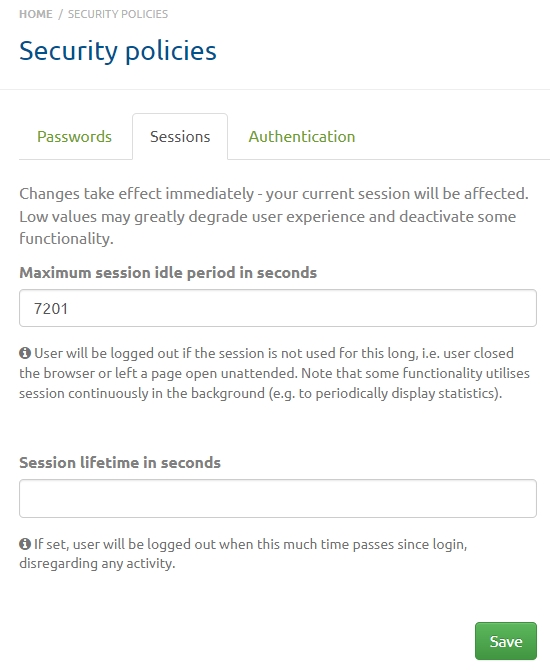
This tab contains session settings.
The applied settings will start working immediately. However low values may significantly worsen the user experience and disable some functions.
In the first field you can set the allowed idle time in seconds. The user will be logged out if the specified value is exceeded.
On some pages data is updated dynamically so the maximum idle time will not be exceeded and the user will not be logged out.
Below is the field where you can set the session lifetime in seconds. After the specified time the user will be logged out regardless of activity.
Then click the "Save" button.
Authentication
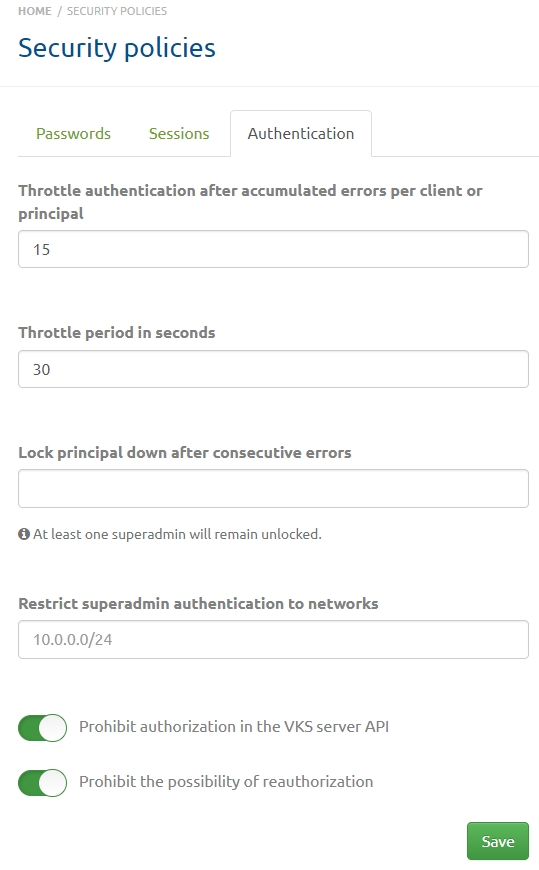
This tab allows you to set restrictions for authentication errors: for logging in after the accumulation of errors for a client or account and the restriction period in seconds and blocking the account after the accumulation of errors in a row.
The "Restrict superadmin authentication to networks" field is used to specify the network from which server super administrators can log in. A super administrator cannot access the server from another network. You can specify multiple networks in the ip/mask format (192.168.0.0/24). Once you start entering a network the additional field will appear below.
Also on the page there are switches that prohibit:
- authorization in the VCS server API;
- possibility of re-authorization.
After setting the restrictions click the "Save" button.
Logging configuration
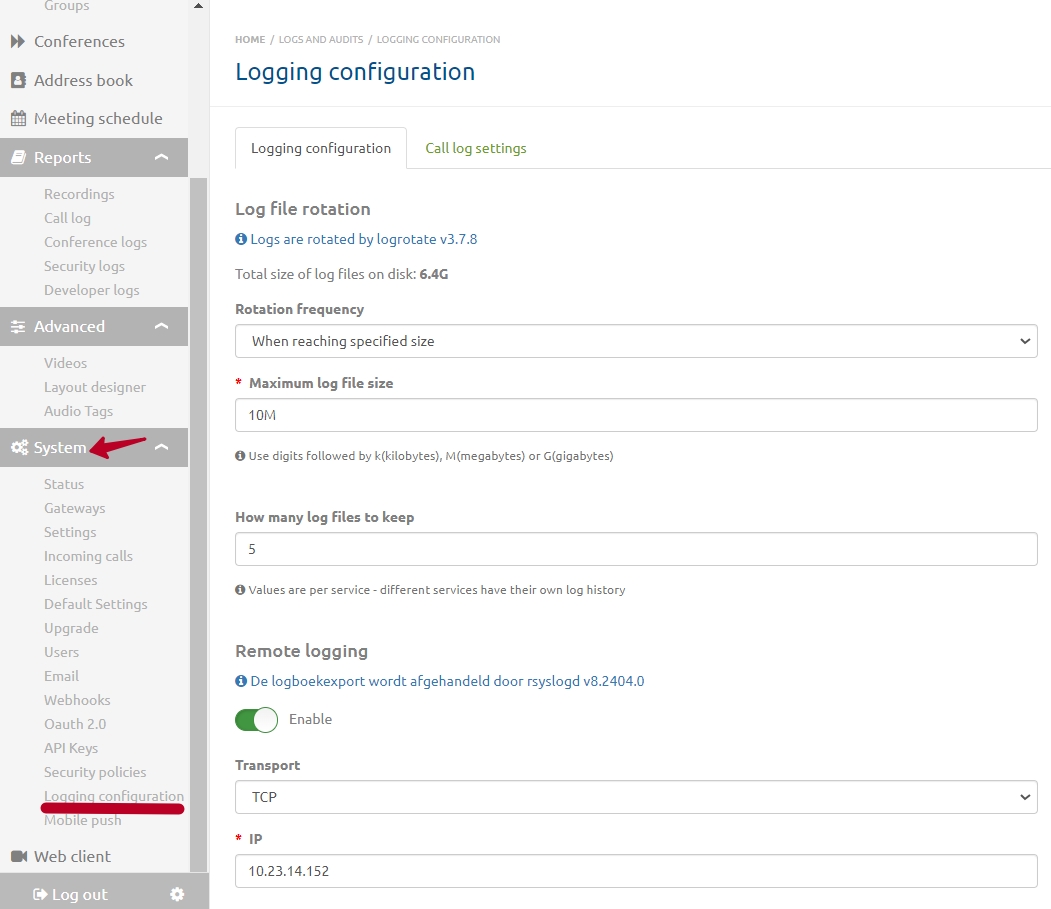
In the list of the "System" section there is a "Log settings" item, which provides access to the page of the same name. There are two tabs here: "Log сonfiguration" and "Call log settings".
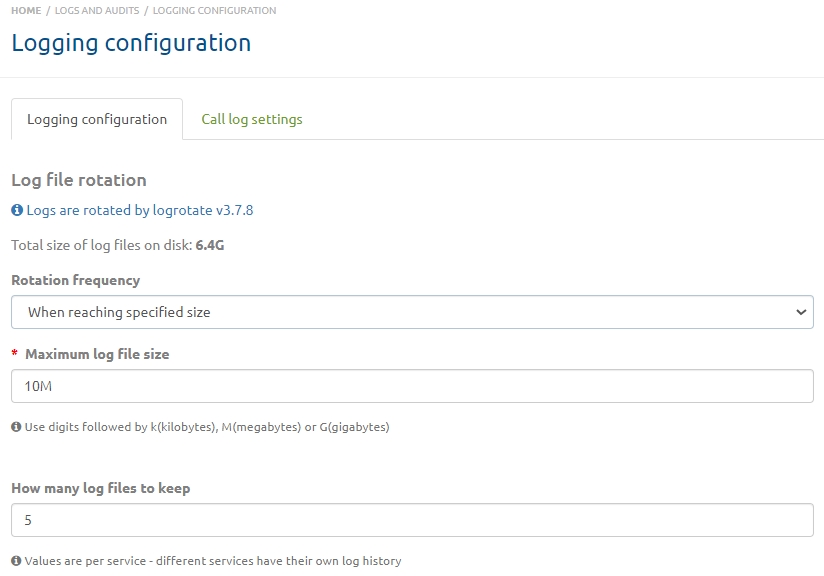
On the "Log configuration" tab you can set up log file rotation. If you don't do this the memory may become full.
In the “Rotation frequency” field you can select a frequency with a certain periodicity from the drop-down list:
- every day;
- every week;
- every month;
- every year;
- “When reaching specified size” (the log file size can be set in the field below.)
You can also specify how many log files to store.
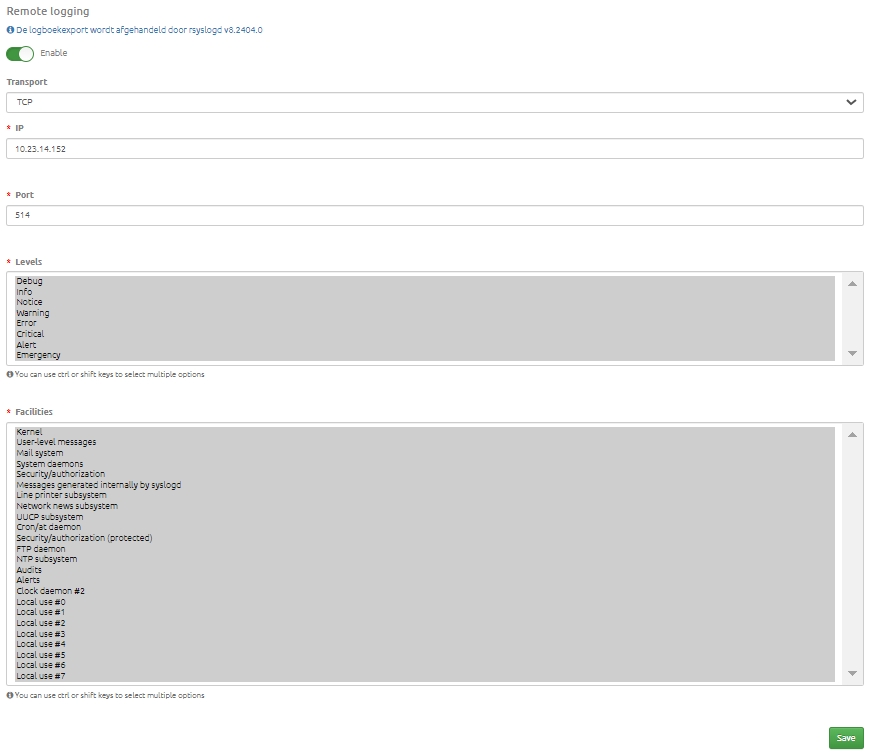
This page also provides the functionality for exporting the log over the network. To set the export parameters activate the switch.
- in the "Transport" field select the protocol type: TCP or UDP;
- specify IP address;
- specify the port number;
- select levels in the field below; you can use Ctrl or Shift keys to select multiple options;
- select categories; you can use Ctrl or Shift keys to select multiple options;
- save your selections by clicking the button at the bottom of the page.
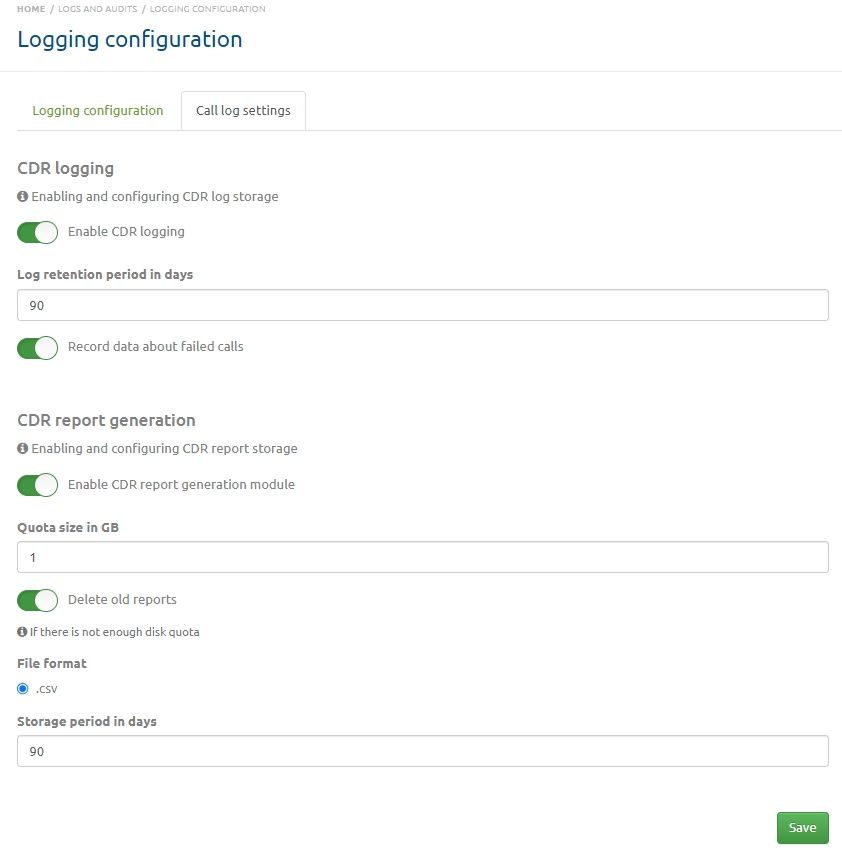
"Call log settings" tab
This tab contains settings for maintaining detailed call logs and generating reports.
To log calls you must activate the "Enable CDR logging" switch and specify how many days the logs should be stored.
The switch below will allow you to log data about failed calls. To generate reports with detailed call records you must activate the "Enable CDR report generation module" switch and specify the allowed quota size in gigabytes. The report is formed in a .csv file.
If the allocated volume for storing reports is not enough activate the "Delete old reports" switch and specify how many days the report will be stored.
Then you need to click the "Save" button.
Mobile push
In the list of the "System" section there is an item "Mobile push" which provides access to the page of the same name.
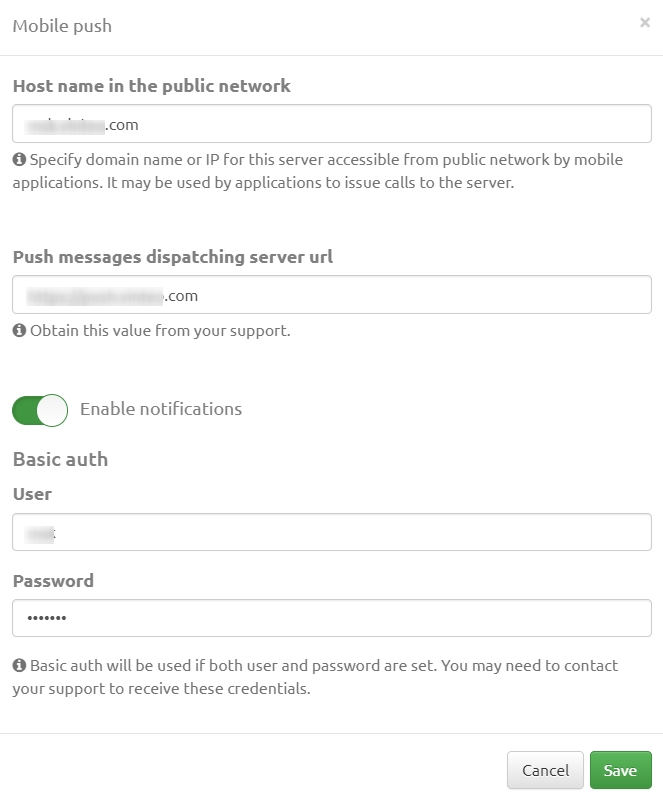
To set up mobile push notifications click the "Configure" button in the upper right part of the page. Then in the window that opens configure the sending of notifications:
- specify name or IP address of the server to which calls can be made from mobile devices;
- contact support to fill in the "Push messages dispatching server URL" field;
- then enter your username and password to activate the “Enable notifications” switch;
- click the “Save” button.
Accounts who have been authorized on mobile devices after setting up push notifications are displayed in the table on the page. If the account was authorized before setting up push notifications he will need to re-authorize.
Then this account can be added to the conference and called from the context menu. At the moment of the call if the phone screen was locked mobile application opens with an incoming call and control buttons: "Accept", "On/Off microphone", "On/Off camera" and call rejection.
If the phone screen is working the push notification window appears with the accept and reject buttons.
Integration settings
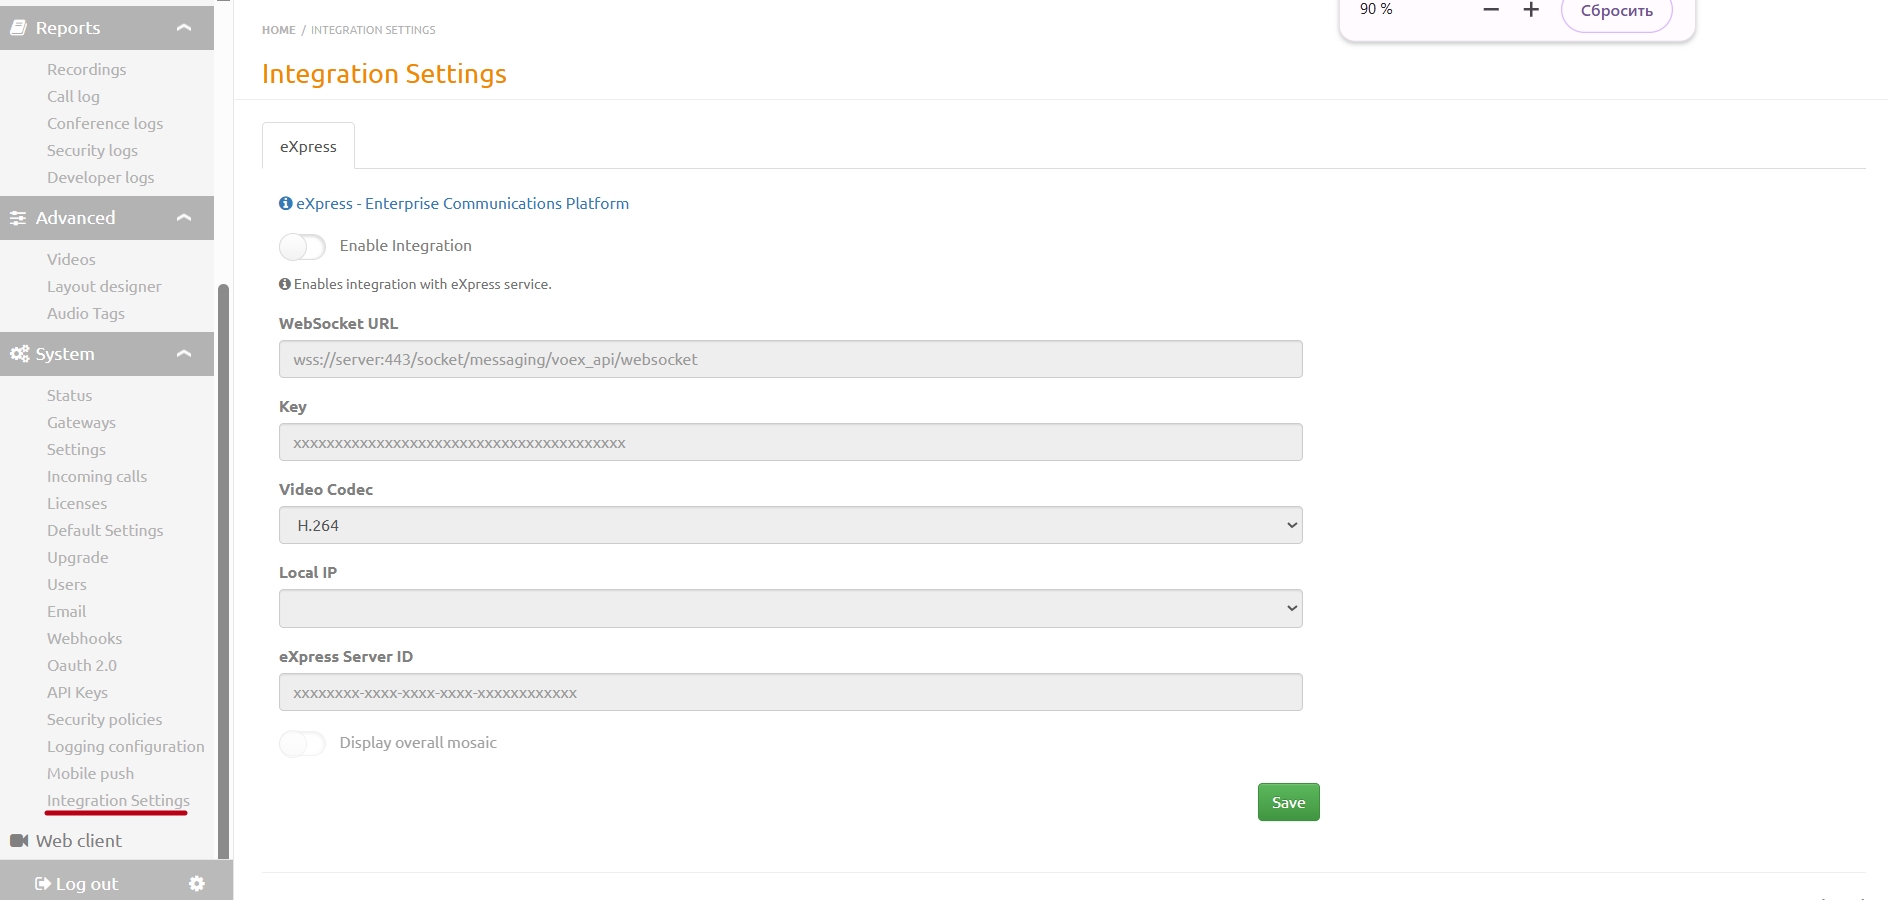
In the configuration menu, in the drop-down list of the "System" section there is the item "Integration settings" which allows you to go to the settings page for integration with the corporate communications platform "eXpress".
To integrate with "eXpress" you need to make the following settings:
- activate the switch that enables integration at the top of the page;
- specify the URL of the "eXpress" service in the format displayed in the "Websocket URL" field*;
- enter the integration key with the "eXpress" service*;
- it is possible to select a video codec for a video of incoming and outgoing calls from the list of the setting of the same name;
- in the "Local IP" field select the server IP address from the list*;
- specify server ID "eXpress"*;
Items marked with an asterisk are mandatory parameters to configure.
On this page you have the option to select a common mosaic by activating the switch at the bottom of the page.
After setting all the necessary parameters click the "Save" button.
