Video conferencing terminal graphical interface
Содержание
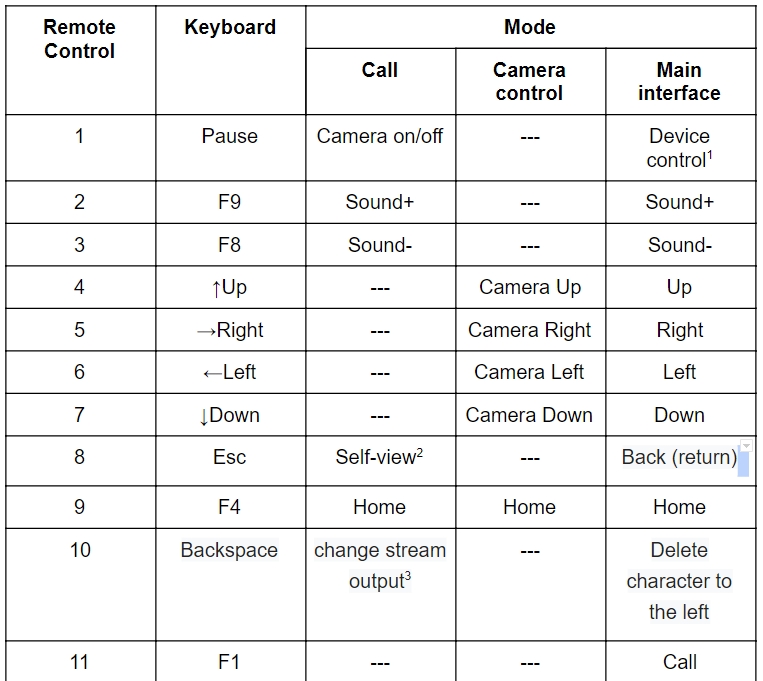
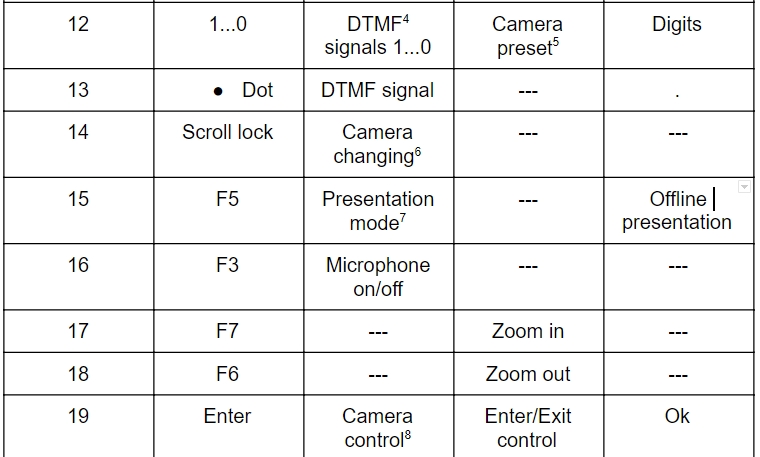
Remote control and keyboard
Remote control diagram
- Short press is the standby mode. Long press (3 seconds) is the system widget.
2. Picture in picture mode. Change the video display location from your camera or remove.
3. Changing the main stream and the second stream on the screen.
4. Dual-tone multifrequency analog signal.
5. From 1 till 6 are presets for the camera. The long press is Save and the short press is Download.
6. Change video transmission from different cameras
7. Turn on/off the presentation transmission from the terminal.
8. Entering mode of the camera control.
9. Changing volume controls (loudspeaker/microphone) in active widget of volume.
10. Picture in picture mode. Changing the display location of another stream or removing.
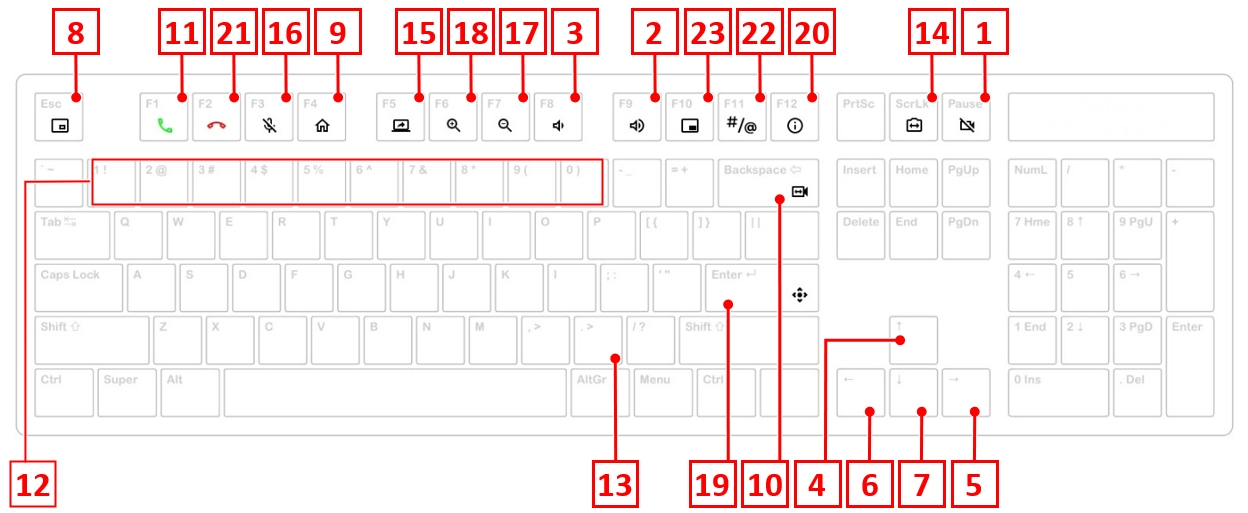
Keyboard diagram
Functions of control buttons in the main interface
After the button naming in parentheses the number of the button in the remote control diagram specified.
The Turn on button (1) with short press
This button starts the low power standby mode.
The Turn on (1) button with long press
This button starts the System widget of the device control. Long press means holding the button 2-3 seconds.
PC button(15)
The PC button starts/stops the view of a presentation in the main interface from the configured video input. The presentation breaks when an incoming call. Starting a presentation during a video conferencing session is considered separately.
Save button (20)
Depending on the interface:
- save changes that you have made on the pages where it is needed;
- when the volume widget is active the Volume+ (2) and Volume- (3) buttons change volume controllers (loudspeaker/microphone) including during the conference.
Main page of the interface
Information about terminal
Terminal name
Terminal name used for identification of the terminal. When incoming call the Caller ID transmissions. On an outgoing call, the terminal name is transmitted as the caller ID. The terminal name is configured in the corresponding Main settings menu item.
Day of the week, date and time
It is recommended to check the current date and time. You can configure them in the corresponding Main settings menu item.
SIP/H.323 registration
This function displays SIP and H.323 status registration. The registration configures in the corresponding Main settings menu item.
IP address
This function displays the current IP address. When the network connection is absent the notification ‘No connection’ displays. The network interface configures in the corresponding System settings menu item.
Outgoing call
Enter number field
Enter number field for entering account’s number or conference number on the server. Such as 10.0.0.1, 1000@10.0.0.100, 1000@test.com. You can enter the number without focus on the string. Outgoing call to the number you enter doing by Call button. You can call without focus on the string. Letters are entered by repeatedly pressing the Digits control buttons (12).
Characters are deleted by pressing the Backspace control button (10).
Enter number field has two modes:
- Enter number mode default installed. The white frame appears in the string after the focus is moved. It is possible only entering and deleting characters to order from the end of the string;
- Control button OK installs the Editing mode in the string (19) and the field is filled by white background. The cursor is moved by Right (5) and Left (6) controlled buttons and it has a possibility of entering and deleting characters in the place where the cursor is located. The exit with saving making by ‘Back’ (8) and ‘Ok’ (19) buttons.
Protocol
Protocol button serves to choose the outgoing call protocol from the dropdown list. Default is Auto.
To change the outgoing call protocol you need:
a. move the focus on the Protocol button;
b. open the list by OK control button (19);
c. move the focus to the string you need;
d. confirm the actions by OK control button (19).
To exit without saving you need to press Back control button (8).
Speed
Speed is the button which can help you choose the speed of outgoing calls. Default is Auto.
To change the speed of outgoing call you need:
a. to move the focus on the Speed button;
b. open the list by OK control button (19);
c. move the focus on the string you need;
d. confirm the actions by OK control button (19).
To exit without saving you need to press Back control button (8).
Calls history
Last calls
The list of last calls generates from five last calls (incominc, outgoing, missed). When the focus moves on any string it is possible to do an outgoing call by ‘Call’ control button (11).
Press the OK button (19) and the focus moves to the number entry string to change the number. When you make an outgoing call from the history the number and chosen protocol will display in corresponding fields of the Outgoing call modul.
All calls history
All calls history is the link for transferring to the corresponding item in the calls history menu.
Camera
Camera is the video output field with a connecting camera or another сapture device.
Camera window
When the camera focus moves on the camera window:
- the white frame is around the camera window;
- the inscription is in the camera window is Press ☉ for the camera control.
Entering in the camera control mode:
- OK control button (19).
The exit from the control mode. Changed position of the camera will be saved:
- Back control button (8);
- OK control button (19).
Presets
Six presets for the camera positions downloading and saving. When moving focus to the any preset:
- the chosen preset highlighted;
- the inscription is in the camera window is Press ☉ for the camera control.
Entering the camera control mode for downloading and changing the selected preset:
- OK control button (19), the position of the camera will change after downloading the choosing preset.
The exit from the control mode. Changed position of the camera will be saved:
- Back control button (8) without change the current preset;
- OK control button (19) with changing the current preset.
Camera control mode (only PTZ camera)
The PTZ camera control with supporting remote direction and zoom control:
- you can change the direction by Up (4), Right (5), Left (6) and Down (7) buttons;
- Zoom configuration with Zoom in (17) and Zoom out (18) buttons.
The exit from the control mode. Changed position of the camera will be saved:
- Back control button (8) without change the current preset;
- OK control button (19) with changing the current preset.
New call
Enter the number
The page with enter modul [Appendix A]. The entering for the outgoing call number. Entered number will be saved until you go from the menu.
Outgoing call
Outgoing call is the field where you can start the outgoing call by the OK button (19). This button is active only after entering and saving the number.
Protocol
Protocol is the function with which you can choose the outgoing call protocol. Default is Auto.
Speed
Speed is the function with which you can choose the outgoing call speed. Default is Auto.
Contacts
All contacts
All contacts is the list of all created contacts with filter function.
To manage of any contacts:
a. move the focus on the contact you need;
b. press the OK control button (19).
c. choose the action moving the focus on the field you need and press the OK control button (19):
- Video call is the start the outgoing video call button;
- Audio call is the start the outgoing audio call button;
- Edit is the button to go to editing. It is similar to the New contact button.
- Delete is the button deleting selected contact.
The status on the contact page displays the presence status of the Vinteo video terminal adding as a contact during the registration on the one video conferencing server:
- grey is the color meaning the status is not determined;
- yellow is the color meaning that the terminal is on but in a call;
- red is the color meaning that the terminal is on but it is in Do not disturb mode;
- green is the color meaning that the terminal is on and it is available for call.
Presence status displayed before every string:
- on the All contacts page;
- on the History page;
- on the Call history in the main page.


