Video terminal web interface
This section describes how to configure the special software of the video conferencing terminal to connect to the video conference.
The Web interface access is enabled by default. In order to disable it, uncheck the “by web” option in the terminal settings: "Main Screen - Settings - System settings - Access".
Содержание
Starting work with the application
Follow next steps to enter the configuration menu:
- start a web-browser;
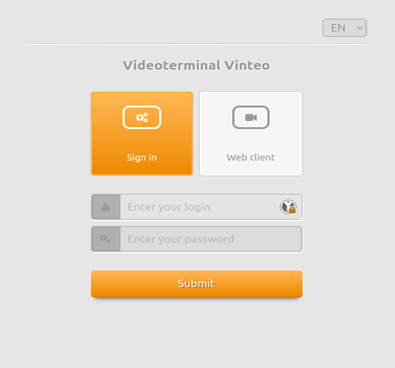
- enter the terminal IP-address into the address bar - a login page will open;
- select the interface language with the top right switch;
- make sure that the "Sign In" button is selected;
- enter the user account name into the "Enter your login" field (“admin” by default);
- enter the user password into the "Enter your password" field ("123" by default);
- click on the "Submit" button - the main window of the terminal management will open.
In order to finish working with the interface, just close the web-browser or click on the "Log out" button in the lower left.
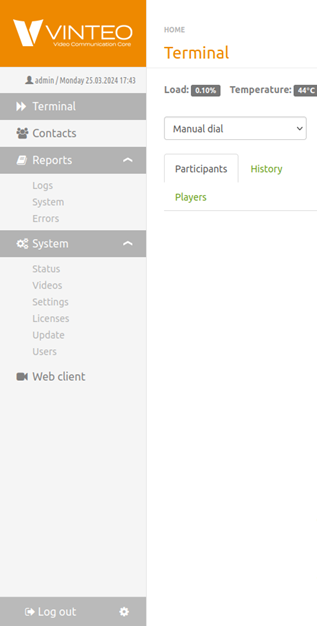
The sidebar menu allows you to visit the main pages of the web-interface, such as "Terminal", "Contacts", "Reports", "System".
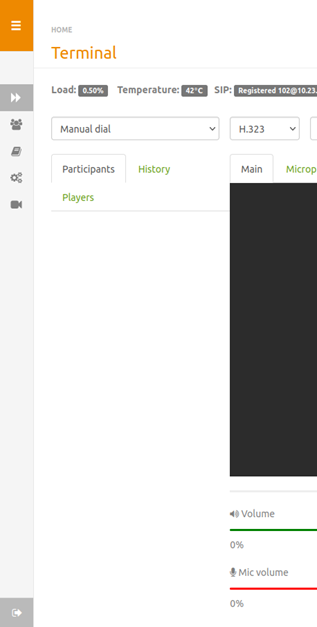
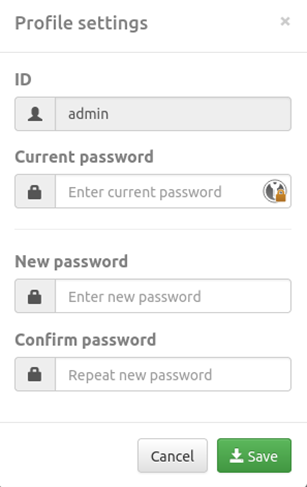
The side menu is hidden by clicking on the Vinteo logo or changing the window size. Two options are available at the bottom of the menu: the account logout and change the password setting.
"Terminal" page
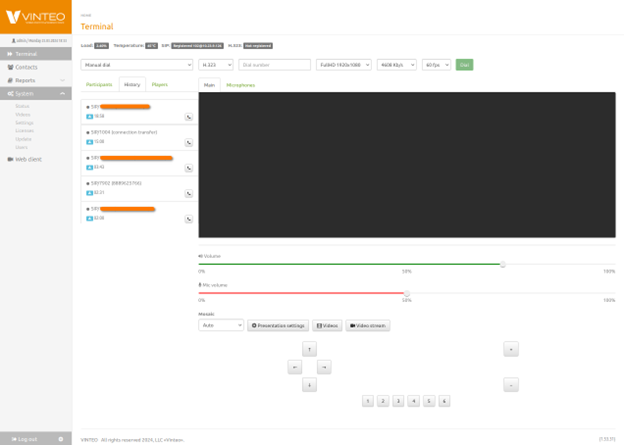
The "Terminal" page displays the connected camera image, the main indicators of system resources utilization and on-server registration. Here you can call an account by number, view current calls and history, call the video player (which is an uploaded video or an IP camera video stream).
There are two sliders under the video conference screen that allow you to control the speakers and microphone volume. There are camera controls at the bottom of the page. You are able to change the camera angle remotely, its position in horizontal and vertical plane, zoom in/out.
Calling an account manually
- select the calling method: "Manual dial";
- select the communication protocol: SIP, H.323, Local or Auto;
- enter the account number;
- select the video stream resolution;account
- select the bitrate;
- select the frame rate;
- click on the "Dial" button.
Calling an account from the contacts list
- specify the calling method: "From contacts list";
- select the account;
- select the video stream resolution;
- select the bitrate;
- select the frame rate;
- click on the "Dial" button.
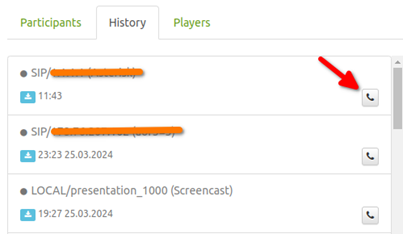
In order to call an account via the call history, go to the "History" tab and click on the call button.
Receiving a video stream with a terminal
In order to receive a video stream (broadcast) you have to follow next steps on the "Terminal" page:
- click on the "Video stream" button under the volume sliders;
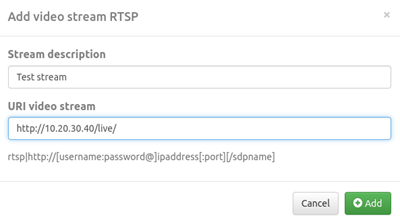
- specify the video stream name in the "Stream description" field in the adding a video stream window;
- specify the terminal address in the "URI video stream" field, as shown in the figure;
- click on the "Add" button.
Video stream receiving is available via RTSP, RTMP, UDP, HLS (http, https).
"Contacts" page
The "Contacts" page is the local address book of the terminal, which allows you to add and delete accounts.
You are able to search the address book by entering the account's number or a part of their name. It is possible to increase the displayed lines number on the page also.
Click on the "Add Contact" button to create a new account.
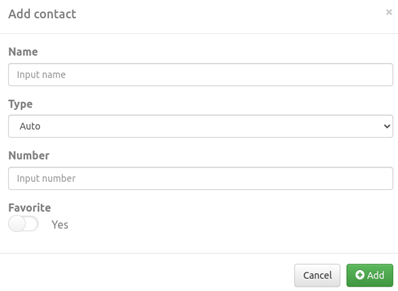
The adding new contact form will open after that. The "Add contact" window contains the following elements:
- the "Name" field;
- the connection type field (SIP, H.323, Local, Auto);
- the input number field;
- the switch that adds an account to the "Favorites" category.
Click on the "Add" button after filling out the form.
In order to import the account list, click on the "Import contacts" button. Browse for a required accounts file and press the "Import" button.
To export the account list, click on the Export contacts" button. The account list file will be downloaded to the device.
If there are several Vinteo terminals in the account book of the video conferencing server they are assigned a presence status. Color values of these presence statuses are:
- The gray means not defined, default status;
- The yellow means the terminal is on and in the “call” mode;
- The red means the terminal is on and the “do not disturb” mode is activated;
- The green means the terminal is on and available for calling.
"Reports" page
This page contains the "Logs", "System" and "Errors" sections.
“Logs" section
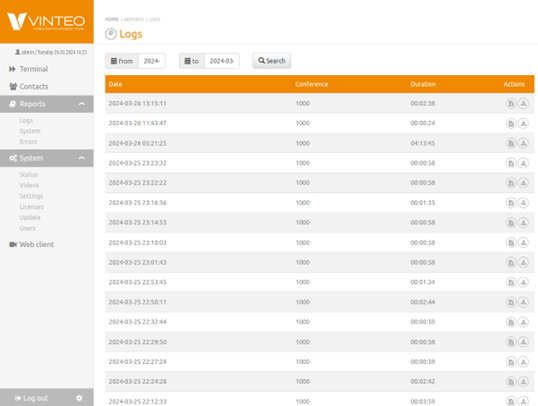
"Logs" contains the following information:
- each conference report;
- conference parameters;
- utilized codecs;
- participant parameters;
- other technical information about the conference run.
To view reports for a certain period follow these:
- set the period in the "from/to" filter;
- click on the "Search" button.
You are able to view logs in a browser window and download them. Use the "sheet" image button to view logs and the "arrow" image button to download logs.
"System" section
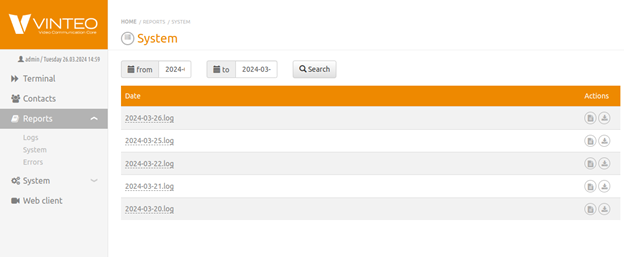
The "System" section contains information about system technical state, system reboot time, error reports, failures and other data.
To view reports for a certain period follow these:
- set the period in the "from/to" filter;
- click on the "Search" button.
You are able to view logs in a browser window and download them. Use the “sheet” image button to view logs and the “arrow” image button to download logs.
"Errors" section
The error data file exports to your local PC when “Errors” item of the main menu is pressed. If necessary (or on request) this file can be sent to "VINTEO" Ltd. for analysis by the technical support department.
“System" page
The page contains the "Status", "Videos", "Settings", "Licenses", "Update" and "Users" sections.
"Status" section
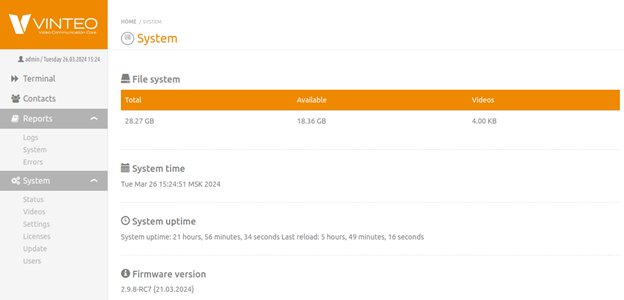
The "Status" section allows you to view basic information about the terminal:
- hard disk capacity, available space and space occupied by video clips;
- system time;
- system uptime;
- current firmware version.
"Videos" section
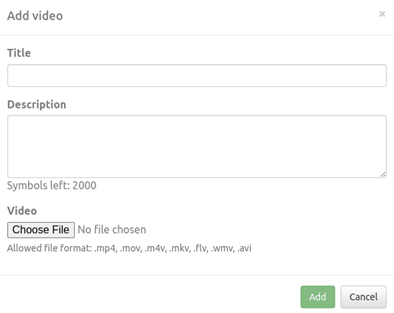
You can add videos of following formats: .mp4, .mov, .m4v, .mkv, .flv, .wmv, .avi on the “Videos" page to display them as an additional stream in the conference.
The uploaded video size must not exceed 100mb.
To add a video you need to click on the button on the top right, then fill in the "Title" and the "Description" field, click on the "Choose File" button. Then click on the "Add" button.
To add a video you need to click on the button on the top right. Then fill in the "Title" and the "Description" field. Click on the "Choose File" button. Then click on the "Add" button.
There is an option to change the display style: in a list or grid. Click on the “trash can” button to delete a video. To edit a previously uploaded video, click on the “pencil” button.
“Settings" section
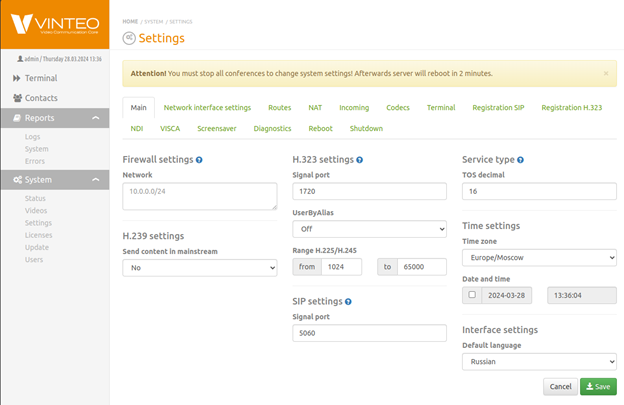
There are following tabs in the "Settings" section :
- "Main";
- "Network Interface Settings";
- "Routes";
- “NAT”
- "Incoming";
- "Codecs";
- "Terminal";
- "Registration SIP";
- "Registration H.323";
- “NDI”
- “VISCA”
- "Screensaver";
- "Diagnostics";
- "Reboot";
- "Shutdown".
“Main” tab
In the main settings tab you can change:
- Firewall settings to deny access to SIP and H.323 ports from the local network;
- H.323 settings, such as signaling port, RTP port range, enabling login/password authorization;
- SIP signaling port and ToS;
- Time settings;
- Default language in interface settings.
The firewall settings work as an access whitelist.
Note: If the field is empty access is allowed from all networks available to the terminal. If a single address or a subnet address is in the list access is allowed from that subnet addresses.
The H.323 and SIP signaling ports changing requires the same value settings on other devices as well.
“Network interface settings” tab
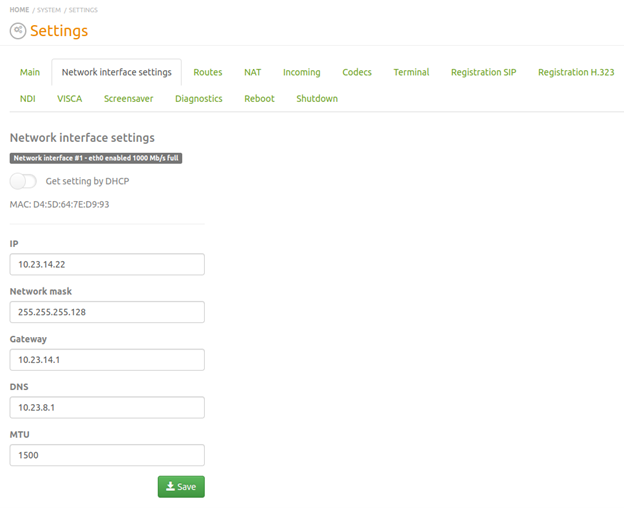
The "Network interfaces settings" tab allows you to configure IP address assigning to network interfaces: automatically (by DHCP) or manually.
In order to configure the IP address manually, you should fill in the fields:
- IP;
- Network mask;
- Gateway;
- DNS;
- MTU.
Click on the “save” button after that.
A dual network interface configuration is also available.
“Routes” tab
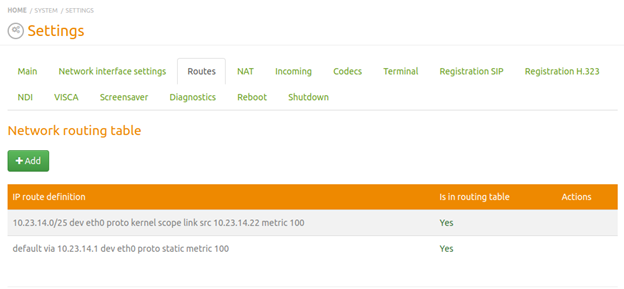
In the "Routes" tab you can view automatically identified routes and assign additional routes.
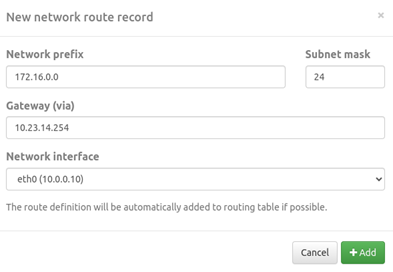
Press the "Add" button to assign a new route. In the modal window you should enter following:
- the destination network prefix;
- the mask and gateway which the destination address is available through;
- choose the interface to connect to the gateway;
- press the "Add" button.
The new route will appear in the table. In case you need to disable or delete this route, click on “Disable” button, confirm your choice and press the “Delete” button after that.
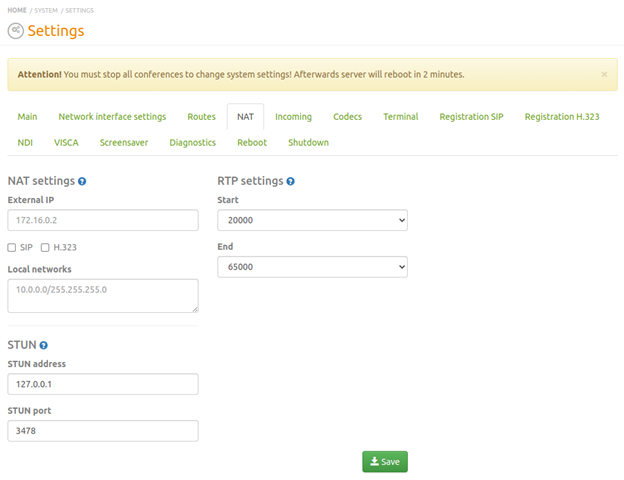
“NAT” tab
The “NAT” settings tab allows you to configure the device if it is behind a NAT router, specify the external IP-address of the UP-Link device, define local networks, STUN address and assign the RTP protocol port range.
The device external address is entered in the "External IP" field. In the "Local networks" field, the prefixes with no need for external address substitution (NAT translation) are defined.
Note: SIP, H.323 and RTP port ranges must be enabled in the router NAT configuration (firewall).
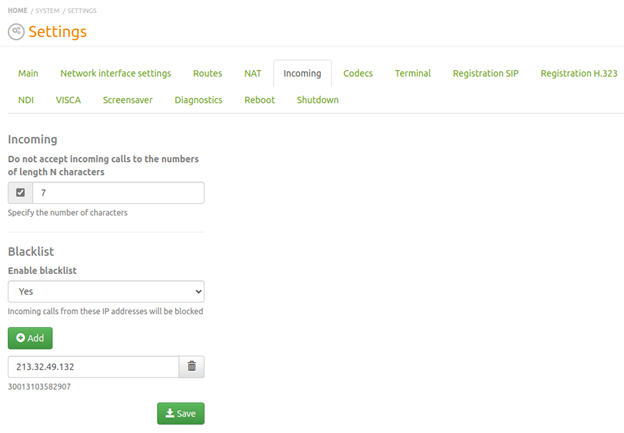
“Incoming" tab
This tab specifies character allowed limit of the phone number, outrange of which is blocked and its IP-address automatically adds to the blacklist. It is available to enable the blacklist that blocks all traffic from included addresses. In order to add IP address to the blacklist you need to:
- click on the "Add" button;
- enter the IP-address;
- press the "Save" button.
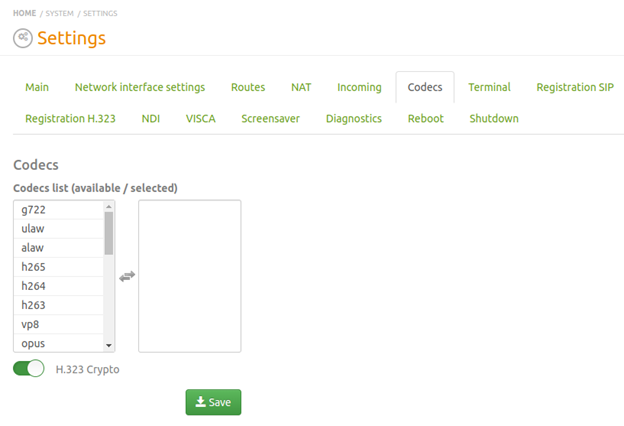
“Codecs” tab “Codecs” is the tab with audio and video codec lists supported by the account's device. The list on the left contains available codecs. In order to use them, transfer a codec to the right field.
An empty field on the right means that default codecs are used. If codecs are selected (moved to the right), only the ones that chosen are in use. For example, if only audio codecs are selected the video stream is not processed. You should carefully install codecs or use default codecs (the right field is clear).
Note: the H.265 codec works with SIP protocol only.
