Simultaneous translation
Содержание
- 1 General provisions
- 2 Audio channels setting up
- 3 Audio channels in the participant settings
- 4 Audio channel properties
- 5 Selecting audio channels in the web client
- 6 Selecting audio channels in Vinteo Desktop
- 7 Working with a private audio channel
- 8 The ways to mute the microphone
- 9 Broadcast and recording
General provisions
Purpose of functionality
This functionality allows you to organize a conference with the possibility of simultaneous translation into several languages at the same time. Audio channel management is available which allows you to implement specific video conferencing scenarios when you need to use different audio channels for several participants.
Functionality
The system has 10 public and private audio channels. With settings you can determine which channels each participant receives audio from and which channels receive audio from the participant. Each conference participant can listen to and send audio to any number of channels. Private channels are used by interpreter to communicate with each other. One channel is shared.
Audio channels setting up
Turning on and selecting audio channels
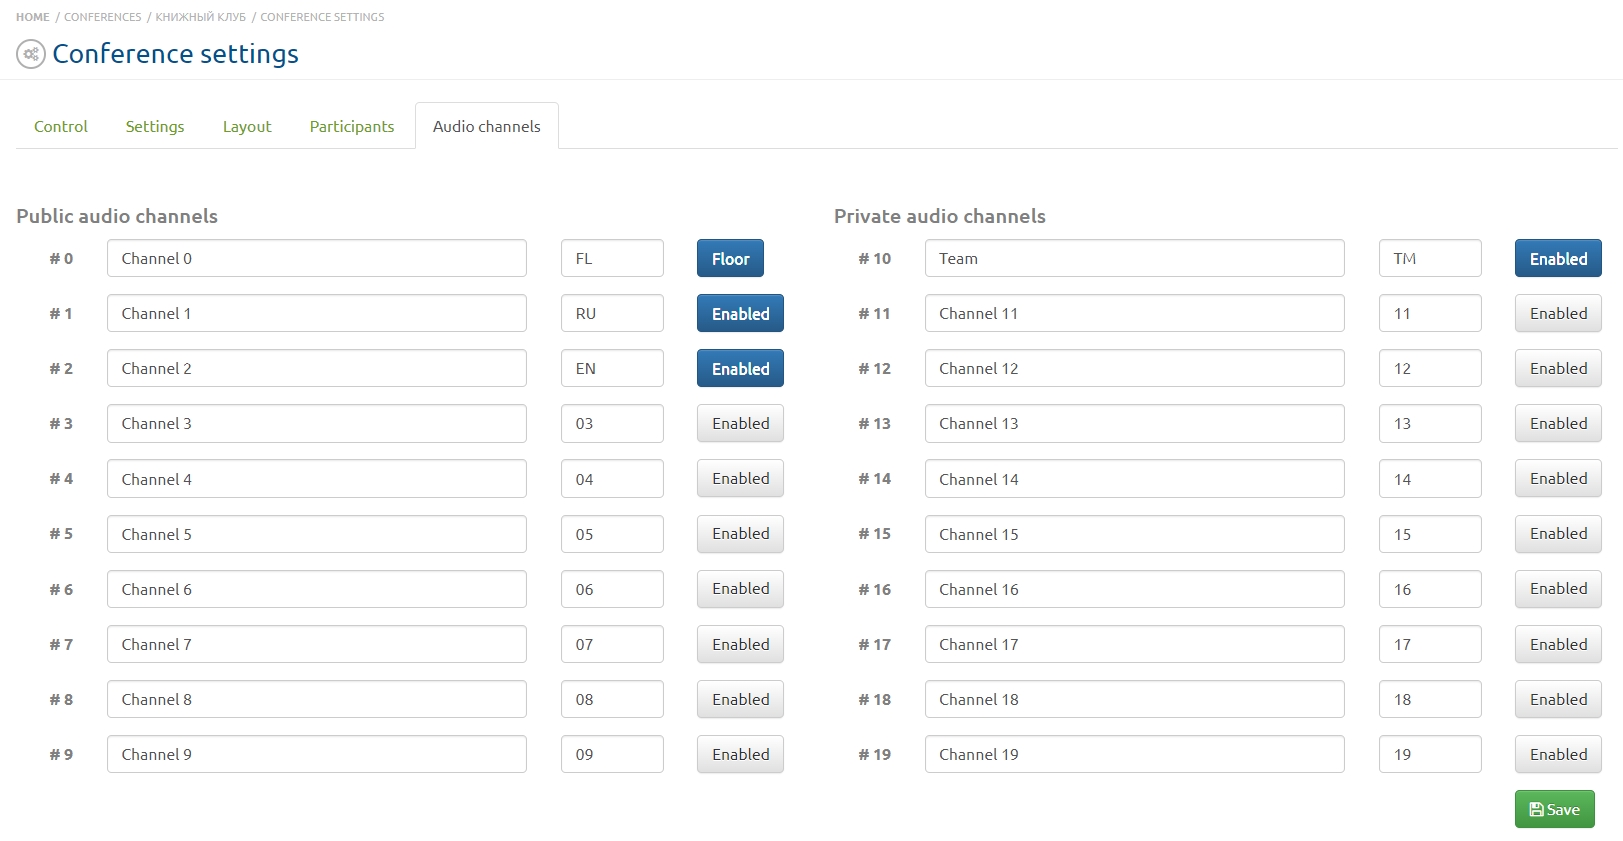
Moderator/administrator, being on the conference management page and going to the "Audio channels" tab, defines audio channels for each language group and turns them on by pressing the button to the right of the channel name field. The button will change color to blue. Channels are divided into public and private.
Public audio channels can be assigned to any conference participant. Private audio channels are assigned only to interpreters so they can communicate with each other. Audio from private channels is not transmitted to other conference participants.
The administrator must also add accounts to the conference and define one or several of them as interpreters. This procedure is described in more detail in the "Assigning the interpreter" section. There is no need for the Administrator to assign audio channels to accounts. The interpreter will also be able to independently choose which audio channel to send the sound to. For more convenience you can rename the channels according to the language groups and in the third column for indication the abbreviations denoting languages. After setting all settings you must click the "Save" button in the lower right part of the page.
The figure shows an example of enabling audio channels. Channel 1 is defined for the Russian-speaking group of participants; channel 2 for the English-speaking group. The third column lists the abbreviations for the audio channels and defines the private audio channel. The zero audio channel (in the figure it is Original) is shared for all conference participants.
Audio channels in the participant settings
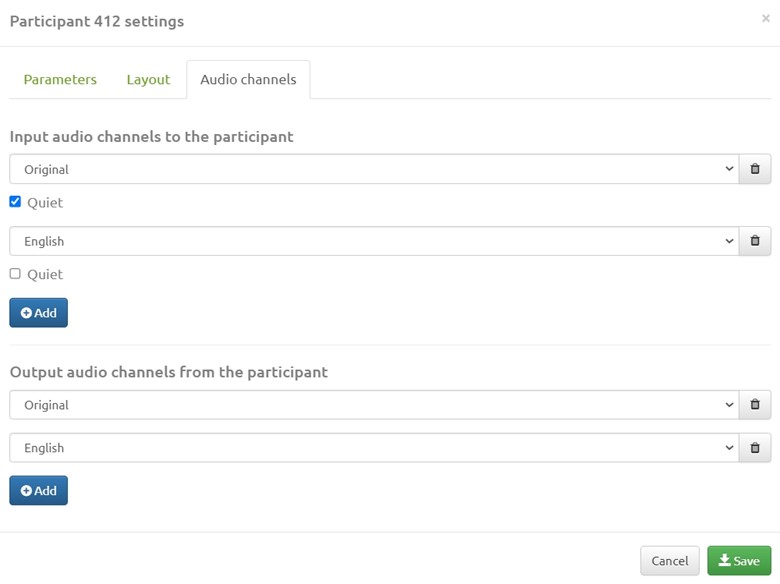
The "Participant settings" window is called up by clicking on the participant's screenshot area; there is the tab "Audio Channels". This tab displays incoming and outgoing audio channels. Clicking on the field with channels opens the list of audio channels involved in the conference. The interpreter is also shown a private audio channel (“Interpreter channel”).
The "Participant settings" window also has a "Quiet" parameter that allows you to reduce the volume of incoming audio channels relative to the participant's other audio channels by a specified amount. This parameter is set under the field with the name of the audio channel. After setting all parameters click the "Save" button.
Audio channel properties
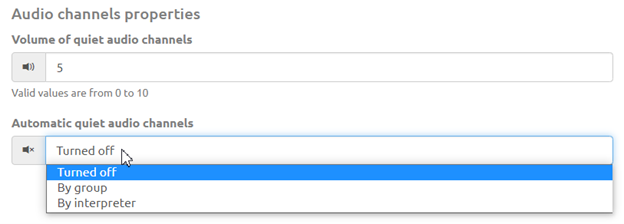
"Audio channels properties" is the block on the conference settings page where you can adjust the volume of quiet audio channels if the "Quiet" checkbox is checked in the "Conferences" section of the participant's properties. Below the quiet audio channel setting is the "Automatic quiet audio channels" setting.
Introducing the following scenario to understand how automatic quiet audio channels work. The conference is attended by English-speaking and Russian-speaking accounts, interpreters, as well as hall in which both English-speaking participants and Russian-speaking participants can act as speakers. Moreover, it is not known at what point in time and in what language they will speak. When a participant begins to speak Russian in the hall, there will be no sound from the interpreter who translates into Russian. The server recognizes the sound level of the Floor (Original) audio channel (absence of sound) and the volume level in the Russian audio channel is increased to 100%. When a participant speaks English in the hall the English interpreter is silent; the server increases the sound to 100% in the English audio channel. To implement such complex scenarios the “Automatic quiet audio channels” functionality was developed.
Also in the "Automatic quiet audio channels" field you can select the option to apply this setting: to a specific language group of participants, to the interpreter's audio channel or disable this functionality. The sound level can be regulated; the minimum volume level of the audio channels is 0 and the maximum volume is 10. We recommend setting the volume level to 5 as shown in the figure. Click the button at the bottom right of the page to save your settings.
Assigning the interpreter
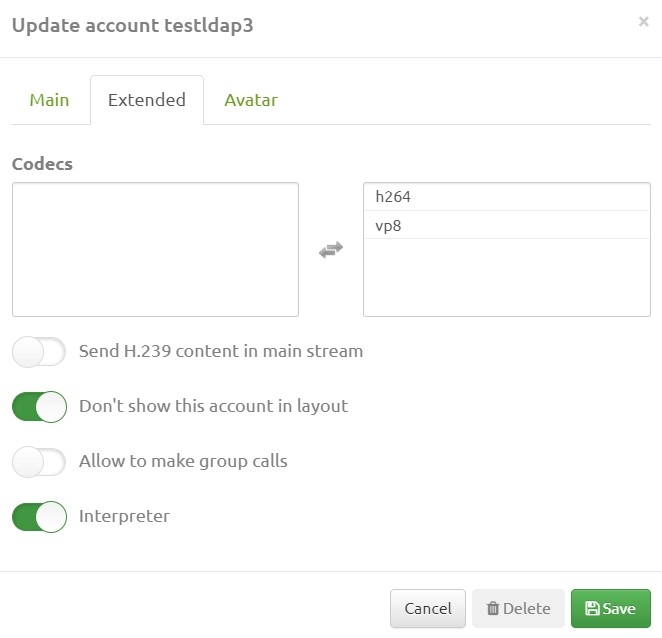
To assign the selected subscriber as an interpreter the moderator needs to select the desired account on the page of the same name and by clicking on this account open the editing window. Then on the "Extended" tab turn on the "Interpreter" toggle. You can also turn on the "Don't show this account in layout" toggle if the participants should not see the interpreter during the conference. Then you need to click the "Save" button in the lower right part of the window.
Selecting audio channels in the web client
The functionality of switching of audio channels by a participant during a conference is also available in the web client. At the bottom of the control panel is the button that has a tooltip “Audio channel setting”. Pressing it calls up the window with audio channels defined for this conference and their abbreviations. The conference participant can choose which audio channel he will receive sound from. By default, the shared audio channel (Original) is selected. It is possible to unmute audio when the microphone is turned off (the first button on the left in the pop-up panel). To do this press and hold the Spacebar or press Alt+A hotkeys.
Selecting audio channels in Vinteo Desktop
Account interface
In this software the choice of audio channels by the account is carried out by pressing the button for setting audio channels. In the window above the button you can select one of the channels defined by the moderator; shared audio channel (Original) is set by default.
Order of audio channels managing in the translator's workplace
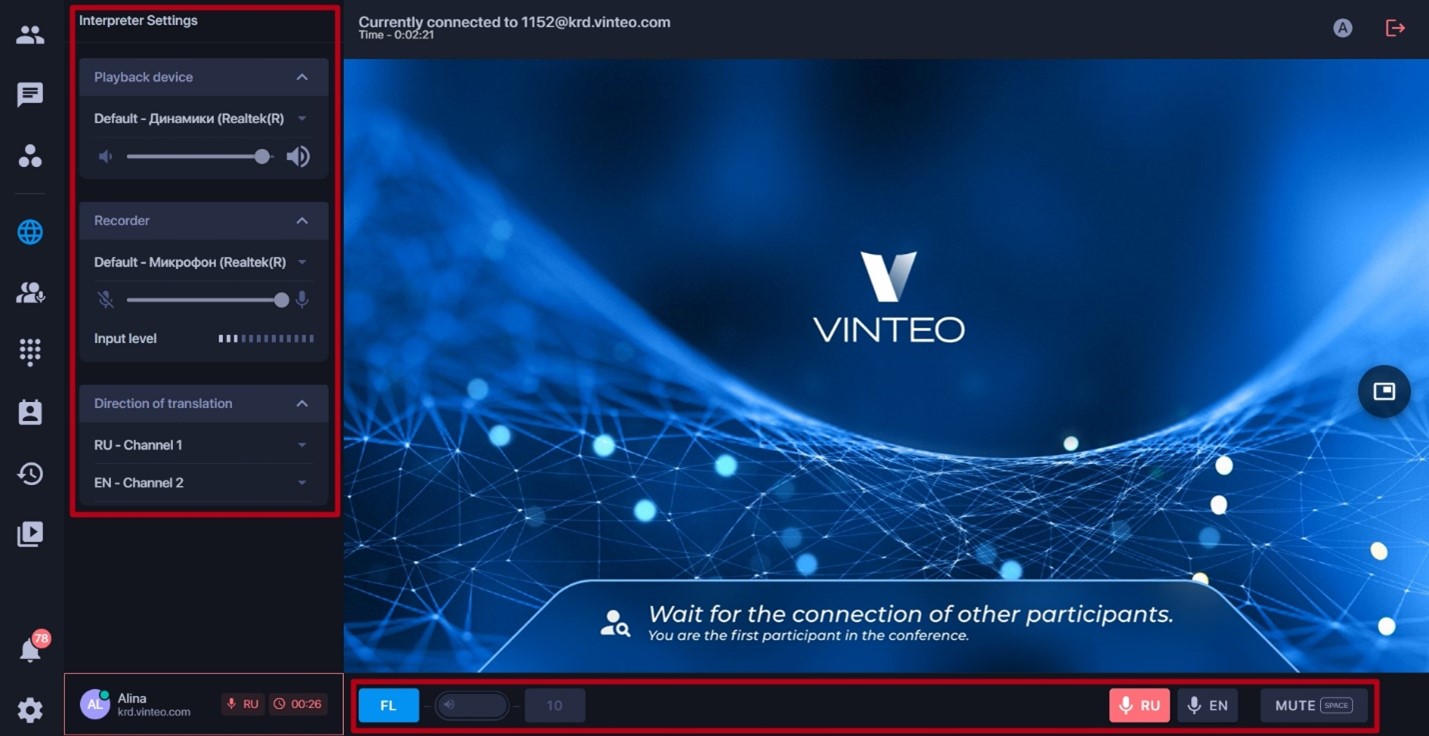
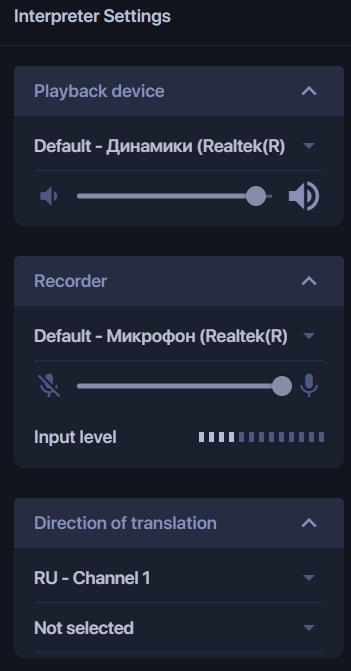
When working an interpreter can perform simultaneous translation in one direction (for example, listens to Russian and simultaneously translates into English) or can perform consecutive or simultaneous translation in both directions. Depending on the operating mode audio channels in the translator's workplace are configured differently in Vinteo Desktop. After connecting to the conference using Vinteo Desktop, the interpreter needs to select translation directions from the list of public audio channels of the conference, i.e. it is necessary to point which languages the translator will translate into in the current videoconferencing. The selected channels will appear on the control panel.
Setting up audio channels for one direction translation
When joining a conference in Vinteo Desktop on the Direction of translation panel the interpreter selects only one audio channel to interpret.
At the bottom on the panel the button to control the microphone with the abbreviation of the channel name will appear. To start the translation the translator needs to press the button, the button should change color to red which corresponds to the switched on microphone for this audio channel. To temporarily mute the microphone press and hold the Mute button.
Setting up two-way translation audio channels
After connecting to the conference using Vinteo Desktop the translator needs to select two directions of translation from the list of public audio channels of the conference, that is it is necessary to specify which languages the translator will translate into in the current video conferencing.
In this example the interpreter translates from English into Russian and vice versa.
The selected channels will appear on the control panel.
When the conference participant starts speaking in English the interpreter needs to press the RU button on the right side of the control panel to turn on his microphone and start interpretation with the sound directed to the Russian channel. The button will turn red thus indicating the activation of the microphone for the Russian channel and the audio channel activity timer will appear on the left side of the control panel.
To start translation in the opposite direction (listen to the Russian audio channel and translate into English) the interpreter needs to press the EN button, it turns red and the RU button turns black which means that the microphone has switched to the English audio channel.
In this way bi-directional translation is achieved by alternately activating the audio channels.
To temporarily mute the microphone press and hold the Mute button.
Working with a private audio channel
The private audio channel allows translators working in the same team to replace each other. When an interpreter speaks into the interpreter audio channel, the other interpreter hears his colleague through the private audio channel. To work this function the Vinteo server conference moderator needs to make the following settings on the conference management page:
- enable private audio channels In the Audio channels section according to the number of translation teams. Each translation team will have a separate audio channel. Assign titles to audio channels if necessary
- in the "Conference management" section in the "Participant settings" connect private audio channels for interpreters in accordance with their team.
To replace an interpreter the substitute must have a private audio channel activated (TM in this example, - the name is determined by the moderator) to hear his colleague while the translation audio channels are automatically deactivated.
At moment of substitution by translators for each other the one who replaces activates and the one who is replaced deactivates the translation audio channel.
The ways to mute the microphone
If necessary the interpreter can make a short pause by holding the Mute button.
While holding down the Mute button, public and private audio channels are deactivated (the interpreter's microphone is completely turned off). To disable the microphone for a long time deactivate the translation audio channels.
Broadcast and recording
Audio from the zero channel gets into the audio track of the recording and broadcast of the conference. If it is necessary to record a conference or broadcast it separately in each language then the moderator creates additional conferences and makes a local quick call from the main conference to the newly created ones. In the main conference for these outgoing connections assigns the corresponding of the language audio channel.
