VD - Quick start: различия между версиями
Alina (обсуждение | вклад) |
Alina (обсуждение | вклад) |
||
| Строка 58: | Строка 58: | ||
In the example below, the "HD Webcam" is assigned as a source (first source), and the "Logitech Webcam C920" is available (second source). If the first camera is being used by another application, at startup or expanding VD will report the problem: | In the example below, the "HD Webcam" is assigned as a source (first source), and the "Logitech Webcam C920" is available (second source). If the first camera is being used by another application, at startup or expanding VD will report the problem: | ||
[[Файл:VD Quick start 4.jpg|800px|безрамки|центр|VD Quick start 4]] | [[Файл:VD Quick start 4.jpg|800px|безрамки|центр|VD Quick start 4]] | ||
| + | There are two options for further work: | ||
| + | 1. close the warning and select the second video source; | ||
| + | 2. find and close the application that uses the camera; minimize and expand the VD window. The selected camera will be automatically restored and you can work on. | ||
| + | A way to find the app that uses the camera or microphone: | ||
| + | |||
| + | Windows 10: Settings - Privacy - Camera or Microphone; | ||
| + | Windows 11: Settings - Privacy and Security - Camera or Microphone. | ||
| + | |||
| + | Issue 3 | ||
| + | Access to a webcam and/or microphone is not allowed in the OS. | ||
| + | |||
| + | '''The app response behavior''' | ||
| + | |||
| + | When you launch or expand the VD window, it will report the problem: | ||
| + | [[Файл:VD Quick start 5.jpg|800px|безрамки|центр|VD Quick start 5]] | ||
| + | There is only one solution to the problem, as it is restricted to make the call: close the message, allow the microphone and camera in the OS privacy and security settings, minimize - expand the application and continue further work. | ||
| + | |||
| + | To allow access to the camera and microphone for Windows 10 you should go to "Settings" -> "Privacy" -> "Camera" or "Microphone", and for Windows 11: "Settings" -> "Privacy and Security" -> "Camera" or "Microphone". On this page you need to check both general permission to access devices and directly to the VD client. | ||
Текущая версия на 19:03, 6 сентября 2024
Vinteo Desktop client settings Detailed installation and configuration instructions of the Vinteo Desktop client (hereinafter, VD) are available at the following link
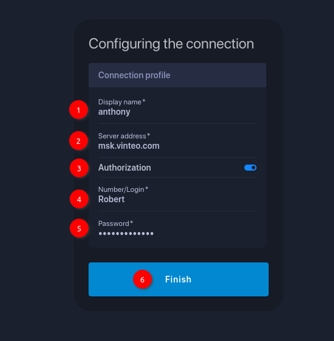
After installing and running the "Vinteo Desktop" client you have to fill in a server address and authorization settings in “Configuring the connection" panel. If there are no problems with audio and video devices you will directly start with it.
The numbers in the figure correspond to the followed algorithm points:
1. enter the account’s name/alias;
2. enter the server address where the WS type account is created;
3. select the "Authorization" option;
4. enter the account's number/login;
5. enter the password;
6. press the "Finish" button, it will become active and change color to blue if the entered data is correct.
Other settings can be changed later. If you have problems with the devices (their absence or unavailability), the application will warn you about it.
You can find the solution to the problems with both the web-client and the application client below, in the chapter "Emerging issues and their solutions".
Emerging issues and their solutions
Various obstacles may happen in working with a client. VD can solve some of them itself informing you about it, and some require you to participate. Below are some examples of issues and their solutions.
Issue 1
There are no webcam and microphone in the system.
The app response behavior
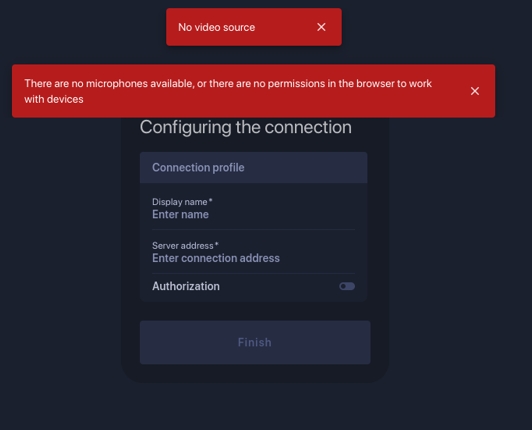
In this case at the application first launch, VD will set the "No Camera" and "No Microphone" modes by itself and warn you with "No video source", "There are no microphones available...". At subsequent launches the client will also inform about the absence of audio and video capture devices in the system.
There are next options for further work:
1. close the warning notification, fill in required forms, click "Finish" and continue without webcam and microphone. Other participants will only see your stub image, including the one you set as avatar (you can upload your own photo). You will be able to see and hear conference process or write to the chat if it is enabled, as well as demonstrate a presentation if necessary.
2. connect either a webcam or just a microphone so you will be able to communicate with conference participants one or another way.
Issue 2
A webcam has been assigned, but it is currently occupied by another application.
VD response actions when there is only one webcam available
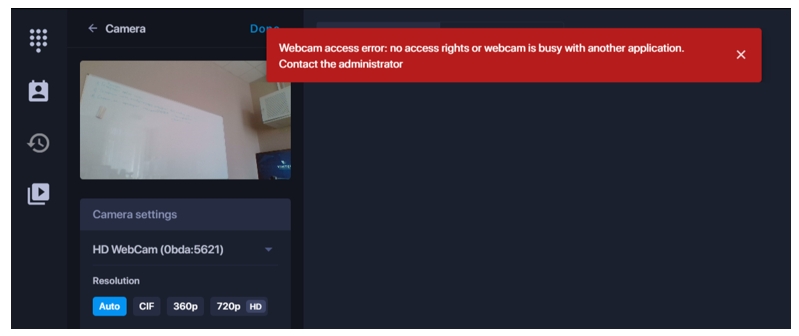
When you launch or expand the application, VD will warn you with the message: “Webcam access error: no access rights or webcam is busy with another application. Contact the administrator” and work on with the "No Camera" mode.
There are two options for further work:
1. close the error message and continue without the camera;
2. find and close the application that uses the camera. The selected camera will be automatically restored and you can continue the work.
VD response behavior when multiple sources are present
In the example below, the "HD Webcam" is assigned as a source (first source), and the "Logitech Webcam C920" is available (second source). If the first camera is being used by another application, at startup or expanding VD will report the problem:
There are two options for further work: 1. close the warning and select the second video source; 2. find and close the application that uses the camera; minimize and expand the VD window. The selected camera will be automatically restored and you can work on. A way to find the app that uses the camera or microphone:
Windows 10: Settings - Privacy - Camera or Microphone; Windows 11: Settings - Privacy and Security - Camera or Microphone.
Issue 3 Access to a webcam and/or microphone is not allowed in the OS.
The app response behavior
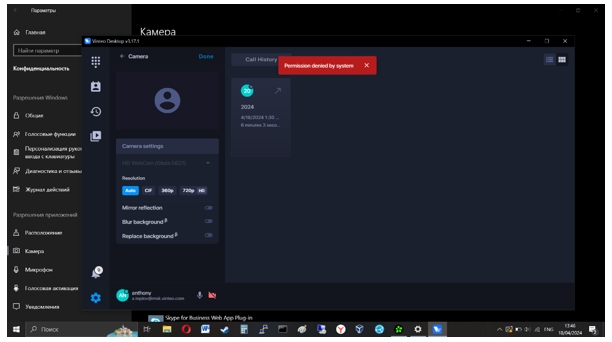
When you launch or expand the VD window, it will report the problem:
There is only one solution to the problem, as it is restricted to make the call: close the message, allow the microphone and camera in the OS privacy and security settings, minimize - expand the application and continue further work.
To allow access to the camera and microphone for Windows 10 you should go to "Settings" -> "Privacy" -> "Camera" or "Microphone", and for Windows 11: "Settings" -> "Privacy and Security" -> "Camera" or "Microphone". On this page you need to check both general permission to access devices and directly to the VD client.


