Video conference terminal web interface: различия между версиями
Alina (обсуждение | вклад) (Новая страница: «This section describes the process of setting up special software of a video conferencing terminal to connect to a VCS. Access to the web interface is default en...») |
Alina (обсуждение | вклад) |
||
| (не показано 59 промежуточных версий этого же участника) | |||
| Строка 1: | Строка 1: | ||
This section describes the process of setting up special software of a video conferencing terminal to connect to a VCS. | This section describes the process of setting up special software of a video conferencing terminal to connect to a VCS. | ||
| − | Access to the web interface is default enabled. To disable web access uncheck the box in the terminal settings: | + | Access to the web interface is default enabled. To disable web access uncheck the box in the terminal settings: |
| − | <font color = 'green'>Menu - System settings - Access - Web access.</font> | + | |
| − | + | <font color = 'green'>Menu - System settings - Access - Web access.</font> | |
== Getting started with the application == | == Getting started with the application == | ||
To enter the functional menu you need: | To enter the functional menu you need: | ||
| − | + | *launch a web browser; | |
| − | + | *enter the IP address of the video terminal in the address bar. The login page will open. | |
| − | + | *choose interface language; | |
| − | + | *check it out you have selected the Sign in button. | |
| − | + | *enter the account name to the Enter your login string. Default is admin. | |
| − | + | *enter your password to the string below. Default is 123. | |
| − | + | Click the <font color = 'green'>Submit</font> button. The main window of the terminal will open. | |
| − | + | [[Файл:Vinteo Terminal1.jpg|400px|безрамки|центр|Terminal1]] | |
| − | + | To finish working with the interface close the web browser or click the <font color = 'green'>Logout</font> button in the lower left part of the screen. | |
| − | + | ||
| − | + | == Sidebar == | |
| − | + | Sidebar allows you to go to main web interface pages such as <font color = 'green'>Terminal, Contacts, Reports, System.</font> | |
| − | + | If you click on the Vinteo logo or shrink the window, the side menu will hide. At the bottom of the menu, two options are available: log out of the account and set it up to change the password. | |
| − | Click the | + | [[Файл:Vinteo Terminal 3.1.jpg|300px|безрамки|центр|Terminal 3.1.jpg]] |
| + | |||
| + | == Terminal == | ||
| + | <font color = 'green'>Terminal</font> page displays the image from the connected camera, the main indicators of the use of system resources, registration on the servers. You can call an account by number, view current calls, call history, dial a player, download video or video stream from an IP camera. | ||
| + | |||
| + | Two sliders are located below the video conferencing screen. They allow you to control the speaker and microphone volume. The camera controls are located at the bottom of the page. They allow you to remotely change the camera angle, its position in the horizontal and vertical planes, enlarge or reduce the image. | ||
| + | [[Файл:Vinteo и Terminal4.jpg|800px|безрамки|центр|Terminal4]] | ||
| + | |||
| + | '''Calling an account manually''' | ||
| + | *Choose the <font color = 'green'>Manual</font> dial way of calling the account. | ||
| + | *Choose one of connect protocols: SIP, H.323, Local or Auto. | ||
| + | *Enter the account number. | ||
| + | *Choose the video stream resolution. | ||
| + | *Choose the data baud rate. | ||
| + | *Choose the frame rate. | ||
| + | *Click <font color = 'green'>Call</font> button. | ||
| + | [[Файл:Vinteo Terminal 5.jpg|800px|безрамки|центр|Terminal 5]] | ||
| + | |||
| + | '''Calling the account from the address book''' | ||
| + | |||
| + | *Choose the account. | ||
| + | *Choose the video stream resolution. | ||
| + | *Choose the data baud rate. | ||
| + | *Choose the frame rate. | ||
| + | *Click <font color = 'green'>Call</font> button. | ||
| + | [[Файл:Vinteo и Terminal6.jpg|800px|безрамки|центр|Terminal6]] | ||
| + | ''To call an account from the call history, go to the <font color = 'green'>History</font> tab and click on the button with the phone image.'' | ||
| + | [[Файл:Vinteo и Terminal7.jpg|600px|безрамки|центр|Terminal7]] | ||
| + | |||
| + | == Contacts == | ||
| + | Contacts page is the local address book of the terminal which allows you to add new accounts. | ||
| + | [[Файл:Contacts - Terminal8.jpg|800px|безрамки|центр|Terminal8]] | ||
| + | It is possible to search the address book by entering the account's number or part of his name. Added the ability to increase the number of displayed strings on the page. | ||
| + | [[Файл:Contacts - Terminal9.jpg|800px|безрамки|центр|Terminal9]] | ||
| + | To create a new contact click the <font color = 'green'>New contact</font> button. Then the form for creating a new address book contact will open. In the form for adding a contact you need enter: | ||
| + | *the contact name; | ||
| + | *connection type. SIP, H.323 and Auto allowed; | ||
| + | *the number; | ||
| + | *selected contact; | ||
| + | click the <font color = 'green'>Add</font> button. | ||
| + | [[Файл:Contacts - Vinteo Terminal10.jpg|400px|безрамки|центр|Terminal10]] | ||
| + | If you want to import contacts click the <font color = 'green'>Import contacts</font> button. Then choose the file you need to import and click the <font color = 'green'>Import</font> button. If you want to export contacts click the <font color = 'green'>Export contacts</font> button. | ||
| + | |||
| + | If there are several Vinteo video terminals in the contact book within one video conferencing server, then they are assigned the presence status. Presence statuses values: | ||
| + | |||
| + | *<font color = 'grey'>Grey</font> color means default status; | ||
| + | *<font color = 'gold'>Yellow</font> color means that the terminal is on but in call mode; | ||
| + | *<font color = 'red'>Red</font> color means the terminal is on, but do not disturb mode is activated; | ||
| + | *<font color = 'green'>Green</font> color means that the terminal is turned on and available for calls. | ||
| + | |||
| + | == Logs == | ||
| + | The <font color = 'green'>Logs</font> page is located on the functional panel on the left in the list of the <font color = 'green'>Reports</font> section. | ||
| + | The following information is displayed on the Logs page: | ||
| + | *report on each conference; | ||
| + | *conference parameters; | ||
| + | *used codecs; | ||
| + | *parameters of participants; | ||
| + | *other technical information about conference. | ||
| + | [[Файл:Logs - Vinteo Terminal11.jpg|800px|безрамки|центр|Terminal11]] | ||
| + | To view reports for a certain period you need: | ||
| + | *specify a period from to in the filter strings; | ||
| + | *click on the <font color = 'green'>Search</font> button. | ||
| + | [[Файл:Logs - Vinteo Terminal12.jpg|800px|безрамки|центр|Terminal12]] | ||
| + | You can view the logs in a browser window or download them. | ||
| + | Use the button with the sheet image to view logs. Use the button with the arrow to download logs. | ||
| + | [[Файл:Logs - Vinteo Terminal13.jpg|800px|безрамки|центр|Terminal13]] | ||
| + | |||
| + | == Reports page== | ||
| + | The Reports page contains information about the technical state of the system, the time of the system reboot, reports on system errors, failures and other data. | ||
| + | [[Файл:System - Vinteo Terminal14.jpg|800px|безрамки|центр|Terminal14]] | ||
| + | To view reports for a certain period you need: | ||
| + | *specify a period from to in the filter strings; | ||
| + | *click on the Search button. | ||
| + | |||
| + | You can view the logs in a browser window or download them. | ||
| + | Use the button with the sheet image to view logs. Use the button with the arrow to download logs. | ||
| + | |||
| + | '''Errors item on the functional panel''' | ||
| + | When you click to the Errors item of the list of the functional panel, the data file is exported. You need to send this file to Vinteo at the request of the technical support staff. | ||
| + | |||
| + | == Status page == | ||
| + | Status page allows you to view the main information about the terminal such as: | ||
| + | *volume, free space and space occupied by videos on the hard drive; | ||
| + | *system time; | ||
| + | *terminal uptime; | ||
| + | *current firmware version. | ||
| + | [[Файл:System - Vinteo Terminal15.jpg|800px|безрамки|центр|Terminal15]] | ||
| + | |||
| + | == Videos page == | ||
| + | On the "Videos" page, videos are added in the following formats: .mp4, .mov, .m4v, .mkv, .flv, .wmv, .avi to display them as an additional stream in the conference.<br> | ||
| + | '''The size of uploaded videos should not exceed 100MB.''' | ||
| + | [[Файл:Videos - Vinteo Terminal16.jpg|800px|безрамки|центр|Terminal16]] | ||
| + | To add a video, you need to click in the upper right corner of the screen, then fill in the <font color = 'green'>Title</font> bar and <font color = 'green'>Description</font> field and select the file. Click the <font color = 'green'>Add</font> button after this button becomes active. | ||
| + | [[Файл:Videos - Vinteo Terminal17.jpg|800px|безрамки|центр|Terminal17]] | ||
| + | You can change the display style of files: a list or a grid. | ||
| + | To delete a video click on the button with the image of the basket. In order to edit the previously uploaded video click on the button with the image of a pencil. | ||
| + | |||
| + | == The main settings of the terminal == | ||
| + | === Main tab === | ||
| + | On the main settings tab you can change: | ||
| + | *firewall settings to deny access to SIP and H.323 ports from the local network; | ||
| + | *H.323 parameters signaling port, RTP port range, enabling authorization by login / password; | ||
| + | *SIP, STUN parameters, ToS signaling port and STUN port; | ||
| + | *time and interface settings, language is default. | ||
| + | [[Файл:Settings - Vinteo Terminal17.jpg|800px|безрамки|центр|Terminal17]] | ||
| + | Firewall parameters work as an white list access. | ||
| + | If the list is empty access allowed from all networks visible to the terminal. If there is a single address or subnet address the access will be allowed only from addresses of this subnet. | ||
| + | [[Файл:Settings - Vinteo Terminal18.jpg|800px|безрамки|центр| Terminal18]] | ||
| + | Changing the signaling ports for H.323 and SIP requires the same values to be configured on other devices. | ||
| + | |||
| + | === Network interface settings === | ||
| + | Network interface settings tab allows you to configure the receiving IP address for network interface (automatic mode / manual input). In automatic mode from a DHCP server. | ||
| + | |||
| + | To configure IP address in manual you need to fill follow fields: | ||
| + | *IP | ||
| + | *Network mask | ||
| + | *Gateway | ||
| + | *DNS | ||
| + | *MTU | ||
| + | After that you need to click the <font color = 'green'>Save</font> button. | ||
| + | You can configure it with two network interfaces. | ||
| + | [[Файл:Settings - Vinteo Terminal19.jpg|800px|безрамки|центр|Terminal19]] | ||
| + | |||
| + | === Routs === | ||
| + | The Routes tab browses automatically determined routes and assigns additional routes. | ||
| + | [[Файл:Settings - Vinteo Terminal20.jpg|800px|безрамки|центр|Terminal20]] | ||
| + | If you want to determine a new route click the Add route button. In the modal window specify: | ||
| + | *destination address; | ||
| + | *mask and gateway through which the destination address is available. | ||
| + | Choose the interface for connection to the gateway. | ||
| + | Click the <font color = 'green'>Add</font> button. | ||
| + | [[Файл:Settings - Vinteo Terminal21.jpg|800px|безрамки|центр|Terminal21]] | ||
| + | The interface which you add displayed in the <font color = 'green'>Assigned</font> routes list. To delete the route click the trash image button. | ||
| + | |||
| + | === NAT === | ||
| + | The NAT tab allows you to configure the device if the device is located behind NAT. To do it specify the external IP address of the upstream device, local networks, assign the port range for the RTP protocol. | ||
| + | [[Файл:Settings - Vinteo Terminal22.jpg|800px|безрамки|центр|Terminal22]] | ||
| + | Enter the external address of the network device in the External IP field. Enter all subnet addresses that do not require external IP substitution in the <font color = 'green'>Local networks</font> field. | ||
| + | |||
| + | It is necessary to forward the SIP, H.323 ports and the RTP port range in the NAT configuration on the network device. | ||
| + | |||
| + | === Incoming === | ||
| + | The maximum allowable number of digits of the number is indicated incoming calls from which are blocked and IPs are automatically added to the black list. | ||
| + | |||
| + | It is possible to activate the black list which will block all traffic from addresses which are added in the black list. | ||
| + | *Click the <font color = 'green'>Add</font> button. | ||
| + | *Enter IP address. | ||
| + | *Click the <font color = 'green'>Save</font> button. | ||
| + | [[Файл:Settings - Vinteo Terminal23.jpg|800px|безрамки|центр|Terminal23]] | ||
| + | |||
| + | === Codecs === | ||
| + | Codecs is the tab with lists of audio and video codecs supported by the account's device. The list on the left contains codecs which are available for use. On the right - the selected codecs for connection. | ||
| + | |||
| + | *If the field is empty, the default codecs in the database are used. | ||
| + | *If you have selected any codecs they will be applied. For example, if you have selected only audio codecs then the video stream will not be processed. | ||
| + | |||
| + | Be careful when choosing codecs. If you want to use the default codecs clear the field on the right. | ||
| + | [[Файл:Settings - Vinteo Terminal24.jpg|800px|безрамки|центр|Terminal24]] | ||
| + | === Terminal === | ||
| + | In the Terminal tab you can change the information about the terminal such as: | ||
| + | *the name of the kit; | ||
| + | *location; | ||
| + | *default protocol; | ||
| + | *resolution; | ||
| + | *bandwidth; | ||
| + | *FPS (frame frequency); | ||
| + | *bandwidth mode; | ||
| + | *maximum call duration; | ||
| + | *monitors and their resolutions; | ||
| + | *time to standby; | ||
| + | *cameras and their resolutions; | ||
| + | *possibility of choice of cameras roles; | ||
| + | *turning on/off the auto answer; | ||
| + | *auto answer time; | ||
| + | *turning off the microphone when auto answer; | ||
| + | *playback device; | ||
| + | *recorder device; | ||
| + | *enable echo cancellation; | ||
| + | *ringtone turning on/off; | ||
| + | *sound check button; | ||
| + | *<font color = 'green'>Do not disturb</font> mode; | ||
| + | *enable SIP and H.323. | ||
| + | [[Файл:Settings - Vinteo Terminal25.jpg|800px|безрамки|центр|Terminal25]] | ||
| + | === SIP registration === | ||
| + | Registration SIP tab serves for the connection parameters setting to the SIP server’s IP address, authorization and using codecs. | ||
| + | '''To register the terminal using only the terminal IP address. If the settings provide for authorization, you must enter the username and password in the appropriate strings. You can choose TCP protocol or UDP protocol the call will be carried out.''' | ||
| + | |||
| + | It is recommended to use the next codecs settings and data transfer protocol. | ||
| + | [[Файл:Settings - Vinteo Terminal26.jpg|800px|безрамки|центр|Terminal26]] | ||
| + | |||
| + | === H.323 registration === | ||
| + | Registration H.323 tab serves for the connection parameters setting to the H.323 server’s IP address, authorization and using codecs. | ||
| + | [[Файл:Settings - Vinteo Terminal27.jpg|800px|безрамки|центр|Terminal27]] | ||
| + | '''As with SIP settings to register the terminal using only the terminal IP address. If the settings provide for authorization, you must enter the username and password in the appropriate strings.''' | ||
| + | It is recommended to use the next codecs settings. | ||
| + | [[Файл:Settings - Vinteo Terminal28.jpg|800px|безрамки|центр|Terminal28]] | ||
| + | |||
| + | === Screensaver === | ||
| + | Images that are downloaded will be shown on the screen in the Screensaver tab while the terminal is in standby mode. In this tab you can configure the frequency of displaying the screensaver and enabling / disabling this function. | ||
| + | [[Файл:Settings - Vinteo Terminal29.jpg|800px|безрамки|центр|Terminal29]] | ||
| + | To add the screensaver you need to click the <font color = 'green'>Upload</font> button. Choose the needed image and click the <font color = 'green'>Upload</font> button. | ||
| + | [[Файл:Settings - Vinteo Terminal30.jpg|800px|безрамки|центр|Terminal30]] | ||
| + | In this tab you can configure the frequency of displaying the screensaver and enabling / disabling this function. | ||
| + | |||
| + | === Diagnostics === | ||
| + | The Diagnostics tab considers common utilities for diagnostic problems about local network connection. Utilities are giving below: | ||
| + | *Ping; | ||
| + | *Traceroute; | ||
| + | *Tcpdump; | ||
| + | *Logs utility logs a call for diagnostic problems when making a call. | ||
| + | [[Файл:Settings - Vinteo Terminal31.jpg|800px|безрамки|центр|Terminal31]] | ||
| + | |||
| + | === Power management === | ||
| + | 2 remaining tabs allow you to reboot and shutdown the power of the terminal. | ||
| + | |||
| + | == Licenses == | ||
| + | The special software of the video conference terminal is distributed under the license. On the Licenses page you can install the license of the terminal, view previously installed licenses and quantity of licenses available for a new participants connection. | ||
| + | |||
| + | ''One HD type license allows you to connect participants with different resolutions. One HD license allows you to connect participants at different resolutions. It will be shown below how licenses can be spent.'' | ||
| + | SD (576p / 30) audio and video connection will take 0.5HD license. | ||
| + | *The connection more than 576p / 30 and less than or equal to 720p / 30 will take a 1HD license. | ||
| + | подключение больше 720р/30 и меньше или равно 1080р/30 займет 2,5HD лицензии; | ||
| + | *The connection more than 720p/30 and less or equal 1080p/30 will take 2,5HD licenses. | ||
| + | |||
| + | '''The participant connection with video stream more than 30 frames per second will take 2x more HD licenses than this requires for connection with the same resolution and frequency before 30 frames per second.''' | ||
| + | [[Файл:Licenses - Vinteo Terminal31.jpg|800px|безрамки|центр|Terminal31]] | ||
| + | === License installation === | ||
| + | To install the license you need: | ||
| + | *request the quantity of license which you need; | ||
| + | *provide the unique installation ID; | ||
| + | *enter the code in the Activation code field; | ||
| + | *click the <font color = 'green'>Activate</font> button. | ||
| + | In the Current license block is displayed the quantity HD and FullHD licenses. | ||
| + | |||
| + | === Update === | ||
| + | This page allows you to install firmware update. To install the file you need: | ||
| + | *click the <font color = 'green'>Choose file</font> button; | ||
| + | *choose the update file; | ||
| + | *click the <font color = 'green'>Upload</font> button. | ||
| + | |||
| + | '''Before updating switch off from the terminal all USB flash drivers.''' | ||
| + | [[Файл:Vinteo Update Terminal.jpg|800px|безрамки|центр|Update]] | ||
Текущая версия на 13:19, 17 сентября 2020
This section describes the process of setting up special software of a video conferencing terminal to connect to a VCS.
Access to the web interface is default enabled. To disable web access uncheck the box in the terminal settings:

Menu - System settings - Access - Web access.
Содержание
Getting started with the application
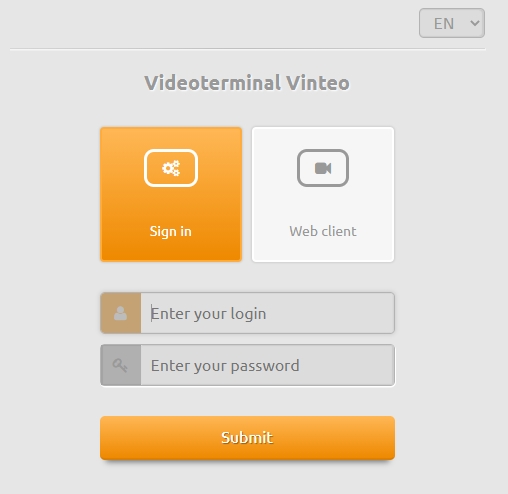
To enter the functional menu you need:
- launch a web browser;
- enter the IP address of the video terminal in the address bar. The login page will open.
- choose interface language;
- check it out you have selected the Sign in button.
- enter the account name to the Enter your login string. Default is admin.
- enter your password to the string below. Default is 123.
Click the Submit button. The main window of the terminal will open.
To finish working with the interface close the web browser or click the Logout button in the lower left part of the screen.
Sidebar
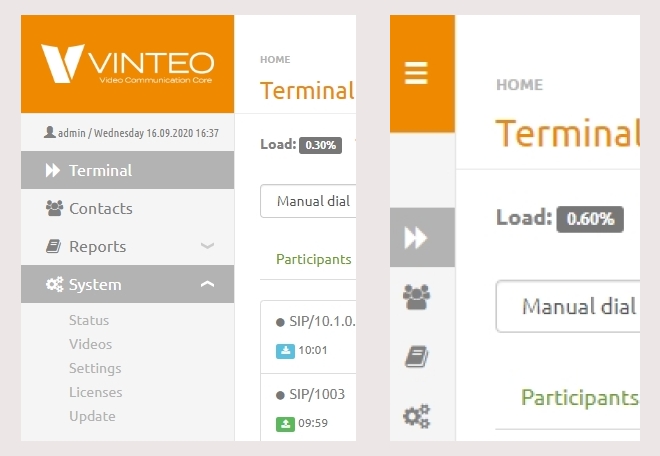
Sidebar allows you to go to main web interface pages such as Terminal, Contacts, Reports, System. If you click on the Vinteo logo or shrink the window, the side menu will hide. At the bottom of the menu, two options are available: log out of the account and set it up to change the password.
Terminal
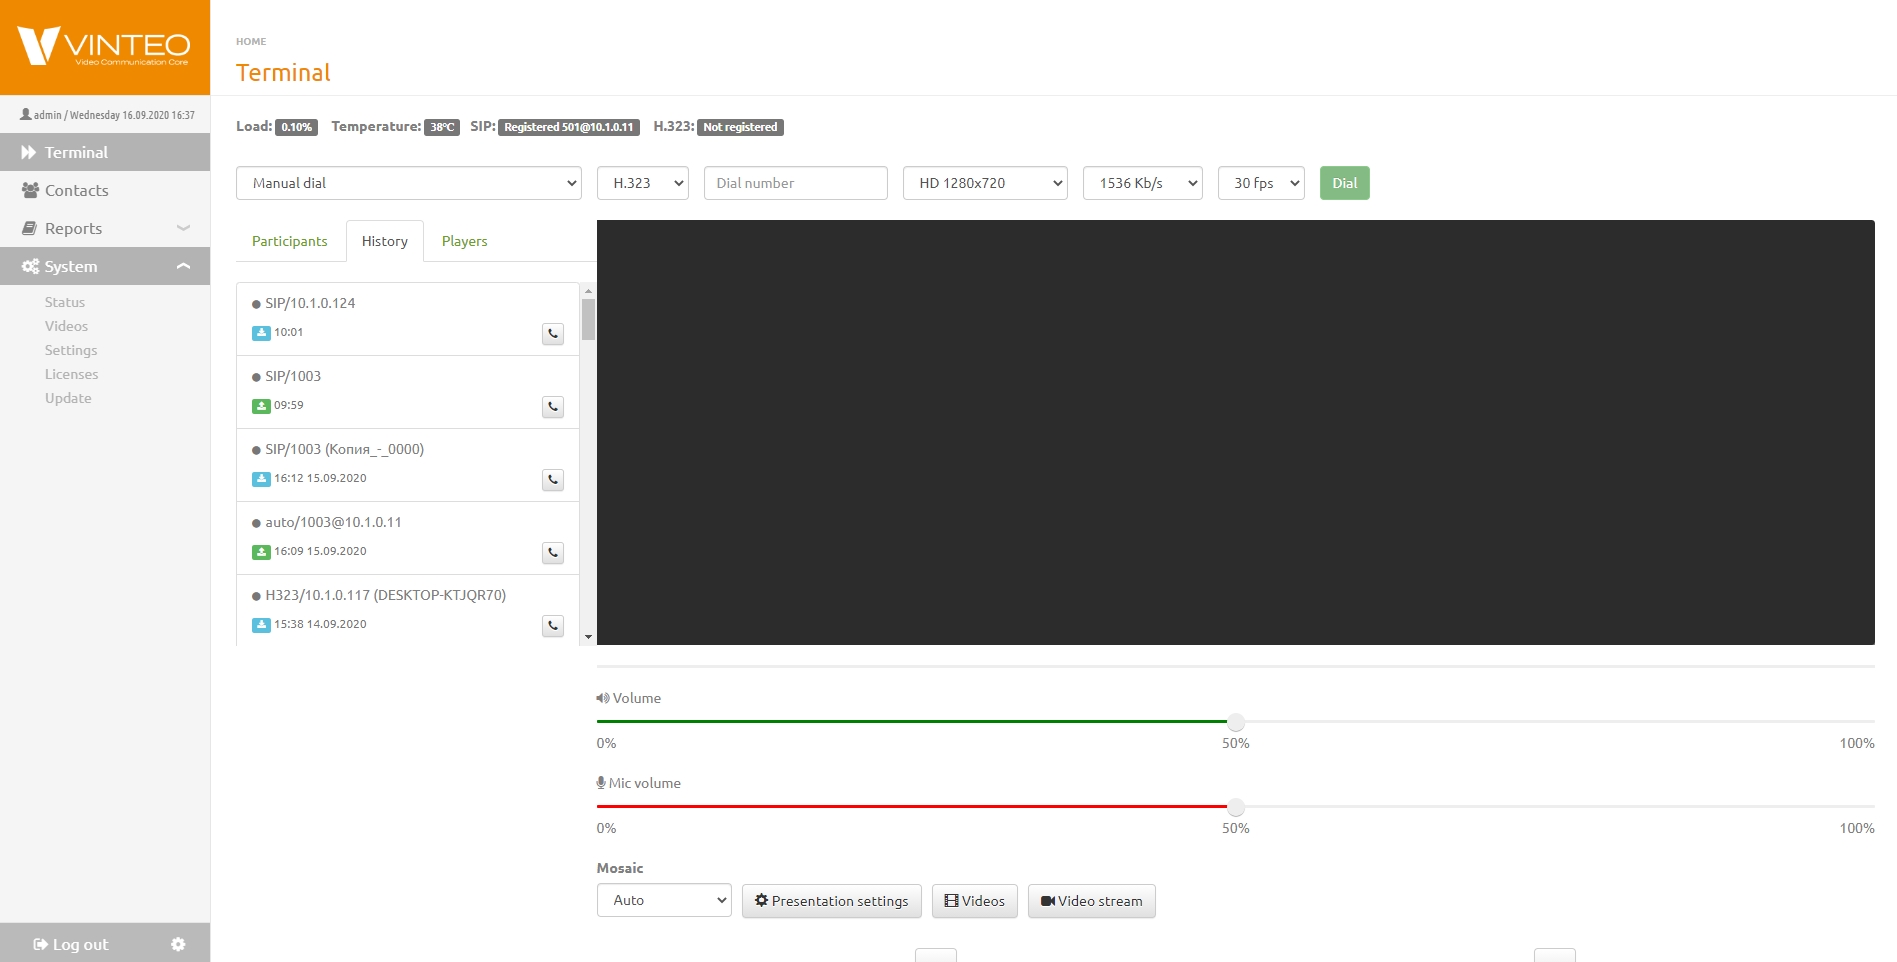
Terminal page displays the image from the connected camera, the main indicators of the use of system resources, registration on the servers. You can call an account by number, view current calls, call history, dial a player, download video or video stream from an IP camera.
Two sliders are located below the video conferencing screen. They allow you to control the speaker and microphone volume. The camera controls are located at the bottom of the page. They allow you to remotely change the camera angle, its position in the horizontal and vertical planes, enlarge or reduce the image.
Calling an account manually
- Choose the Manual dial way of calling the account.
- Choose one of connect protocols: SIP, H.323, Local or Auto.
- Enter the account number.
- Choose the video stream resolution.
- Choose the data baud rate.
- Choose the frame rate.
- Click Call button.
Calling the account from the address book
- Choose the account.
- Choose the video stream resolution.
- Choose the data baud rate.
- Choose the frame rate.
- Click Call button.
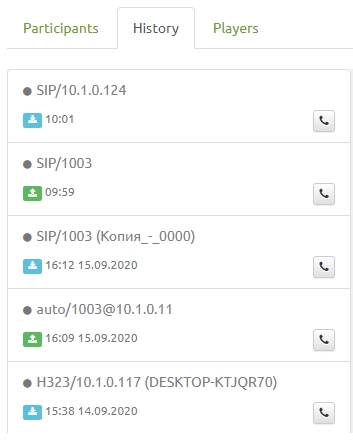
To call an account from the call history, go to the History tab and click on the button with the phone image.
Contacts
Contacts page is the local address book of the terminal which allows you to add new accounts.
It is possible to search the address book by entering the account's number or part of his name. Added the ability to increase the number of displayed strings on the page.
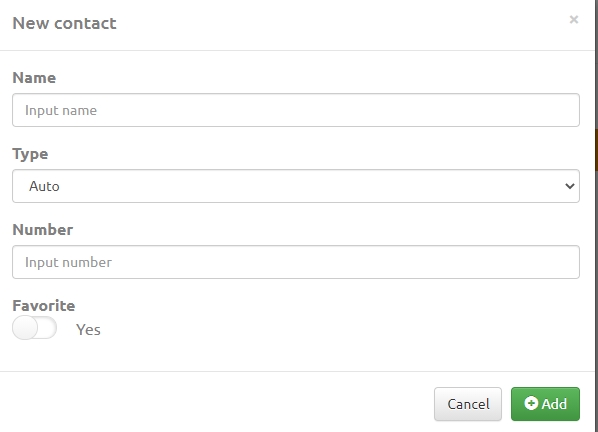
To create a new contact click the New contact button. Then the form for creating a new address book contact will open. In the form for adding a contact you need enter:
- the contact name;
- connection type. SIP, H.323 and Auto allowed;
- the number;
- selected contact;
click the Add button.
If you want to import contacts click the Import contacts button. Then choose the file you need to import and click the Import button. If you want to export contacts click the Export contacts button.
If there are several Vinteo video terminals in the contact book within one video conferencing server, then they are assigned the presence status. Presence statuses values:
- Grey color means default status;
- Yellow color means that the terminal is on but in call mode;
- Red color means the terminal is on, but do not disturb mode is activated;
- Green color means that the terminal is turned on and available for calls.
Logs
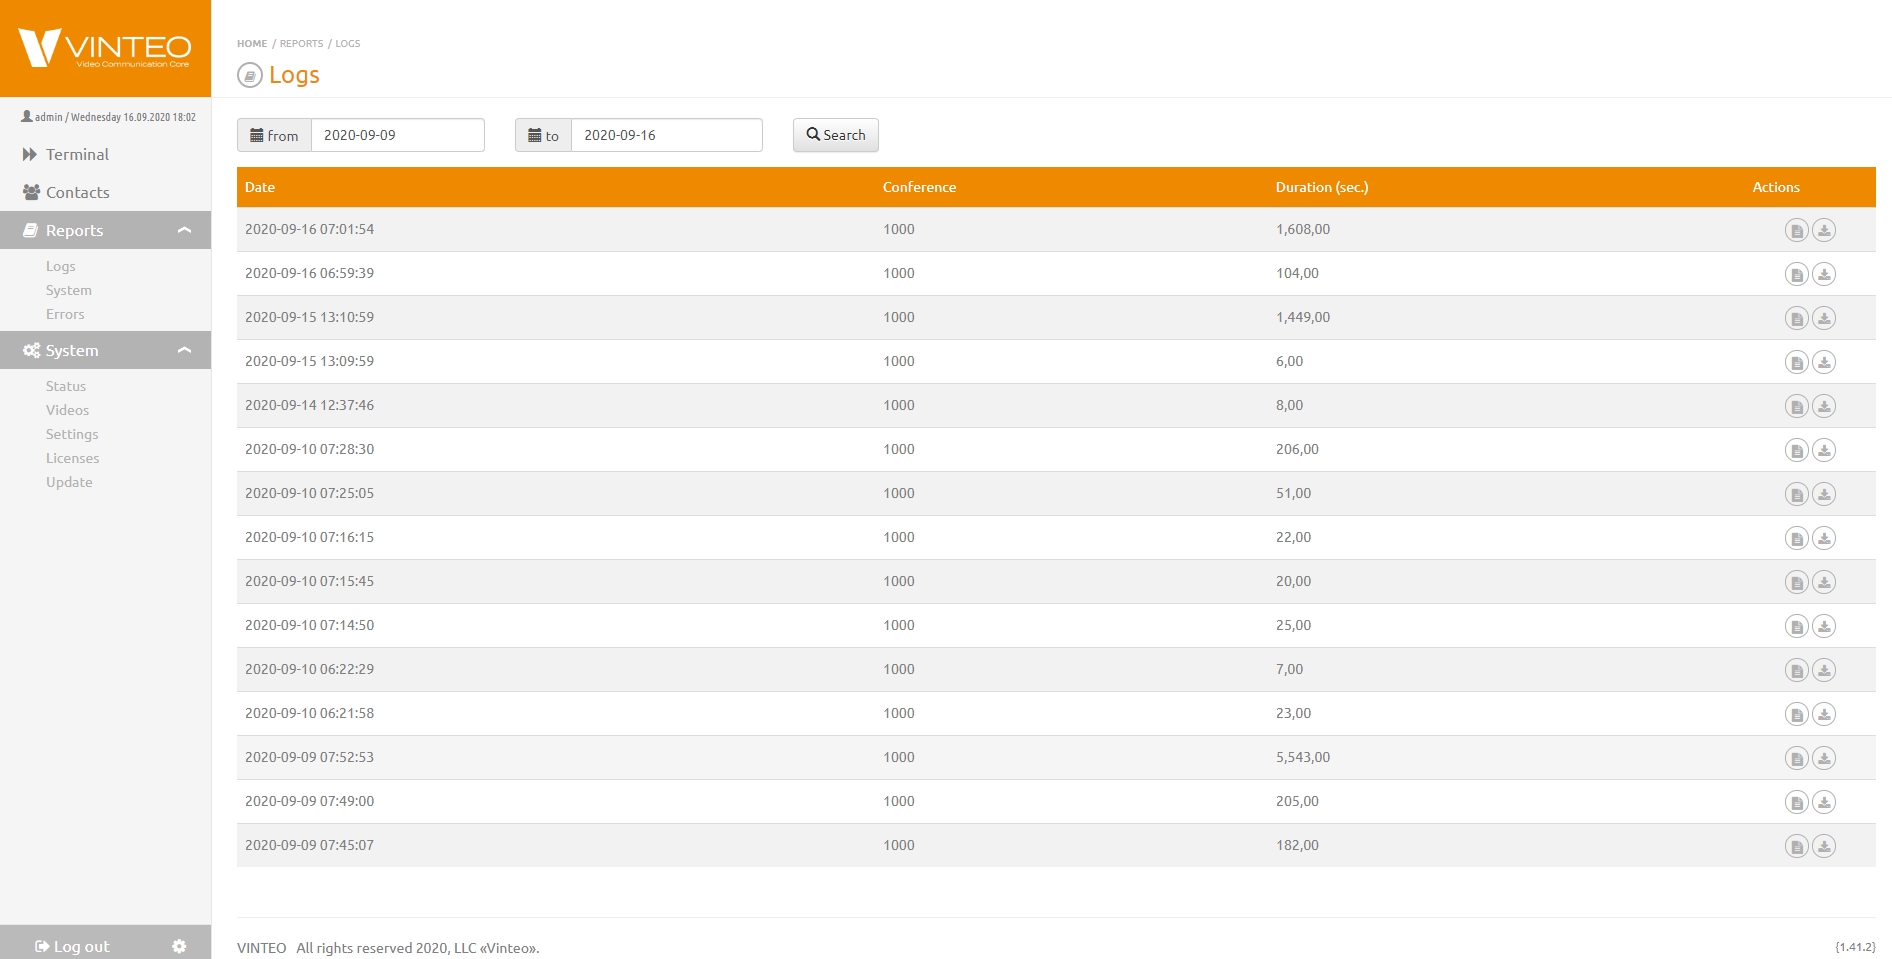
The Logs page is located on the functional panel on the left in the list of the Reports section. The following information is displayed on the Logs page:
- report on each conference;
- conference parameters;
- used codecs;
- parameters of participants;
- other technical information about conference.
To view reports for a certain period you need:
- specify a period from to in the filter strings;
- click on the Search button.
You can view the logs in a browser window or download them. Use the button with the sheet image to view logs. Use the button with the arrow to download logs.
Reports page
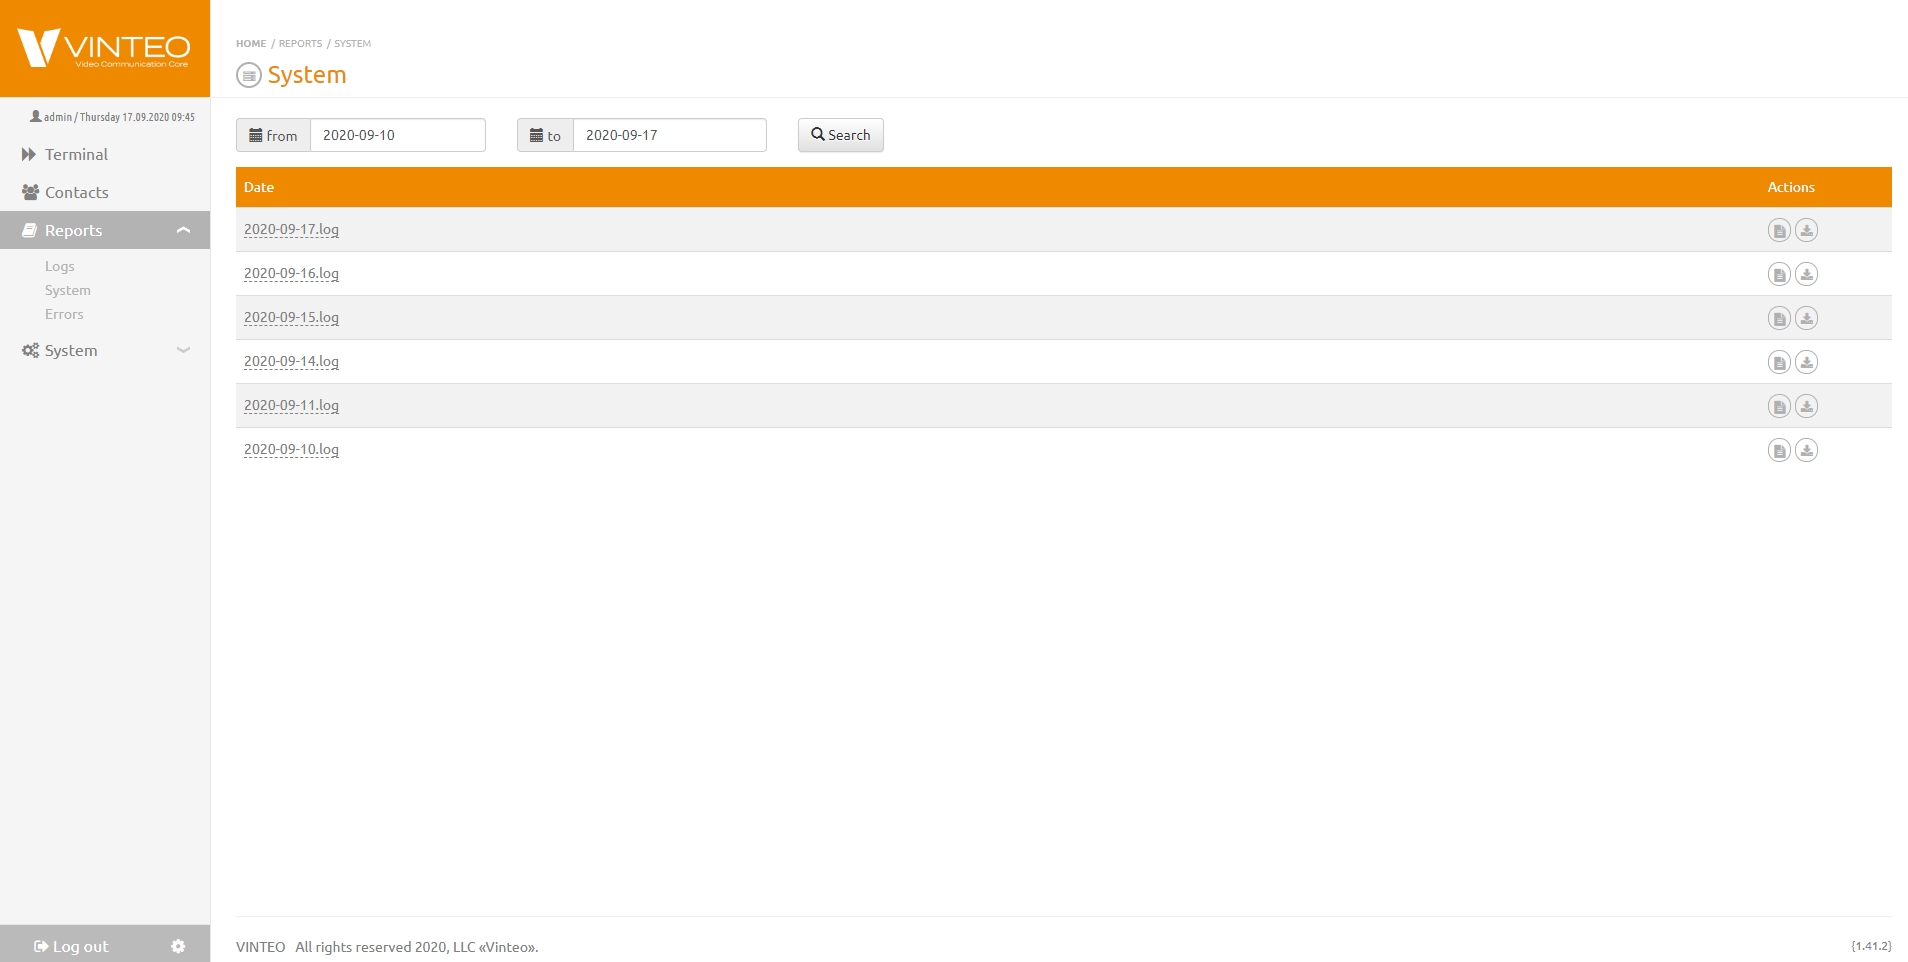
The Reports page contains information about the technical state of the system, the time of the system reboot, reports on system errors, failures and other data.
To view reports for a certain period you need:
- specify a period from to in the filter strings;
- click on the Search button.
You can view the logs in a browser window or download them. Use the button with the sheet image to view logs. Use the button with the arrow to download logs.
Errors item on the functional panel
When you click to the Errors item of the list of the functional panel, the data file is exported. You need to send this file to Vinteo at the request of the technical support staff.
Status page
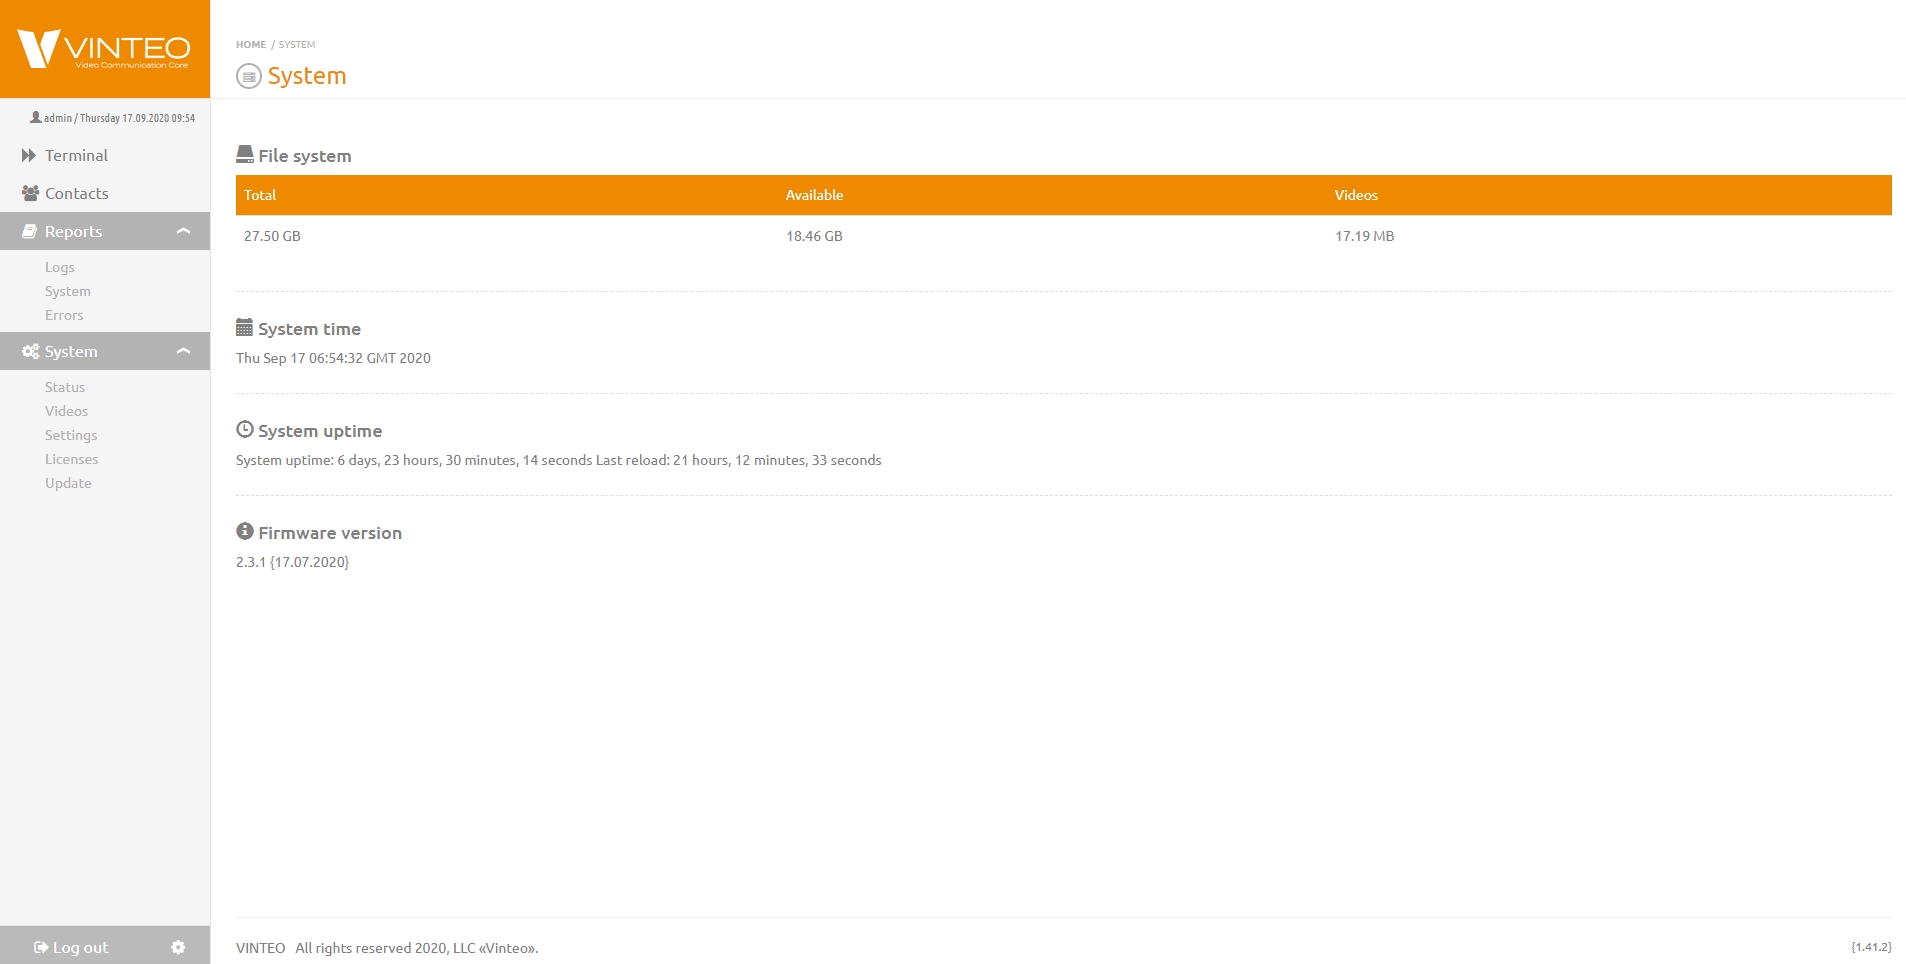
Status page allows you to view the main information about the terminal such as:
- volume, free space and space occupied by videos on the hard drive;
- system time;
- terminal uptime;
- current firmware version.
Videos page
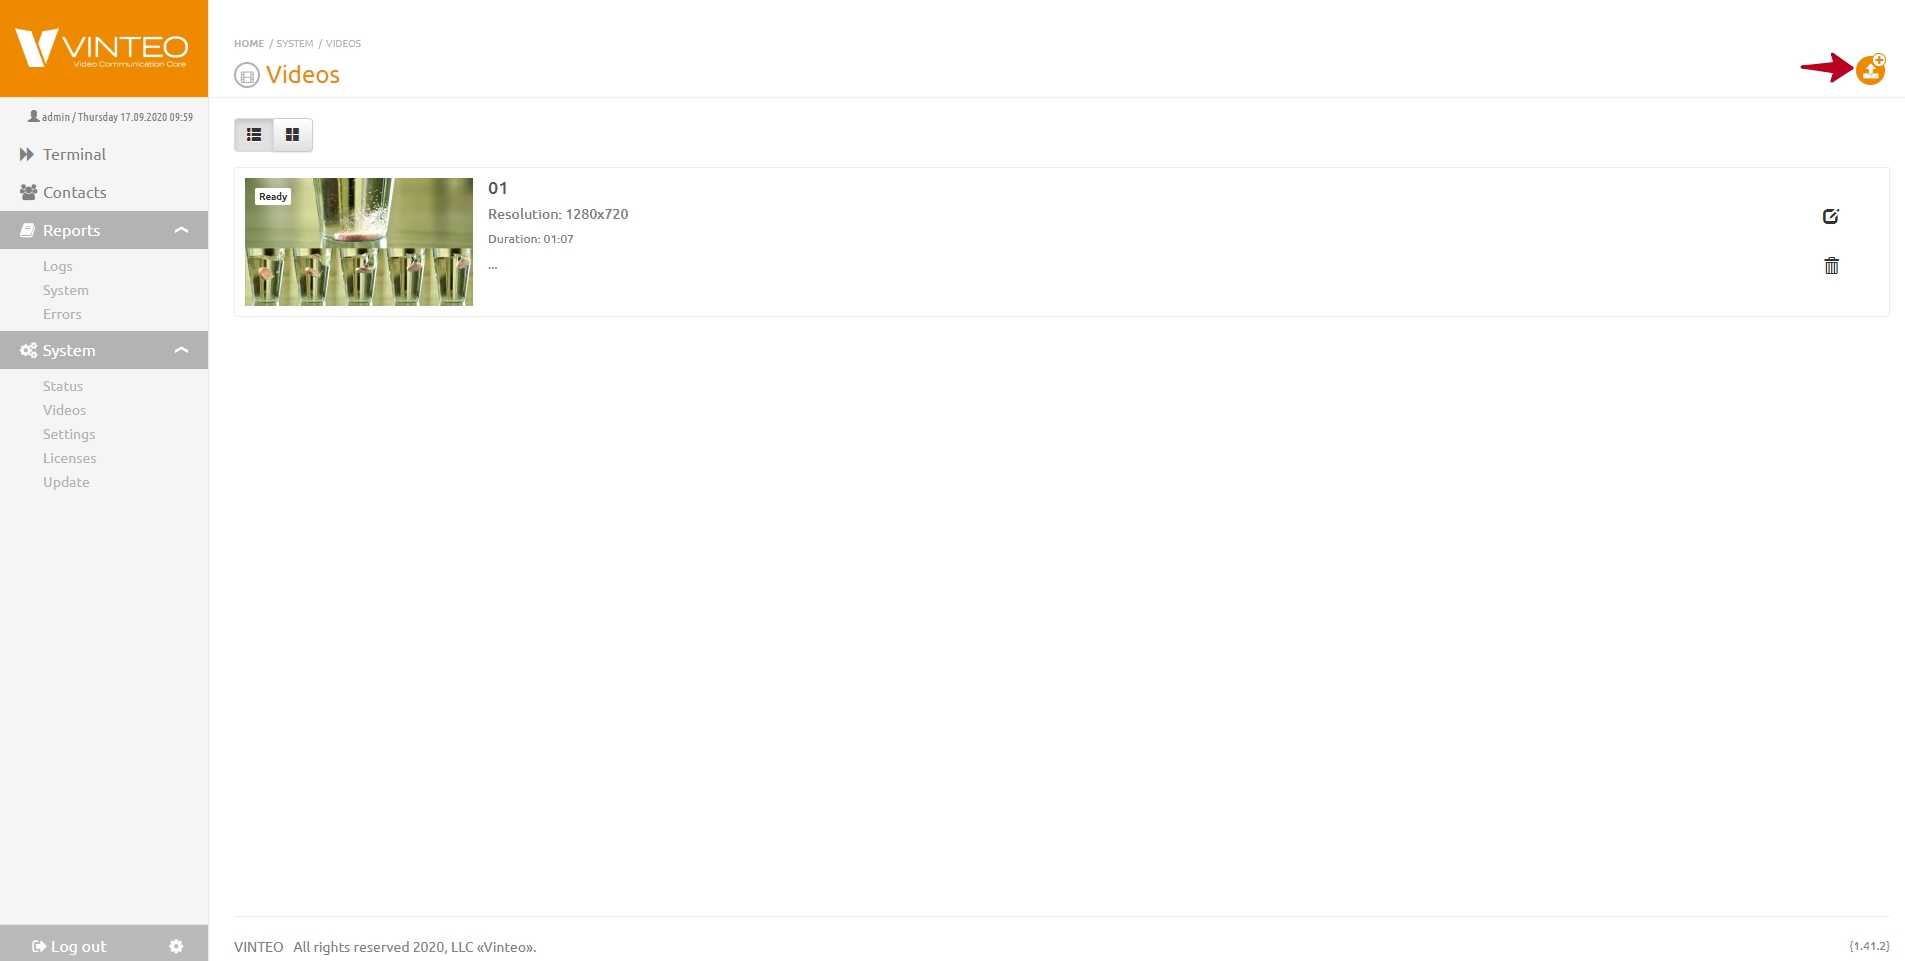
On the "Videos" page, videos are added in the following formats: .mp4, .mov, .m4v, .mkv, .flv, .wmv, .avi to display them as an additional stream in the conference.
The size of uploaded videos should not exceed 100MB.
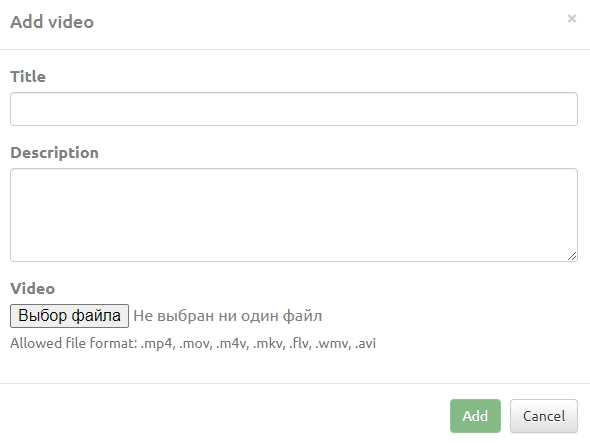
To add a video, you need to click in the upper right corner of the screen, then fill in the Title bar and Description field and select the file. Click the Add button after this button becomes active.
You can change the display style of files: a list or a grid. To delete a video click on the button with the image of the basket. In order to edit the previously uploaded video click on the button with the image of a pencil.
The main settings of the terminal
Main tab
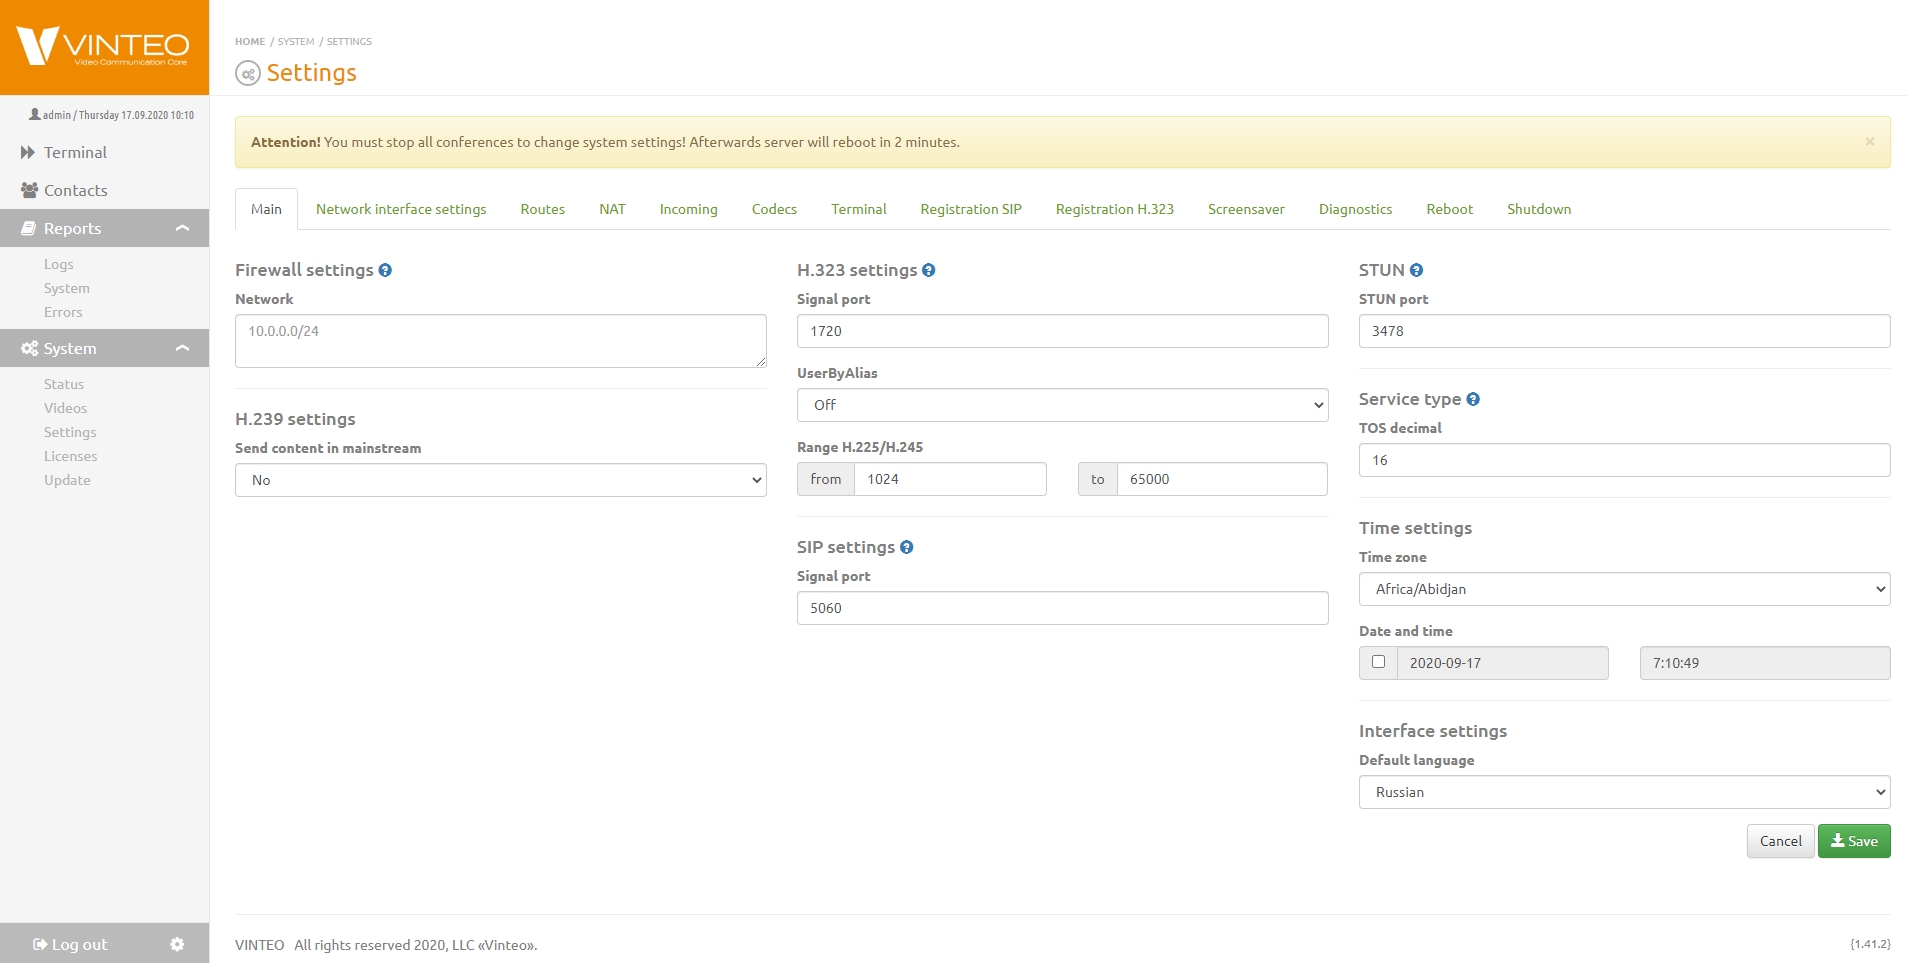
On the main settings tab you can change:
- firewall settings to deny access to SIP and H.323 ports from the local network;
- H.323 parameters signaling port, RTP port range, enabling authorization by login / password;
- SIP, STUN parameters, ToS signaling port and STUN port;
- time and interface settings, language is default.
Firewall parameters work as an white list access.
If the list is empty access allowed from all networks visible to the terminal. If there is a single address or subnet address the access will be allowed only from addresses of this subnet.
Changing the signaling ports for H.323 and SIP requires the same values to be configured on other devices.
Network interface settings
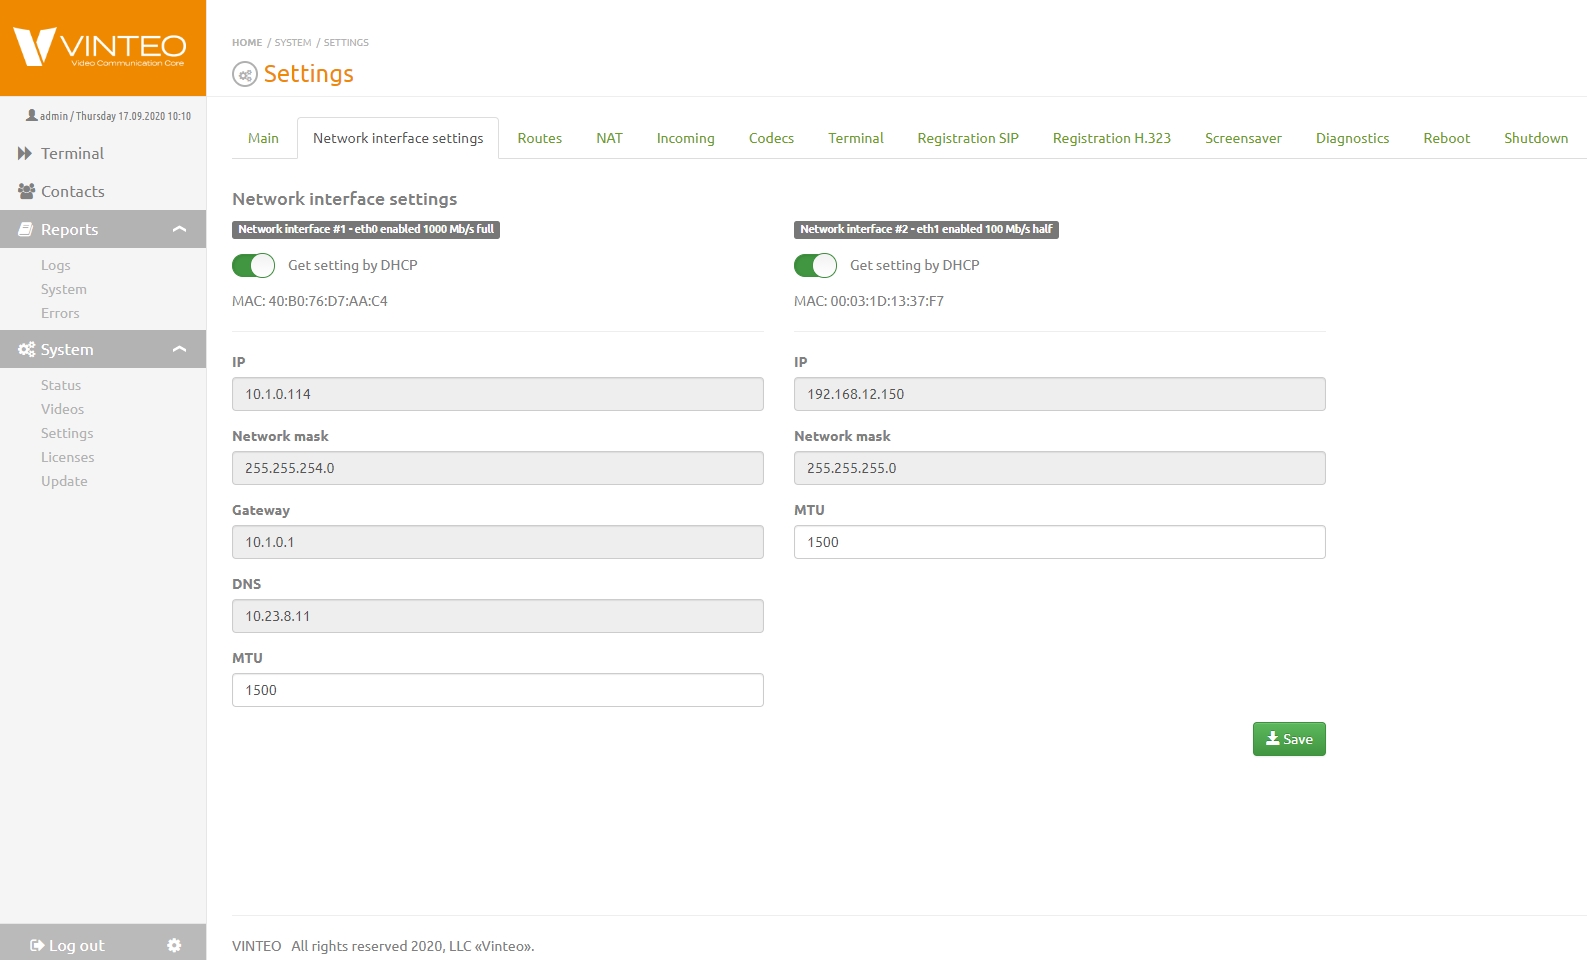
Network interface settings tab allows you to configure the receiving IP address for network interface (automatic mode / manual input). In automatic mode from a DHCP server.
To configure IP address in manual you need to fill follow fields:
- IP
- Network mask
- Gateway
- DNS
- MTU
After that you need to click the Save button. You can configure it with two network interfaces.
Routs
The Routes tab browses automatically determined routes and assigns additional routes.
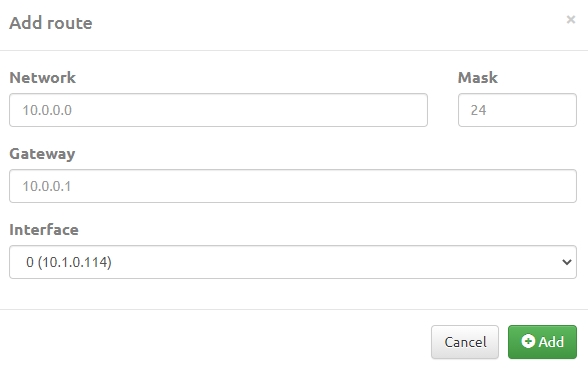
If you want to determine a new route click the Add route button. In the modal window specify:
- destination address;
- mask and gateway through which the destination address is available.
Choose the interface for connection to the gateway. Click the Add button.
The interface which you add displayed in the Assigned routes list. To delete the route click the trash image button.
NAT
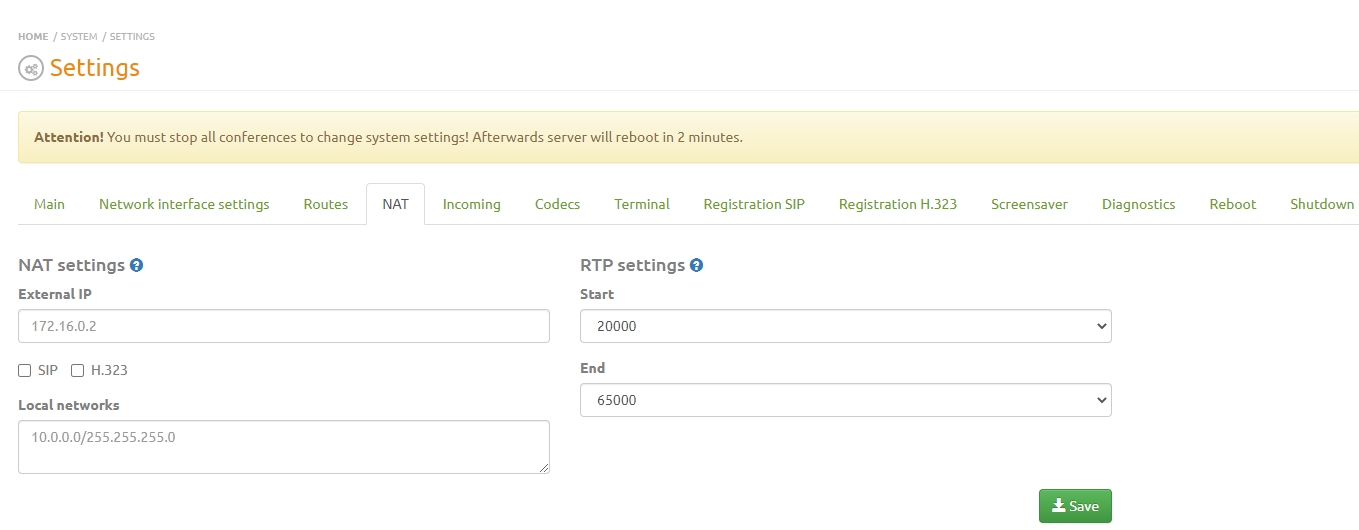
The NAT tab allows you to configure the device if the device is located behind NAT. To do it specify the external IP address of the upstream device, local networks, assign the port range for the RTP protocol.
Enter the external address of the network device in the External IP field. Enter all subnet addresses that do not require external IP substitution in the Local networks field.
It is necessary to forward the SIP, H.323 ports and the RTP port range in the NAT configuration on the network device.
Incoming
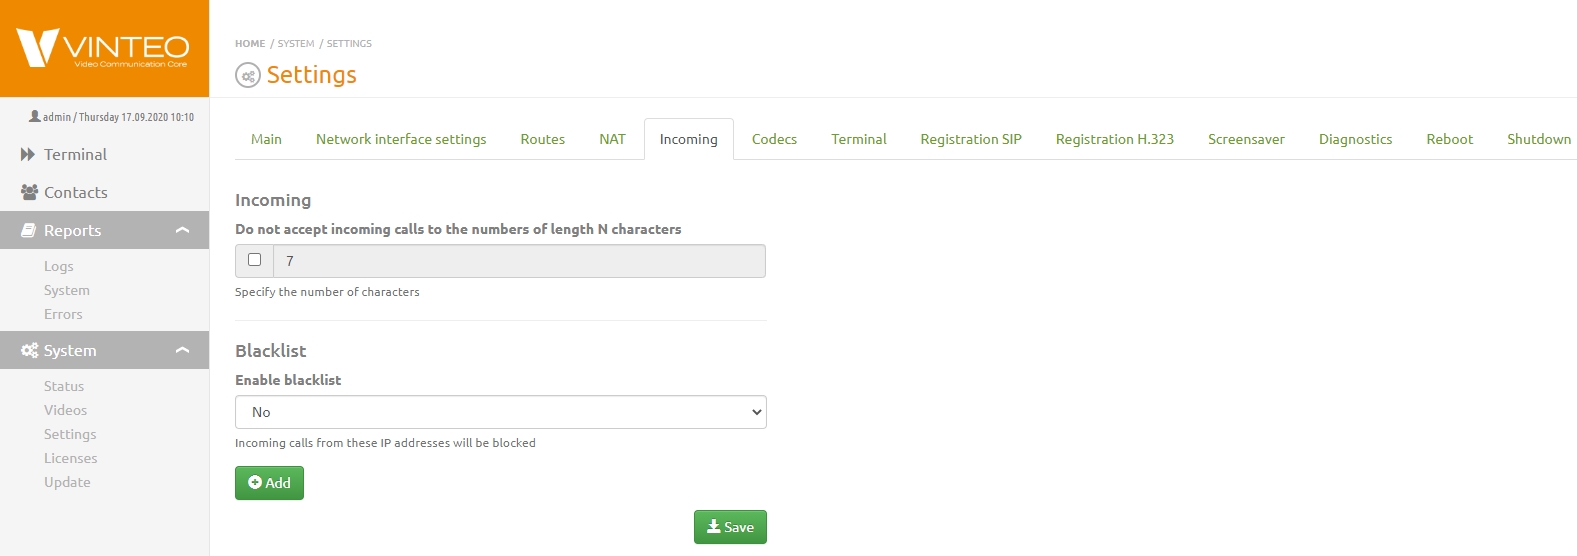
The maximum allowable number of digits of the number is indicated incoming calls from which are blocked and IPs are automatically added to the black list.
It is possible to activate the black list which will block all traffic from addresses which are added in the black list.
- Click the Add button.
- Enter IP address.
- Click the Save button.
Codecs
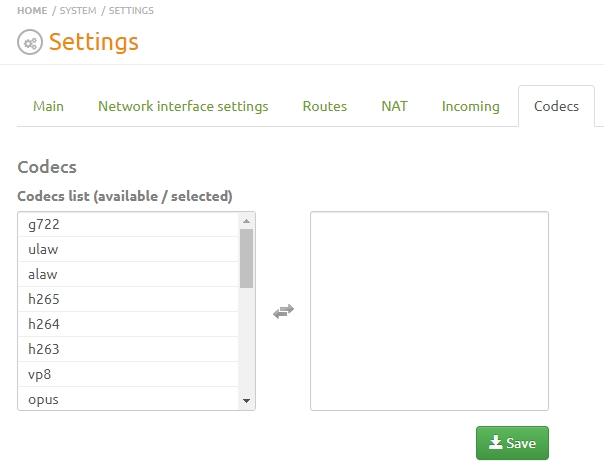
Codecs is the tab with lists of audio and video codecs supported by the account's device. The list on the left contains codecs which are available for use. On the right - the selected codecs for connection.
- If the field is empty, the default codecs in the database are used.
- If you have selected any codecs they will be applied. For example, if you have selected only audio codecs then the video stream will not be processed.
Be careful when choosing codecs. If you want to use the default codecs clear the field on the right.
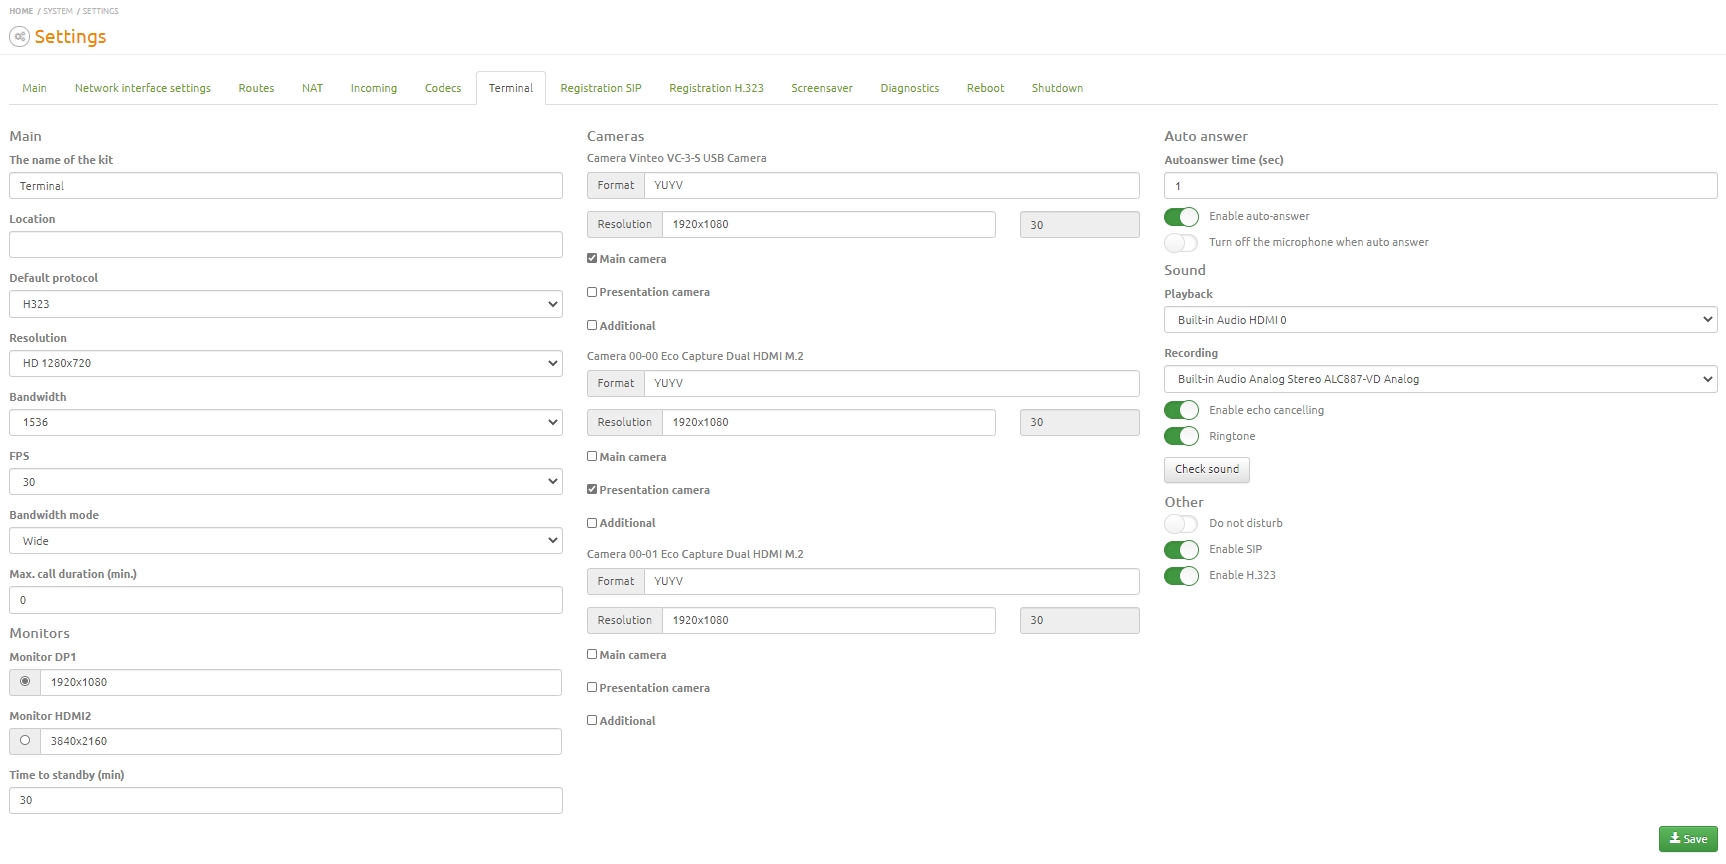
Terminal
In the Terminal tab you can change the information about the terminal such as:
- the name of the kit;
- location;
- default protocol;
- resolution;
- bandwidth;
- FPS (frame frequency);
- bandwidth mode;
- maximum call duration;
- monitors and their resolutions;
- time to standby;
- cameras and their resolutions;
- possibility of choice of cameras roles;
- turning on/off the auto answer;
- auto answer time;
- turning off the microphone when auto answer;
- playback device;
- recorder device;
- enable echo cancellation;
- ringtone turning on/off;
- sound check button;
- Do not disturb mode;
- enable SIP and H.323.
SIP registration
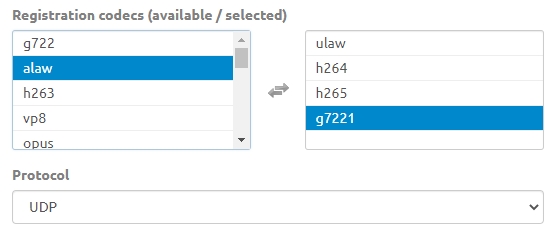
Registration SIP tab serves for the connection parameters setting to the SIP server’s IP address, authorization and using codecs.
To register the terminal using only the terminal IP address. If the settings provide for authorization, you must enter the username and password in the appropriate strings. You can choose TCP protocol or UDP protocol the call will be carried out.
It is recommended to use the next codecs settings and data transfer protocol.
H.323 registration
Registration H.323 tab serves for the connection parameters setting to the H.323 server’s IP address, authorization and using codecs.
As with SIP settings to register the terminal using only the terminal IP address. If the settings provide for authorization, you must enter the username and password in the appropriate strings.
It is recommended to use the next codecs settings.
Screensaver
Images that are downloaded will be shown on the screen in the Screensaver tab while the terminal is in standby mode. In this tab you can configure the frequency of displaying the screensaver and enabling / disabling this function.
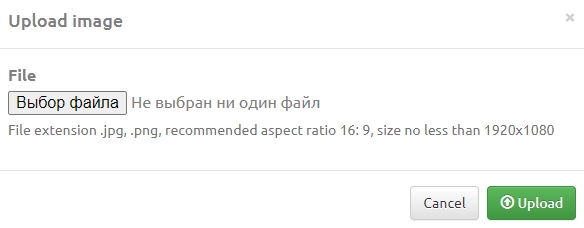
To add the screensaver you need to click the Upload button. Choose the needed image and click the Upload button.
In this tab you can configure the frequency of displaying the screensaver and enabling / disabling this function.
Diagnostics
The Diagnostics tab considers common utilities for diagnostic problems about local network connection. Utilities are giving below:
- Ping;
- Traceroute;
- Tcpdump;
- Logs utility logs a call for diagnostic problems when making a call.
Power management
2 remaining tabs allow you to reboot and shutdown the power of the terminal.
Licenses
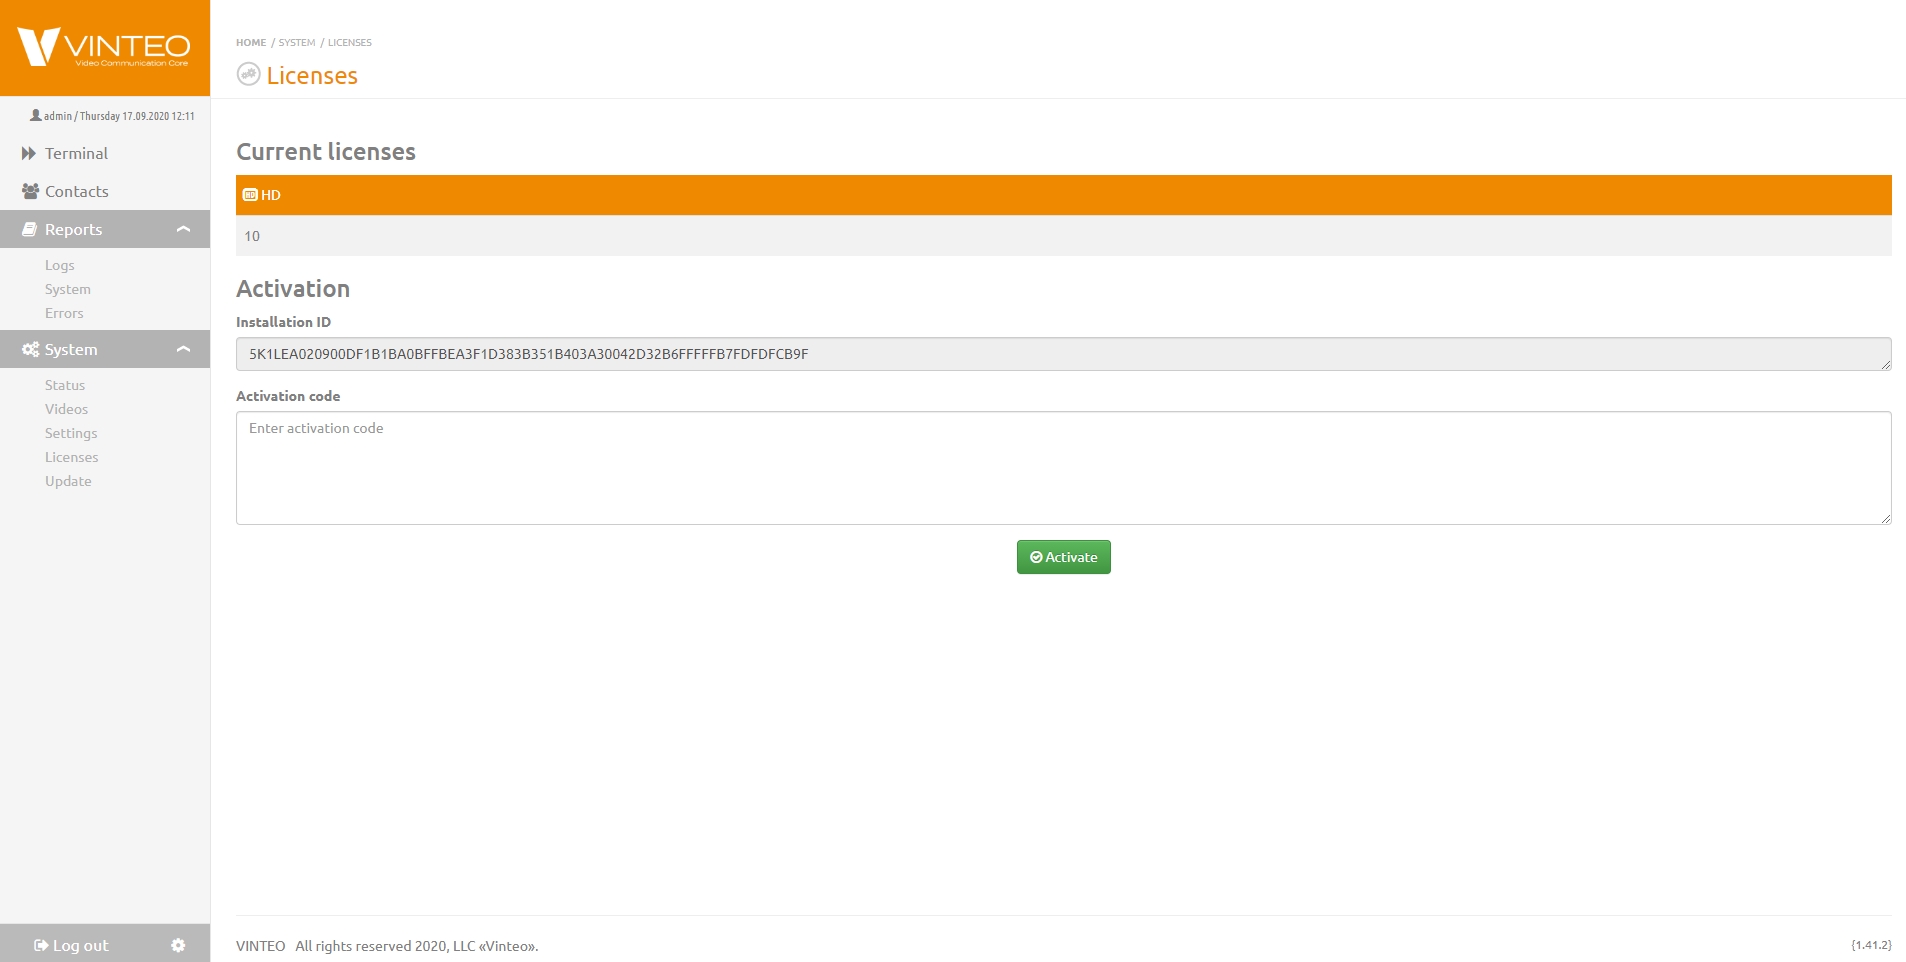
The special software of the video conference terminal is distributed under the license. On the Licenses page you can install the license of the terminal, view previously installed licenses and quantity of licenses available for a new participants connection.
One HD type license allows you to connect participants with different resolutions. One HD license allows you to connect participants at different resolutions. It will be shown below how licenses can be spent.
SD (576p / 30) audio and video connection will take 0.5HD license.
- The connection more than 576p / 30 and less than or equal to 720p / 30 will take a 1HD license.
подключение больше 720р/30 и меньше или равно 1080р/30 займет 2,5HD лицензии;
- The connection more than 720p/30 and less or equal 1080p/30 will take 2,5HD licenses.
The participant connection with video stream more than 30 frames per second will take 2x more HD licenses than this requires for connection with the same resolution and frequency before 30 frames per second.
License installation
To install the license you need:
- request the quantity of license which you need;
- provide the unique installation ID;
- enter the code in the Activation code field;
- click the Activate button.
In the Current license block is displayed the quantity HD and FullHD licenses.
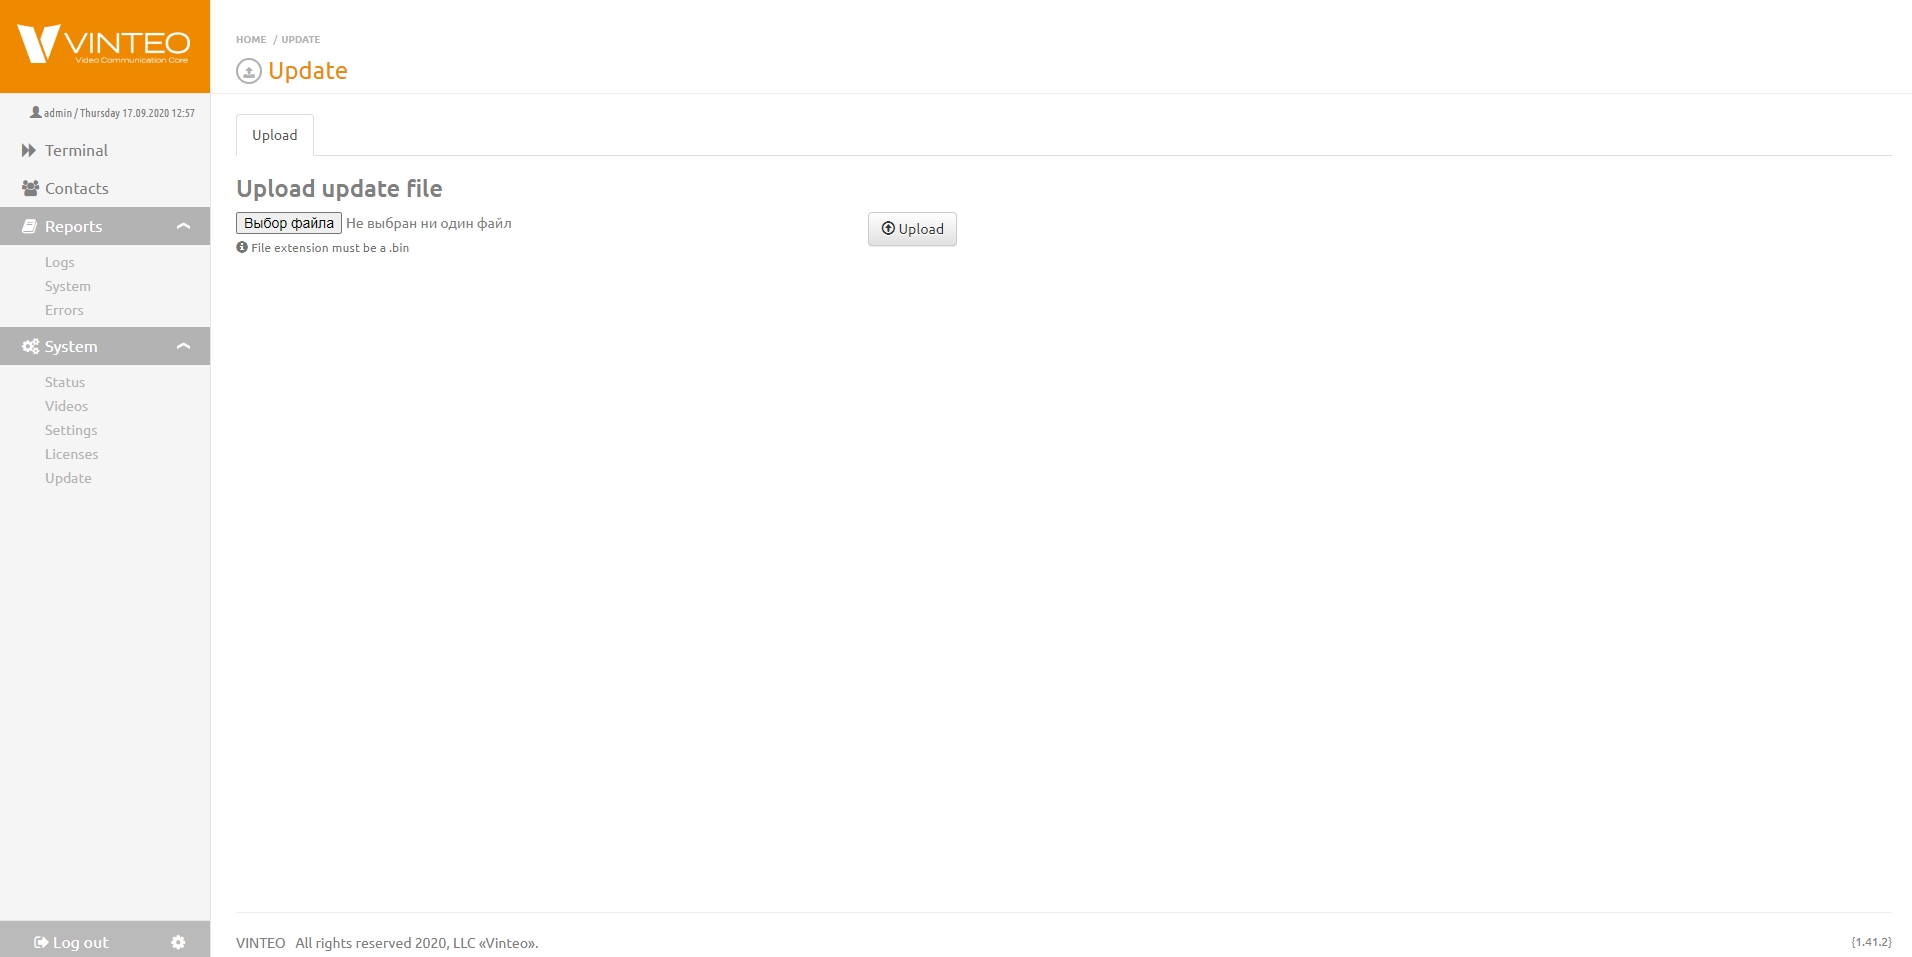
Update
This page allows you to install firmware update. To install the file you need:
- click the Choose file button;
- choose the update file;
- click the Upload button.
Before updating switch off from the terminal all USB flash drivers.
