Quick start: различия между версиями
Alina (обсуждение | вклад) |
Alina (обсуждение | вклад) |
||
| (не показано 30 промежуточных версий этого же участника) | |||
| Строка 3: | Строка 3: | ||
=== Preparing the network === | === Preparing the network === | ||
| − | When deploying a server inside | + | When deploying a server inside a corporate network behind NAT and FW you must perform the following server settings. |
=== Basic tab === | === Basic tab === | ||
| Строка 15: | Строка 15: | ||
=== Network interface settings tab === | === Network interface settings tab === | ||
| − | On this tab after the first launch and login to the web interface you need to register the settings that were specified via the command line during the installation of the Vinteo | + | On this tab after the first launch and login to the web interface you need to register the settings that were specified via the command line during the installation of the Vinteo videoconferencing server; add the DNS server address and save the settings. |
| − | + | When using two or more network interfaces it is recommended to use the first interface eth0 to access the server from the external network and the second interface for clients on the local network. Routing requests from local clients to external clients and back is carried out on the "Routes" tab. | |
| + | |||
| + | When adding an interface after saving the settings you must restart the server. After the restart the second interface should have the "Up" status. | ||
=== NAT Tab === | === NAT Tab === | ||
| Строка 23: | Строка 25: | ||
On this tab write in "External IP" field external address of server, mark required protocols to work through NAT - H.323 and/or SIP. Write the local networks as given in the example on the page, each on a new line. Set the RTP port range (default is 20000-65000). Save your settings. | On this tab write in "External IP" field external address of server, mark required protocols to work through NAT - H.323 and/or SIP. Write the local networks as given in the example on the page, each on a new line. Set the RTP port range (default is 20000-65000). Save your settings. | ||
| − | === | + | === Firewall and NAT settings === |
| − | For the server | + | For normal operation of the server through an external network it is necessary to organize the passaging of traffic in both directions via the ports that were specified above in the server settings. The table shows the default values: |
{| class="wikitable" | {| class="wikitable" | ||
| Строка 31: | Строка 33: | ||
! Port !! Protocol !! Assignment | ! Port !! Protocol !! Assignment | ||
|- | |- | ||
| − | | 22 || TCP/UDP || SSH for Support Services | + | | 22 || TCP/UDP || SSH for Support Services if required |
|- | |- | ||
| 443 || TCP/UDP || For Web services | | 443 || TCP/UDP || For Web services | ||
| Строка 54: | Строка 56: | ||
'''Setting up''' | '''Setting up''' | ||
| − | For a quick start | + | For a quick start the settings on the "Basic" tab, "Anonymous connaction" pages and adding test accounts are required.<br> |
| − | 1.To work with registered H.323 | + | 1.To work with registered H.323 accounts, go to "Settings" => to the "Main" tab and enable the "Internal gatekeeper" server; |
[[Файл:Settings - H.323.jpg||800px|безрамки|центр|Settings - H.323]] | [[Файл:Settings - H.323.jpg||800px|безрамки|центр|Settings - H.323]] | ||
2. Be sure to check the date and time;<br> | 2. Be sure to check the date and time;<br> | ||
| − | 3. | + | 3. Enable the "Allow to make group calls" option in the "Other settings" block; it will allow any authorised WS type account to transfer point-to-point calls to multi-party conference mode and make group calls;<br> |
| + | [[Файл:Quick start 2.jpg|800px|безрамки|центр|Quick start 2]] | ||
4. Save the settings;<br> | 4. Save the settings;<br> | ||
| − | 5. Go to the tab "Connect Anonymous" | + | 5. Go to the tab "Connect Anonymous" set the bandwidth for HD 1.5Mbps for FHD 2.5Mbps and enable the "Create an anonymous room" set the other items as preferred and save the settings. This item allows accounts having previously agreed among themselves on the date/time/conference number independently launch and conduct video conferences and webcasting without any moderation. Anonymous conferences are not displayed in the general list on the "Conferences" page but only on the main page in the anonymous conferences indicator where they can be forced to end. After checking you can turn it off if it is not needed for further work;<br> |
| − | 6. check that there is nothing in the list of allowed codecs (right column) by default, this means that all codecs from the left column are allowed;<br> | + | 6. check that there is nothing in the list of allowed codecs (right column) by default, - this means that all codecs from the left column are allowed;<br> |
| − | 7. | + | 7. Save the settings. |
[[Файл:Settings - Annonymous Connection.jpg|800px|безрамки|центр|Settings - Annonymous Connection]] | [[Файл:Settings - Annonymous Connection.jpg|800px|безрамки|центр|Settings - Annonymous Connection]] | ||
''Note'' | ''Note'' | ||
| Строка 68: | Строка 71: | ||
''Codec sequence in lists'' | ''Codec sequence in lists'' | ||
| − | + | An important role in the normal operation of a server with a huge fleet of terminal models is played by the correct sequence of codecs both in the settings for anonymous users and in accounts cards. First there are audio codecs from “best” to “worst”; then video codecs with the same selection principal. | |
| + | |||
| + | For anonymous users using the Vinteo Desktop application, web client and Vinteo mobile application to work without authorization on the server the list of codecs for anonymous users must include the Opus audio codec and the H.264 and VP8 video codecs. The following are examples of universal lists with the correct sequence of codecs:<br> | ||
1. For anonymous:<br> | 1. For anonymous:<br> | ||
* aac_ld | * aac_ld | ||
| Строка 86: | Строка 91: | ||
* h261 | * h261 | ||
* vp8 | * vp8 | ||
| − | 2. For codecs in | + | 2. For codecs in account cards |
* aac_ld | * aac_ld | ||
* opus | * opus | ||
| Строка 100: | Строка 105: | ||
=== Registration of accounts on the server === | === Registration of accounts on the server === | ||
| − | To create accounts go from Home => | + | To create accounts go from "Home" => "Accountes" => "List" page. In the window that opens use the buttons to create an account or a group of accounts. |
| − | # | + | |
| − | # if you want to change the number of this | + | This description will provide a brief algorithm for creating two accounts of WS and H.323 type using individual settings for each. A more detailed description can be found by following this [[Add_new_account|link]]. To add a new account click on the "Add" button. In the modal window that opens make the following settings: |
| + | # set the "Type" - "WS"; | ||
| + | # if you want to change the number of this account which is his name during authentication the number is created automatically in increments of +1; | ||
# enter his name/alias; | # enter his name/alias; | ||
| − | # change the generated password | + | # change the generated password if necessary or generate it anew; |
| − | # enter the | + | # enter the account's email; his authentication and settings data will be sent to him after his settings are completed; |
| − | # | + | # account's maximum resolution when connecting; |
# maximum channel width; | # maximum channel width; | ||
| − | # | + | # account's maximum resolution for point-to-point connection; |
| − | # | + | # click the "Add" button. |
| − | Add the following participants with H.323 and SIP types in the same way. The default codec set is often suitable for most modern terminals. For Polycom VSX6000 terminals | + | Add the following participants with H.323 and SIP types in the same way. The default codec set is often suitable for most modern terminals. For Polycom VSX6000 terminals add h263p and h.263 after H.264 codec. "Main" settings for SIP and H.323 type accounts are identical to WS; the differences are only at the "Extended" tab. |
[[Файл:Accounts - Main - Google Chrome.jpg|800px|безрамки|центр|Accounts - Main]] | [[Файл:Accounts - Main - Google Chrome.jpg|800px|безрамки|центр|Accounts - Main]] | ||
| Строка 117: | Строка 124: | ||
'''Create a test conference''' | '''Create a test conference''' | ||
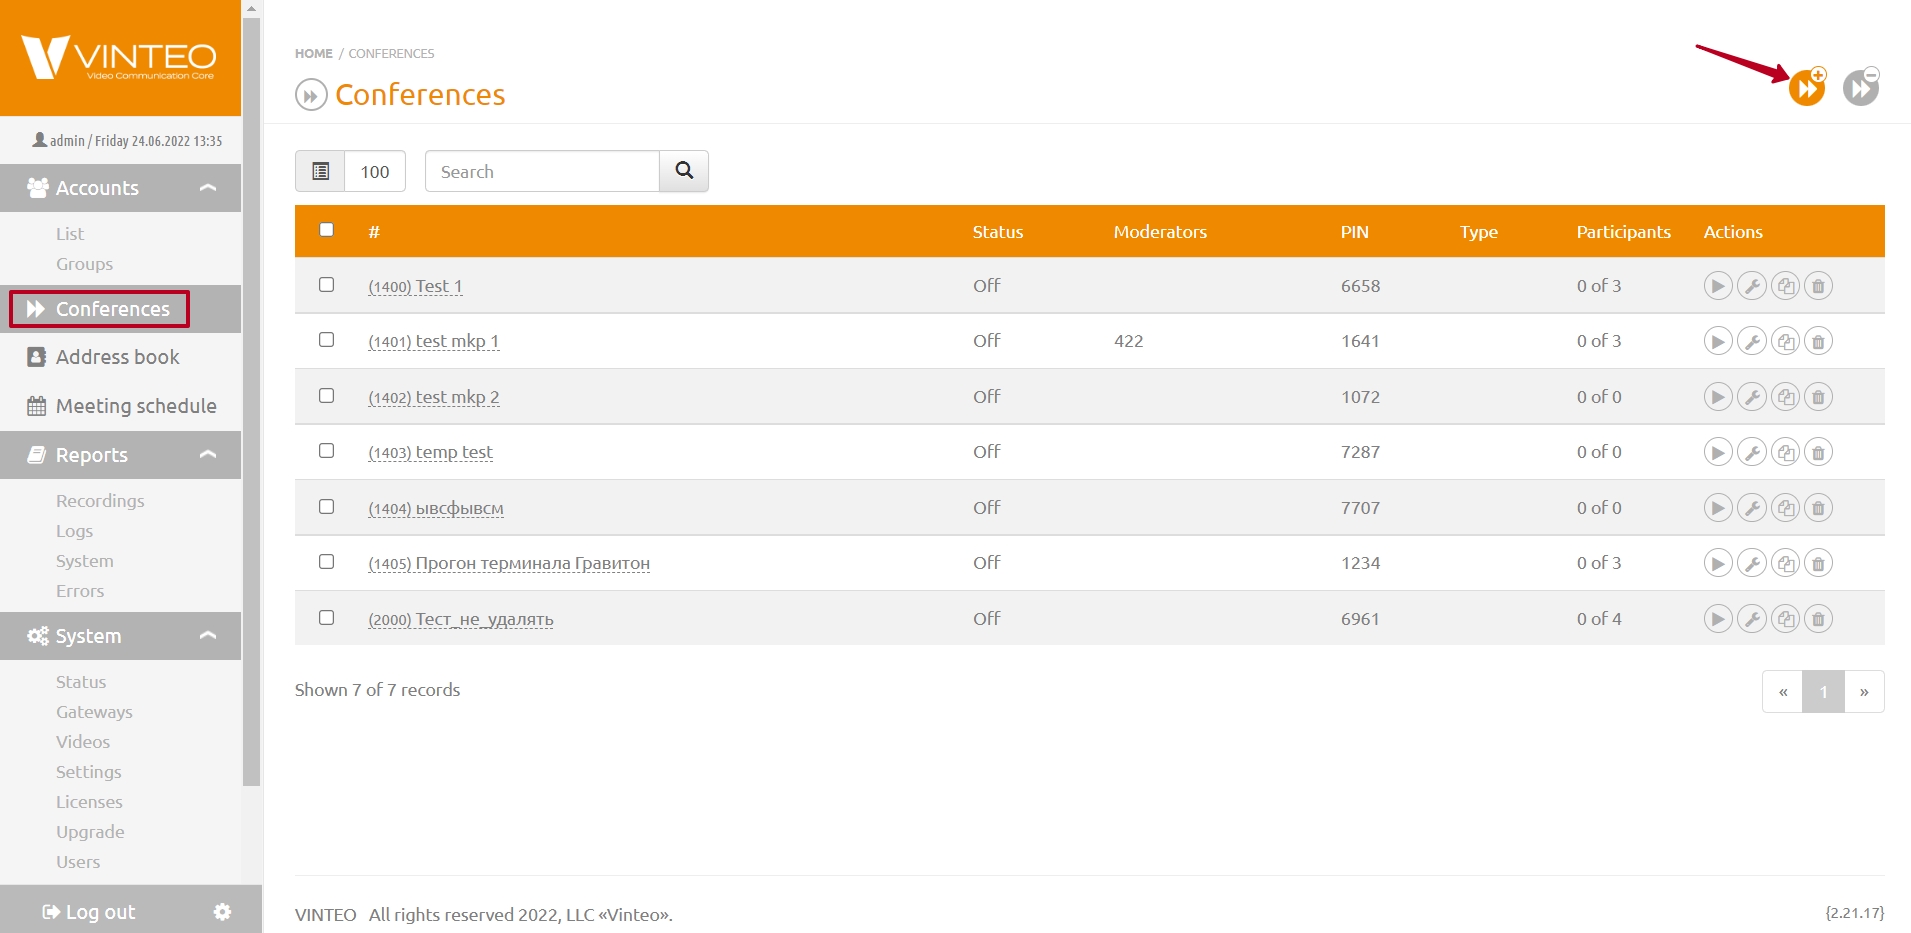
| − | Click the | + | Click the add new conference button on the "Conferences" page. |
[[Файл:Conferences - Vinteo.jpg|800px|безрамки|центр|Conferences - Vinteo]] | [[Файл:Conferences - Vinteo.jpg|800px|безрамки|центр|Conferences - Vinteo]] | ||
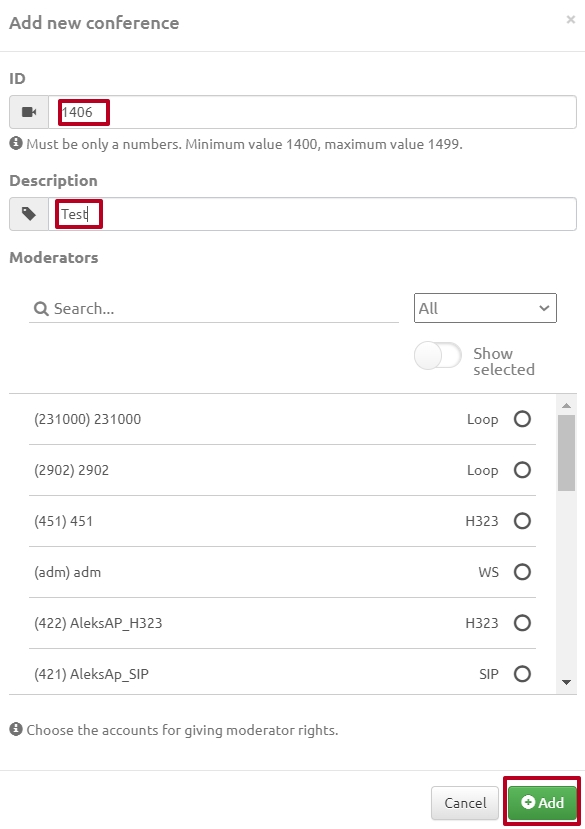
| − | In the Create | + | In the "Create new conference" dialog box enter "1000" in the "Number" field. In the "Description" field enter "Test". Click the "Add" button. |
[[Файл:Conferences - Add new conference.jpg|800px|безрамки|центр|Conferences - Add new conference]] | [[Файл:Conferences - Add new conference.jpg|800px|безрамки|центр|Conferences - Add new conference]] | ||
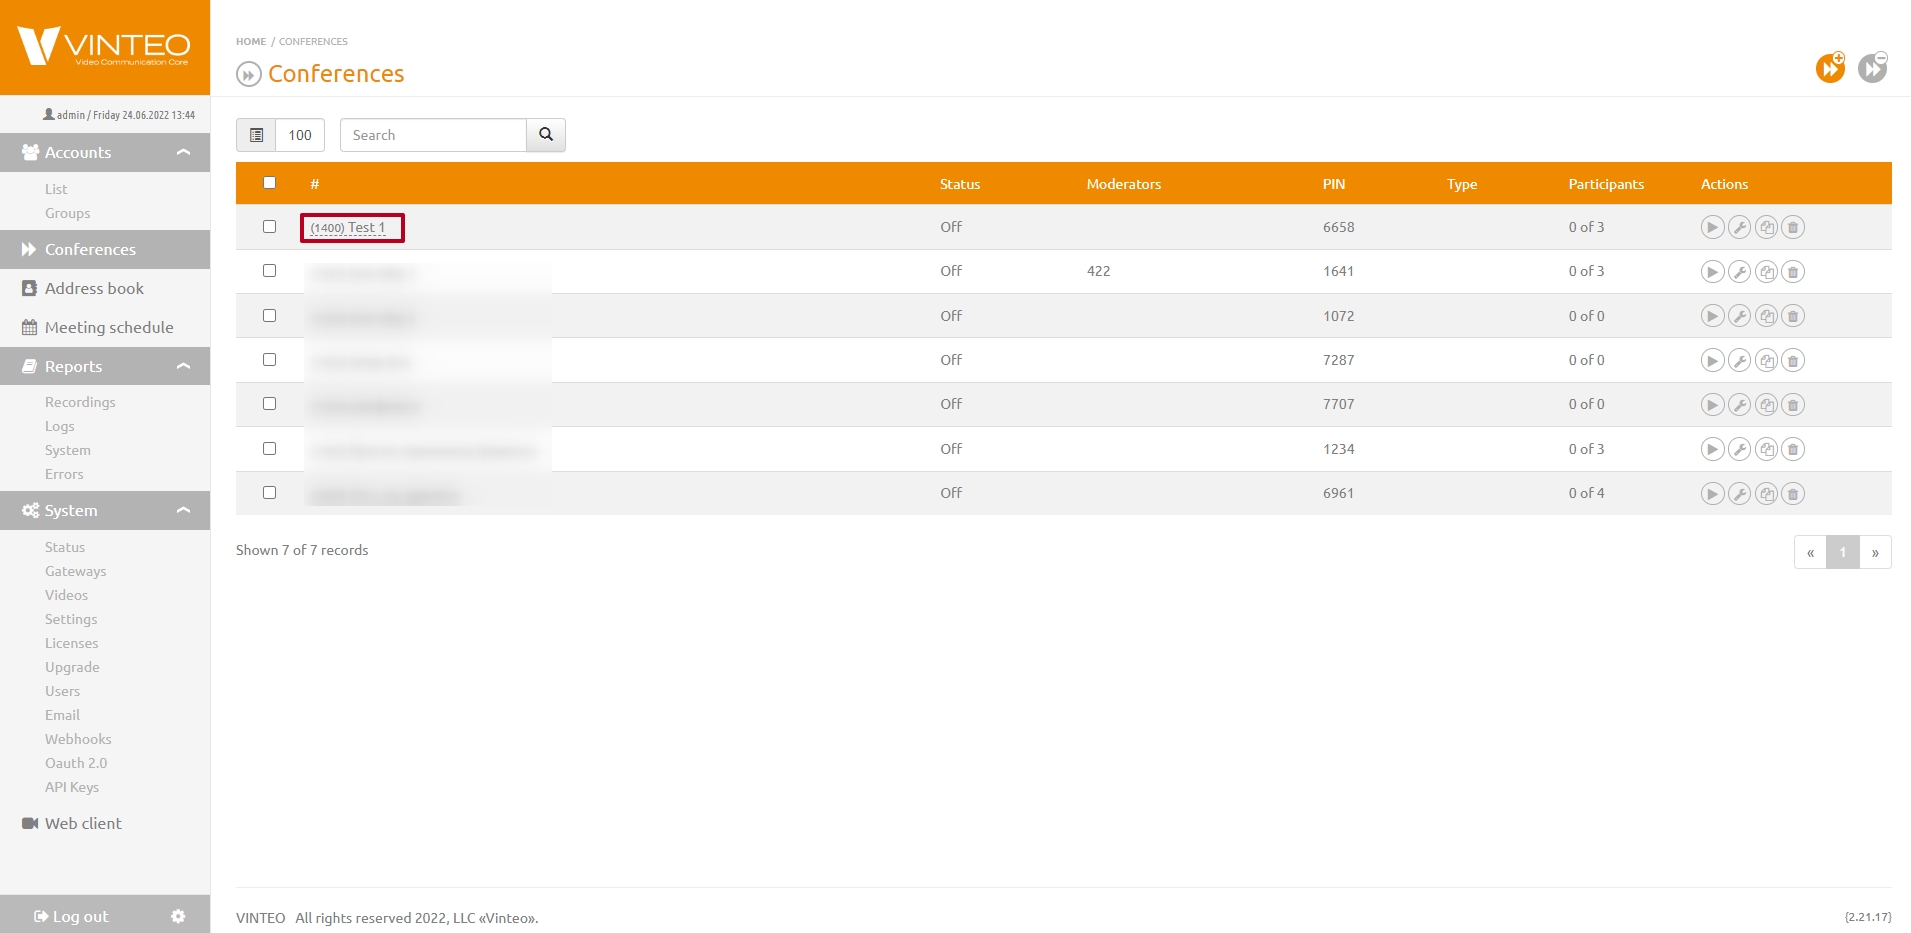
Go to the conference settings by clicking on the "(1000) Test" line in the conference list. | Go to the conference settings by clicking on the "(1000) Test" line in the conference list. | ||
[[Файл:Conferences - Test.jpg|800px|безрамки|центр|Conferences - Test]] | [[Файл:Conferences - Test.jpg|800px|безрамки|центр|Conferences - Test]] | ||
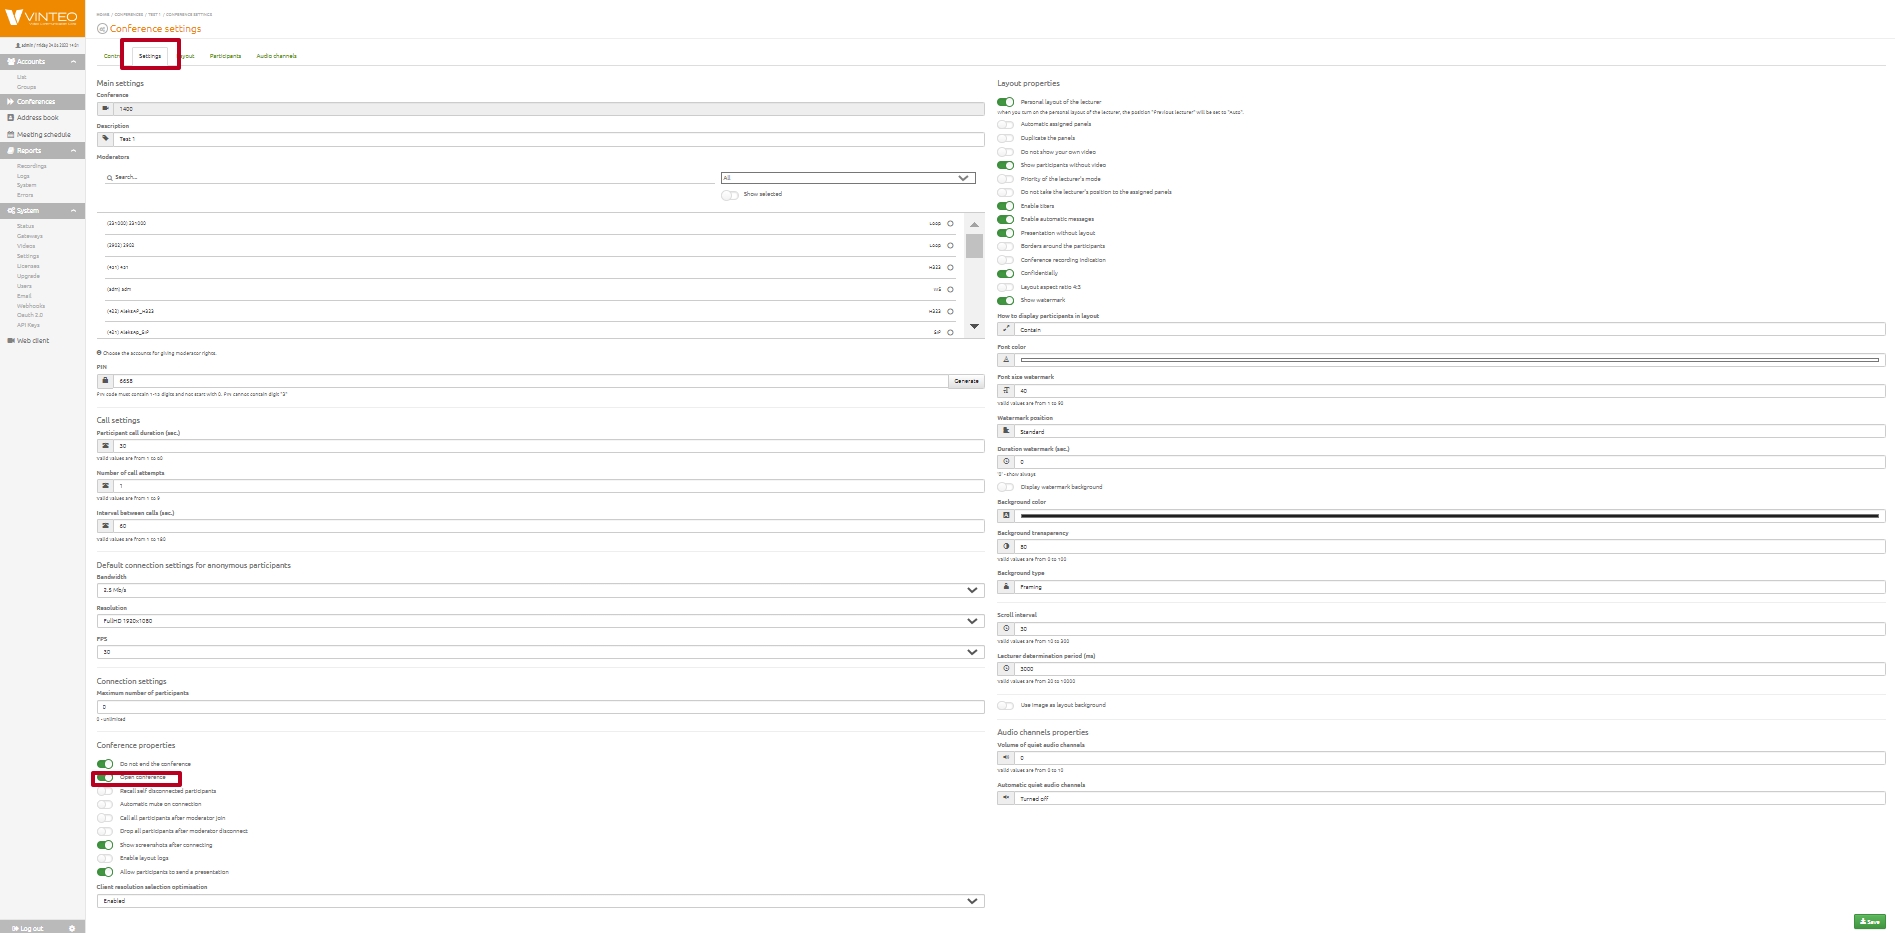
| − | In the conference settings | + | In the conference settings under in the "Settings" tab activate the "Open conference" option and press the "Save" button. |
[[Файл:Open Conference - Google Chrome.jpg|800px|безрамки|центр|Open Conference]] | [[Файл:Open Conference - Google Chrome.jpg|800px|безрамки|центр|Open Conference]] | ||
| − | Click the "Off" button in the "Control" tab to start the conference. | + | Click the "Off" button in the "Control" tab to start the conference. Press the "Confirm" button in the modal window. |
[[Файл:Conference start.jpg|800px|безрамки|центр|Conference start]] | [[Файл:Conference start.jpg|800px|безрамки|центр|Conference start]] | ||
| + | |||
| + | '''Webcast enable''' | ||
| + | |||
| + | To test the Webcast feature follow these steps: | ||
| + | |||
| + | 1. enter the webcast settings from the “Conference management” page;<br> | ||
| + | 2. copy the temporary broadcast link to the clipboard;<br> | ||
| + | 3. save the settings if you made changes;<br> | ||
| + | 4. turn on the broadcast; the color of key will change. | ||
| + | [[Файл:Quick start 6.jpg|800px|безрамки|центр|Quick start 6]] | ||
| + | 5. paste the copied link into the address bar of your browser and follow it; | ||
| + | сlick on the screen or press the start broadcast button. | ||
| + | |||
| + | You will see the broadcast from the conference; the main controls for broadcast playback will open at the bottom of the window. | ||
=== Accounts connection === | === Accounts connection === | ||
'''Vinteo Desktop Account''' | '''Vinteo Desktop Account''' | ||
| − | + | To make a call to an open conference with the number “1000” specified above an authorized Vinteo Desktop client just needs to dial the same number in the dialing line. He can also call any authorized account via a point-to-point connection by dialing, for example, the number “101” assigned to a Polycom RPD account with H.323 type. | |
'''Polycom RealPresence Mobile Account''' | '''Polycom RealPresence Mobile Account''' | ||
| − | An authorised Polycom RPD | + | An authorised Polycom RPD account also only needs to dial the number of the conference or Vinteo Desktop account (100) created and make the call. |
| − | Calling | + | '''Calling accounts from a conference''' |
| − | To call registered | + | To call registered accounts from the server enter the created conference: "Home" => "Conferences" => line in the list with "(1000) Test". |
[[Файл:Add Participant.jpg|800px|безрамки|центр|Add Participant]] | [[Файл:Add Participant.jpg|800px|безрамки|центр|Add Participant]] | ||
| − | # Press the "Add | + | # Press the "Add participant" button; |
| − | # Select the registered | + | # Select the registered accounts "100" and "101" in the modal window; |
| − | # Activate the "Call | + | # Activate the "Call participant" item; |
# Press the "Add" button. | # Press the "Add" button. | ||
| − | As the "Call | + | As the "Call participant" item has been enabled after clicking the "Add" button, they will be added to the invitee list and immediately called into the conference; if not enabled you will have to call them one by one from the invitee list via the participant management functionalit: |
# Drop down the participant control panel; | # Drop down the participant control panel; | ||
| Строка 152: | Строка 173: | ||
[[Файл:Call Participant.jpg|800px|безрамки|центр|Call Participant]] | [[Файл:Call Participant.jpg|800px|безрамки|центр|Call Participant]] | ||
| − | Lecturer mode must be switched on | + | Lecturer mode must be switched on as it is not active by default and participants can see all speakers including themselves in the layout. |
'''Adding callers who are not invited''' | '''Adding callers who are not invited''' | ||
| − | If the authorized | + | If the authorized accounts are called into a closed conference and they are not in the list of invited accounts you need to go to page "Conference management" to the "Management" tab. Perform the following actions: |
# Open the pop-up window on the top right; | # Open the pop-up window on the top right; | ||
# Press the caller icon; | # Press the caller icon; | ||
| Строка 163: | Строка 184: | ||
'''Working with the audio channel of the participants''' | '''Working with the audio channel of the participants''' | ||
| − | To quickly mute a | + | To quickly mute a participant’s microphone double-press or click the left mouse button on it; the internal field of the active participants background will turn black. |
[[Файл:Microphone.jpg|800px|безрамки|центр|Audio channels]] | [[Файл:Microphone.jpg|800px|безрамки|центр|Audio channels]] | ||
| Строка 181: | Строка 202: | ||
If the "Create anonymous rooms" function is active, perform the following actions: | If the "Create anonymous rooms" function is active, perform the following actions: | ||
| − | 1. Dial an arbitrary conference number from the software terminal of the first | + | 1. Dial an arbitrary conference number from the software terminal of the first account, e.g. "4000". A connection to the anonymous conference number 4000 will be established; |
| − | 2. Carry out the same actions from the terminal of the second | + | 2. Carry out the same actions from the terminal of the second account, as well as from the next necessary to check connection. |
| − | All | + | All accounts who dialed "4000" will get into a conference with the same number which was created by the first account. Moderation and Webcasting of anonymous conferences is not possible. |
'''Checking the operation of "Group Calls"''' | '''Checking the operation of "Group Calls"''' | ||
| − | "Group Calls" are only available to authorised WS | + | "Group Calls" are only available to authorised WS accounts with the right to this action, via the Vinteo Desktop application. |
# Add callers with numbers 101 and 102 to the VD record book; | # Add callers with numbers 101 and 102 to the VD record book; | ||
| Строка 198: | Строка 219: | ||
# The last moderator concludes the conference. | # The last moderator concludes the conference. | ||
| − | === | + | === Vinteo mobile client setting up === |
Our mobile app for smartphones and tablets is available at the AppStore and Play Market. After installing it, let's set it up: The "Calls" page is the home page of the app. This is where your call history records will be displayed. | Our mobile app for smartphones and tablets is available at the AppStore and Play Market. After installing it, let's set it up: The "Calls" page is the home page of the app. This is where your call history records will be displayed. | ||
| Строка 215: | Строка 236: | ||
# End the call. | # End the call. | ||
| − | === | + | === RealPresence Mobile client setting up === |
Let's set up the Polycom mobile client available on Play Market and AppStore as RealPresence Mobile. Here are the settings for the Android OS. After installing the software on the smartphone, proceed to its settings. | Let's set up the Polycom mobile client available on Play Market and AppStore as RealPresence Mobile. Here are the settings for the Android OS. After installing the software on the smartphone, proceed to its settings. | ||
| Строка 227: | Строка 248: | ||
# Internal GK server address; | # Internal GK server address; | ||
# GK server's external address; | # GK server's external address; | ||
| − | # Number of the | + | # Number of the account; |
# Also enter the number of the Account. | # Also enter the number of the Account. | ||
[[Файл:RealPresenceMobile 2.jpg|800px|безрамки|центр|RealPresenceMobile 2]] | [[Файл:RealPresenceMobile 2.jpg|800px|безрамки|центр|RealPresenceMobile 2]] | ||
This is what the "Status" page should look like for a GK H.323 authorised Account. | This is what the "Status" page should look like for a GK H.323 authorised Account. | ||
[[Файл:RealPresenceMobile 3.jpg|800px|безрамки|центр|RealPresenceMobile 3]] | [[Файл:RealPresenceMobile 3.jpg|800px|безрамки|центр|RealPresenceMobile 3]] | ||
Текущая версия на 12:00, 19 июня 2024
These instructions are for the quick installation and testing of the Vinteo VCS server.
Содержание
- 1 Preparing the network
- 2 Basic tab
- 3 Network interface settings tab
- 4 NAT Tab
- 5 Firewall and NAT settings
- 6 Server and client preparation
- 7 Registration of accounts on the server
- 8 Working with conferences and accounts
- 9 Accounts connection
- 10 Vinteo mobile client setting up
- 11 RealPresence Mobile client setting up
Preparing the network
When deploying a server inside a corporate network behind NAT and FW you must perform the following server settings.
Basic tab
On the Settings page, under the Basic tab, check and set the ports required for operation:
- H323 - TCP: 1720, TCP: H225/245 change from 1024-65000 to 20000-65000 (the port range can be changed by limiting the number to what you need);
- SIP - 5060;
- save your settings.
Network interface settings tab
On this tab after the first launch and login to the web interface you need to register the settings that were specified via the command line during the installation of the Vinteo videoconferencing server; add the DNS server address and save the settings.
When using two or more network interfaces it is recommended to use the first interface eth0 to access the server from the external network and the second interface for clients on the local network. Routing requests from local clients to external clients and back is carried out on the "Routes" tab.
When adding an interface after saving the settings you must restart the server. After the restart the second interface should have the "Up" status.
NAT Tab
On this tab write in "External IP" field external address of server, mark required protocols to work through NAT - H.323 and/or SIP. Write the local networks as given in the example on the page, each on a new line. Set the RTP port range (default is 20000-65000). Save your settings.
Firewall and NAT settings
For normal operation of the server through an external network it is necessary to organize the passaging of traffic in both directions via the ports that were specified above in the server settings. The table shows the default values:
| Port | Protocol | Assignment |
|---|---|---|
| 22 | TCP/UDP | SSH for Support Services if required |
| 443 | TCP/UDP | For Web services |
| 1719 | UDP | H.323 Registration, Logon and Status (RAS) |
| 1720 | TCP | H.323 - Call Signalling (H.225) |
| 3478 | UDP | STUN needed for WebRTC (not effective with symmetric NAT) |
| 5060 | TCP/UDP | SIP |
| 5061 | TCP | SIP TLS signaling |
| 1024-65000 | TCP | H.323 (H.225/245) If not changed as above (20000-65000) |
| 20000-65000 | UDP | Media (RTP/RTCP) |
Server and client preparation
Setting up
For a quick start the settings on the "Basic" tab, "Anonymous connaction" pages and adding test accounts are required.
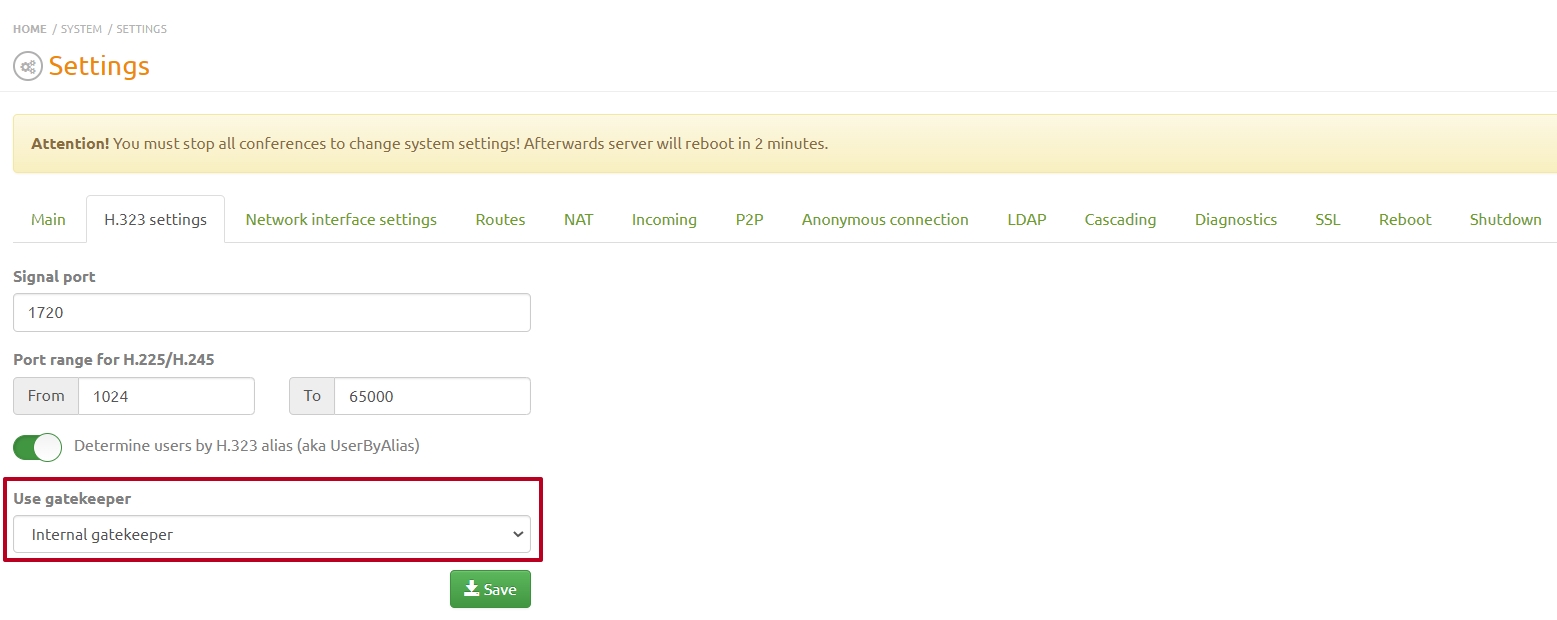
1.To work with registered H.323 accounts, go to "Settings" => to the "Main" tab and enable the "Internal gatekeeper" server;
2. Be sure to check the date and time;
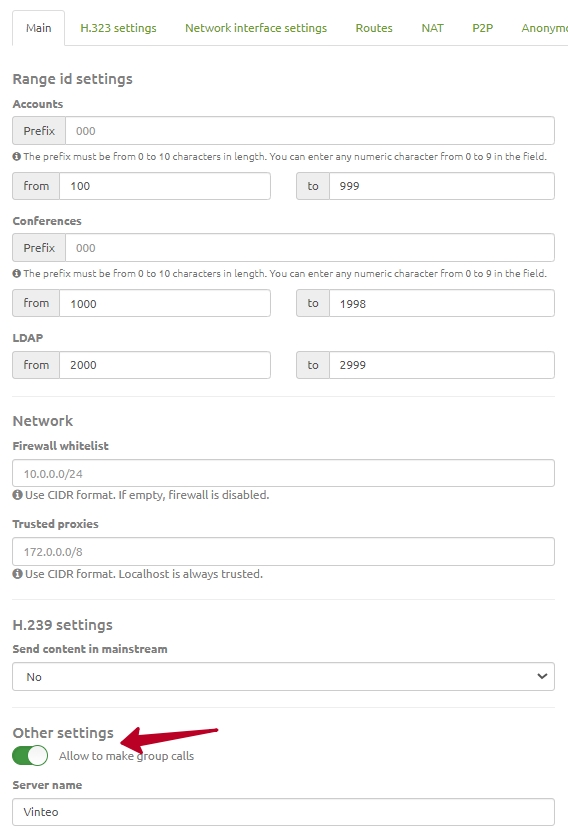
3. Enable the "Allow to make group calls" option in the "Other settings" block; it will allow any authorised WS type account to transfer point-to-point calls to multi-party conference mode and make group calls;
4. Save the settings;
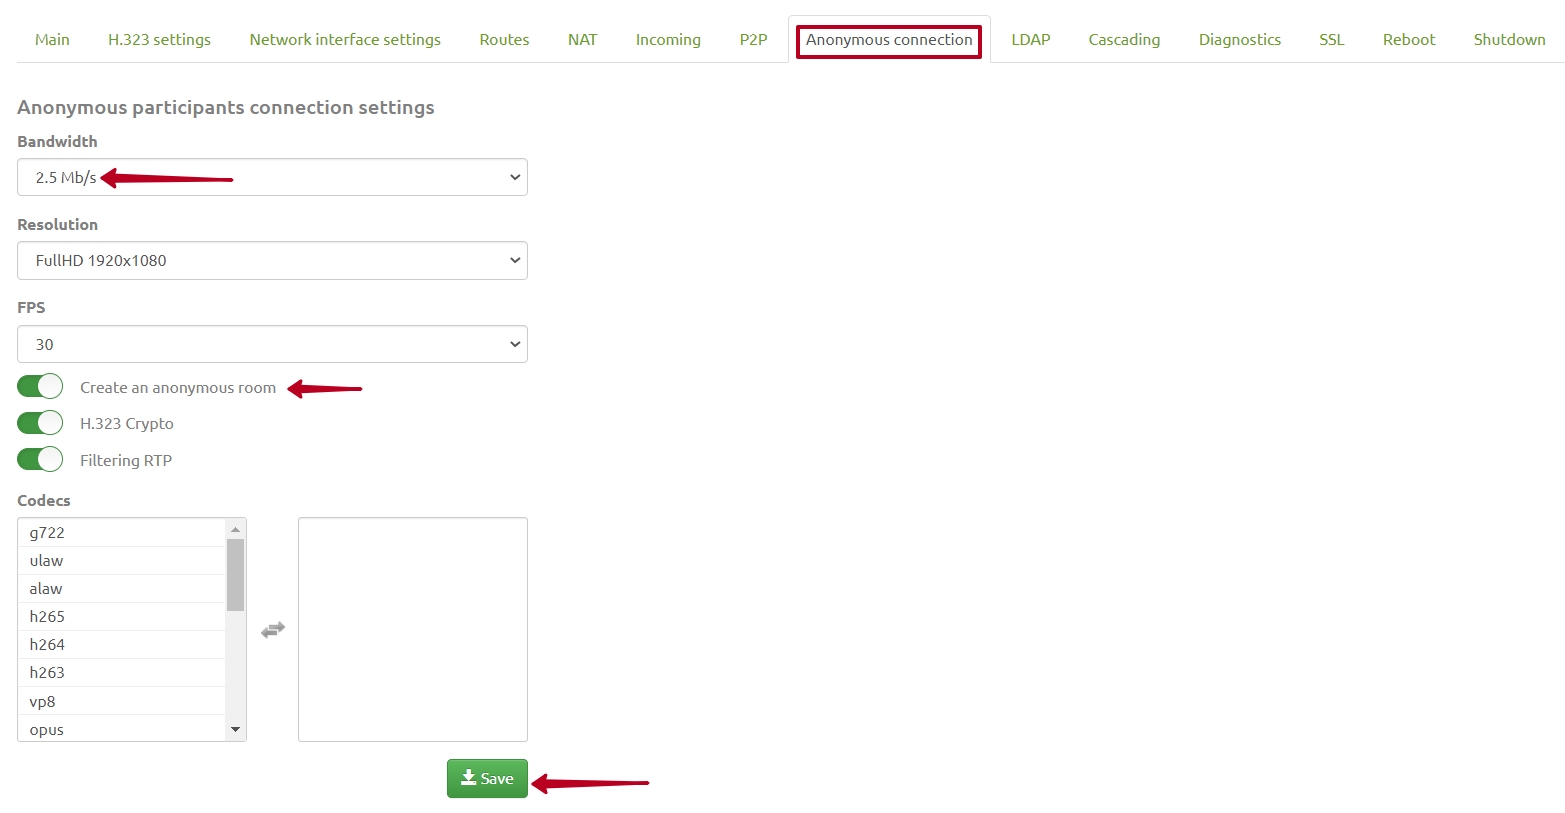
5. Go to the tab "Connect Anonymous" set the bandwidth for HD 1.5Mbps for FHD 2.5Mbps and enable the "Create an anonymous room" set the other items as preferred and save the settings. This item allows accounts having previously agreed among themselves on the date/time/conference number independently launch and conduct video conferences and webcasting without any moderation. Anonymous conferences are not displayed in the general list on the "Conferences" page but only on the main page in the anonymous conferences indicator where they can be forced to end. After checking you can turn it off if it is not needed for further work;
6. check that there is nothing in the list of allowed codecs (right column) by default, - this means that all codecs from the left column are allowed;
7. Save the settings.
Note
Codec sequence in lists
An important role in the normal operation of a server with a huge fleet of terminal models is played by the correct sequence of codecs both in the settings for anonymous users and in accounts cards. First there are audio codecs from “best” to “worst”; then video codecs with the same selection principal.
For anonymous users using the Vinteo Desktop application, web client and Vinteo mobile application to work without authorization on the server the list of codecs for anonymous users must include the Opus audio codec and the H.264 and VP8 video codecs. The following are examples of universal lists with the correct sequence of codecs:
1. For anonymous:
- aac_ld
- opus
- g7221_48_32
- g7221_32_32
- g7221_24_32
- g7221_32
- g7221_24
- g7221_16
- g722
- ulaw
- h264
- h263pp
- h263p
- h263
- h261
- vp8
2. For codecs in account cards
- aac_ld
- opus
- g7221
- g722
- ulaw
- h264
- h263pp
- h263p
- h263
- h261
Registration of accounts on the server
To create accounts go from "Home" => "Accountes" => "List" page. In the window that opens use the buttons to create an account or a group of accounts.
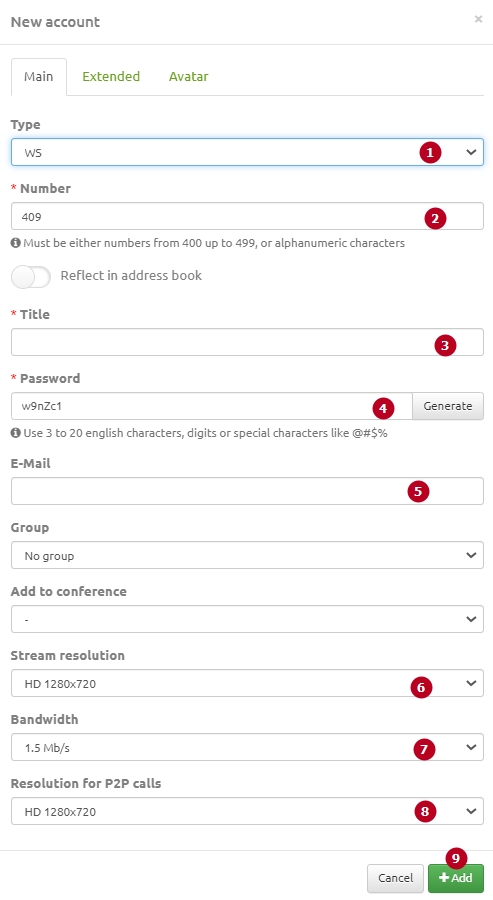
This description will provide a brief algorithm for creating two accounts of WS and H.323 type using individual settings for each. A more detailed description can be found by following this link. To add a new account click on the "Add" button. In the modal window that opens make the following settings:
- set the "Type" - "WS";
- if you want to change the number of this account which is his name during authentication the number is created automatically in increments of +1;
- enter his name/alias;
- change the generated password if necessary or generate it anew;
- enter the account's email; his authentication and settings data will be sent to him after his settings are completed;
- account's maximum resolution when connecting;
- maximum channel width;
- account's maximum resolution for point-to-point connection;
- click the "Add" button.
Add the following participants with H.323 and SIP types in the same way. The default codec set is often suitable for most modern terminals. For Polycom VSX6000 terminals add h263p and h.263 after H.264 codec. "Main" settings for SIP and H.323 type accounts are identical to WS; the differences are only at the "Extended" tab.
Working with conferences and accounts
Create a test conference
Click the add new conference button on the "Conferences" page.
In the "Create new conference" dialog box enter "1000" in the "Number" field. In the "Description" field enter "Test". Click the "Add" button.
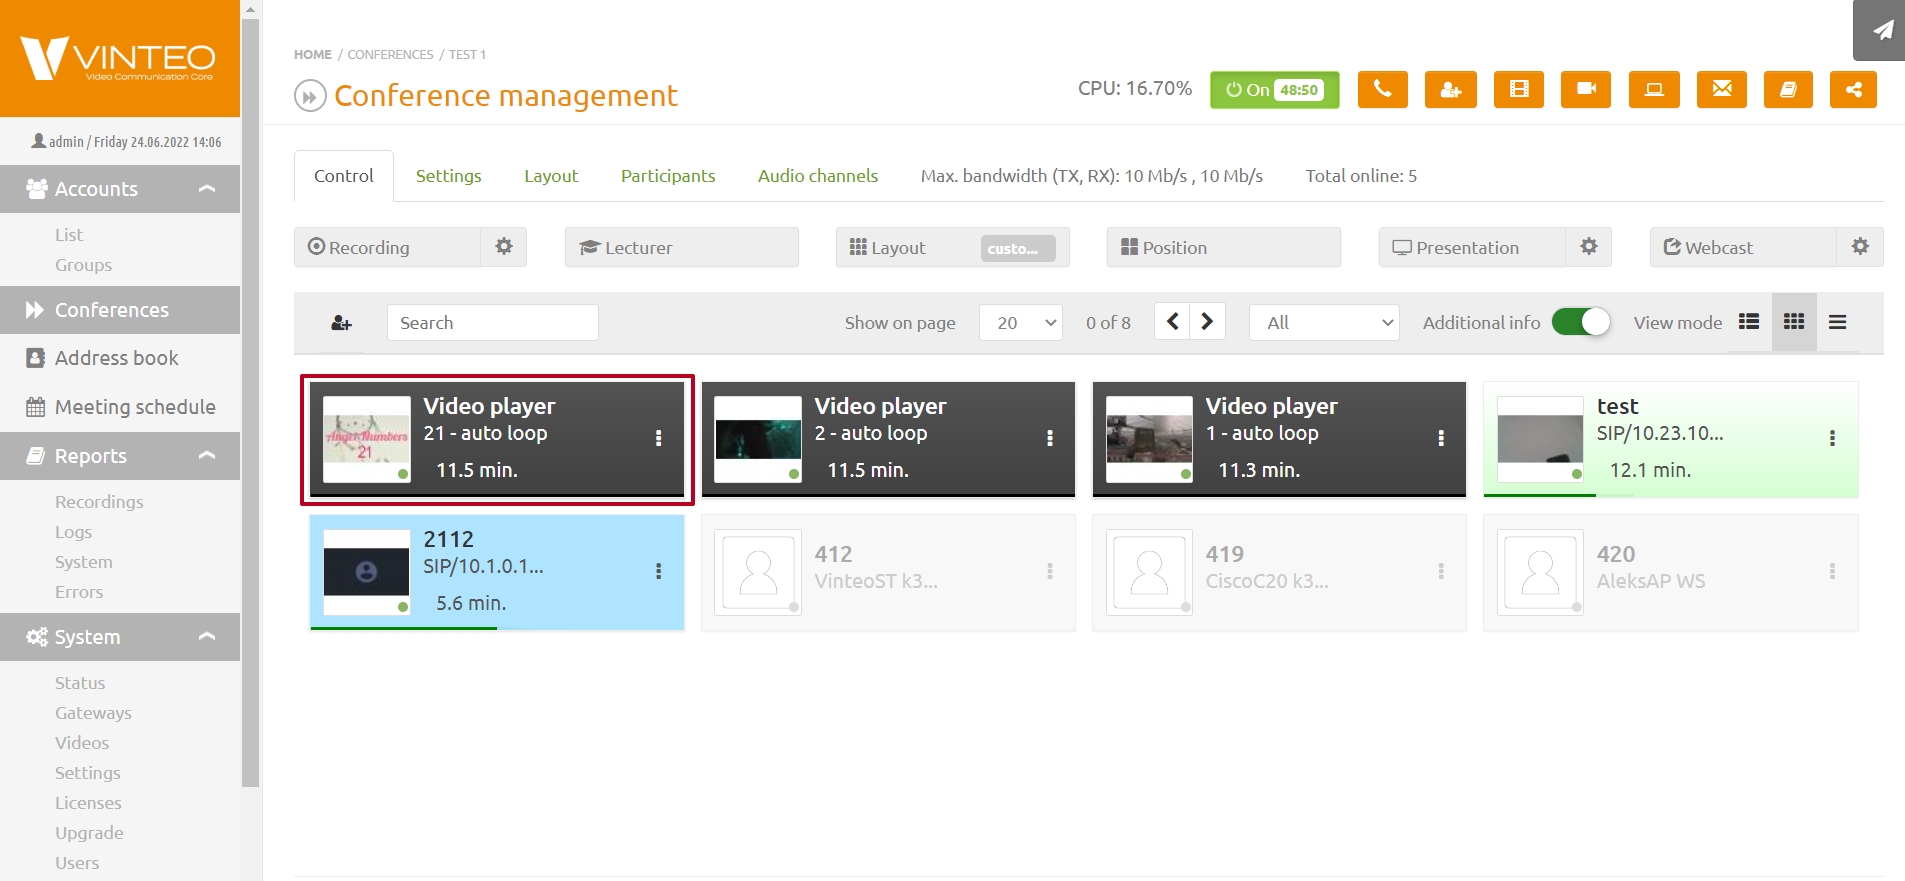
Go to the conference settings by clicking on the "(1000) Test" line in the conference list.
In the conference settings under in the "Settings" tab activate the "Open conference" option and press the "Save" button.
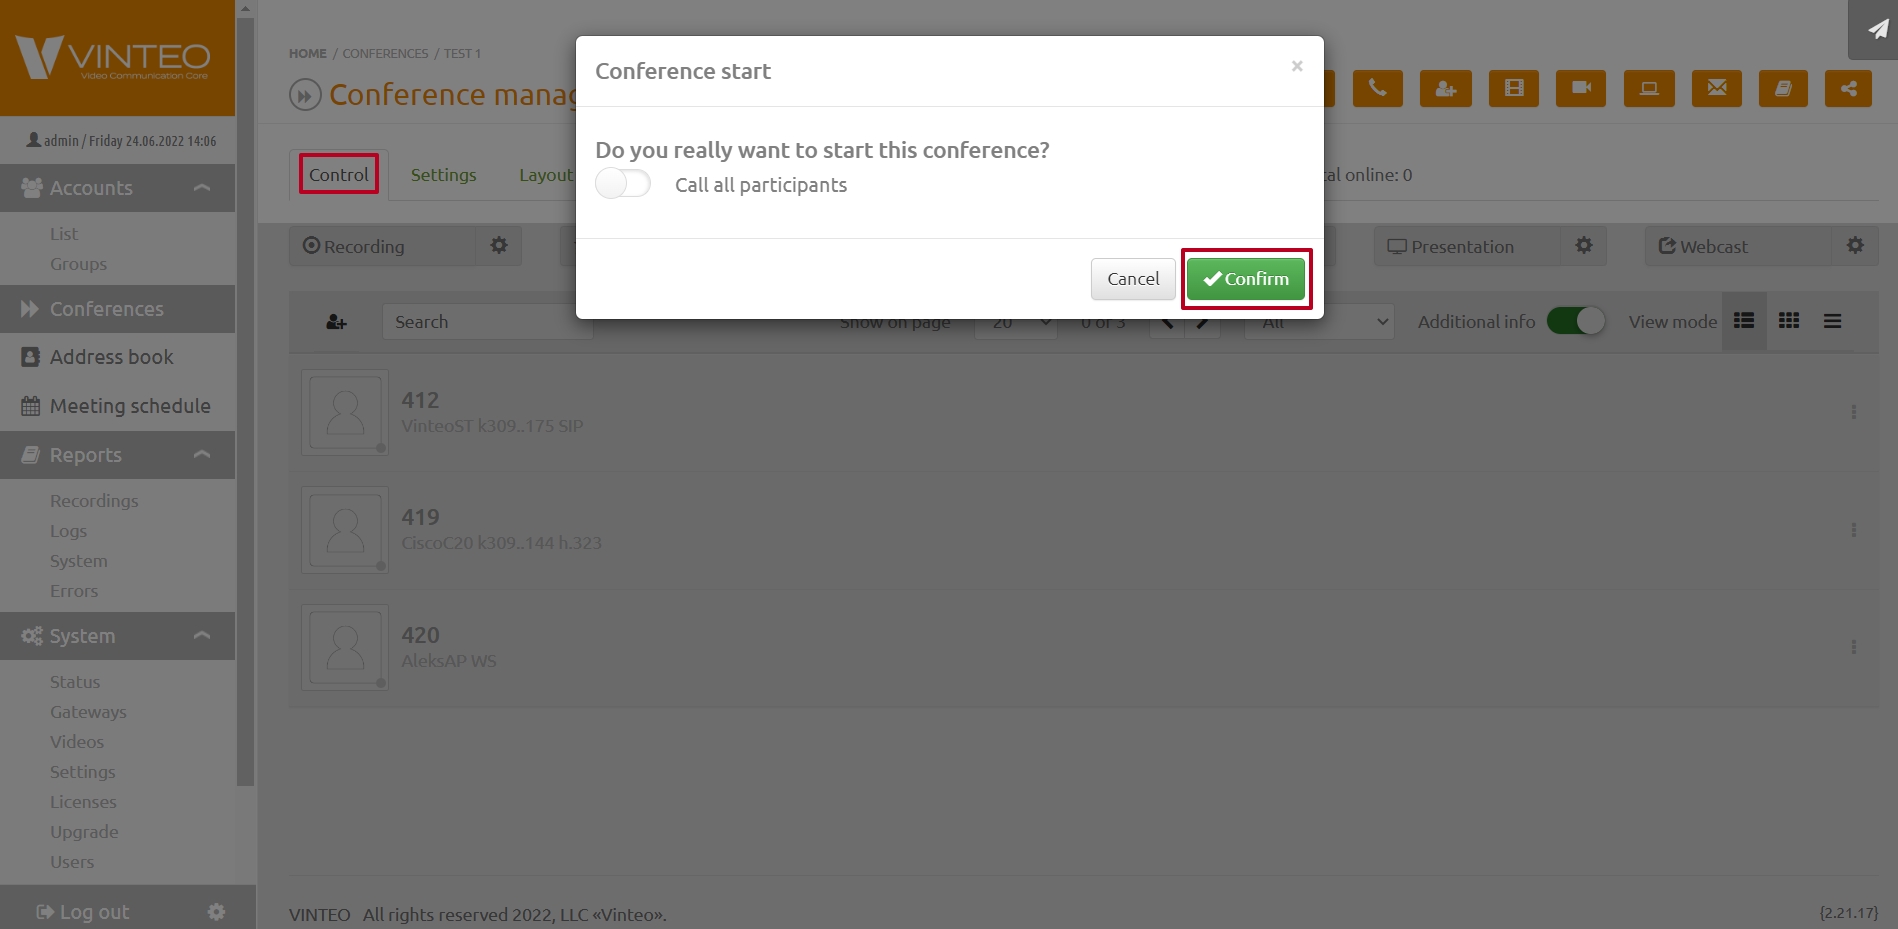
Click the "Off" button in the "Control" tab to start the conference. Press the "Confirm" button in the modal window.
Webcast enable
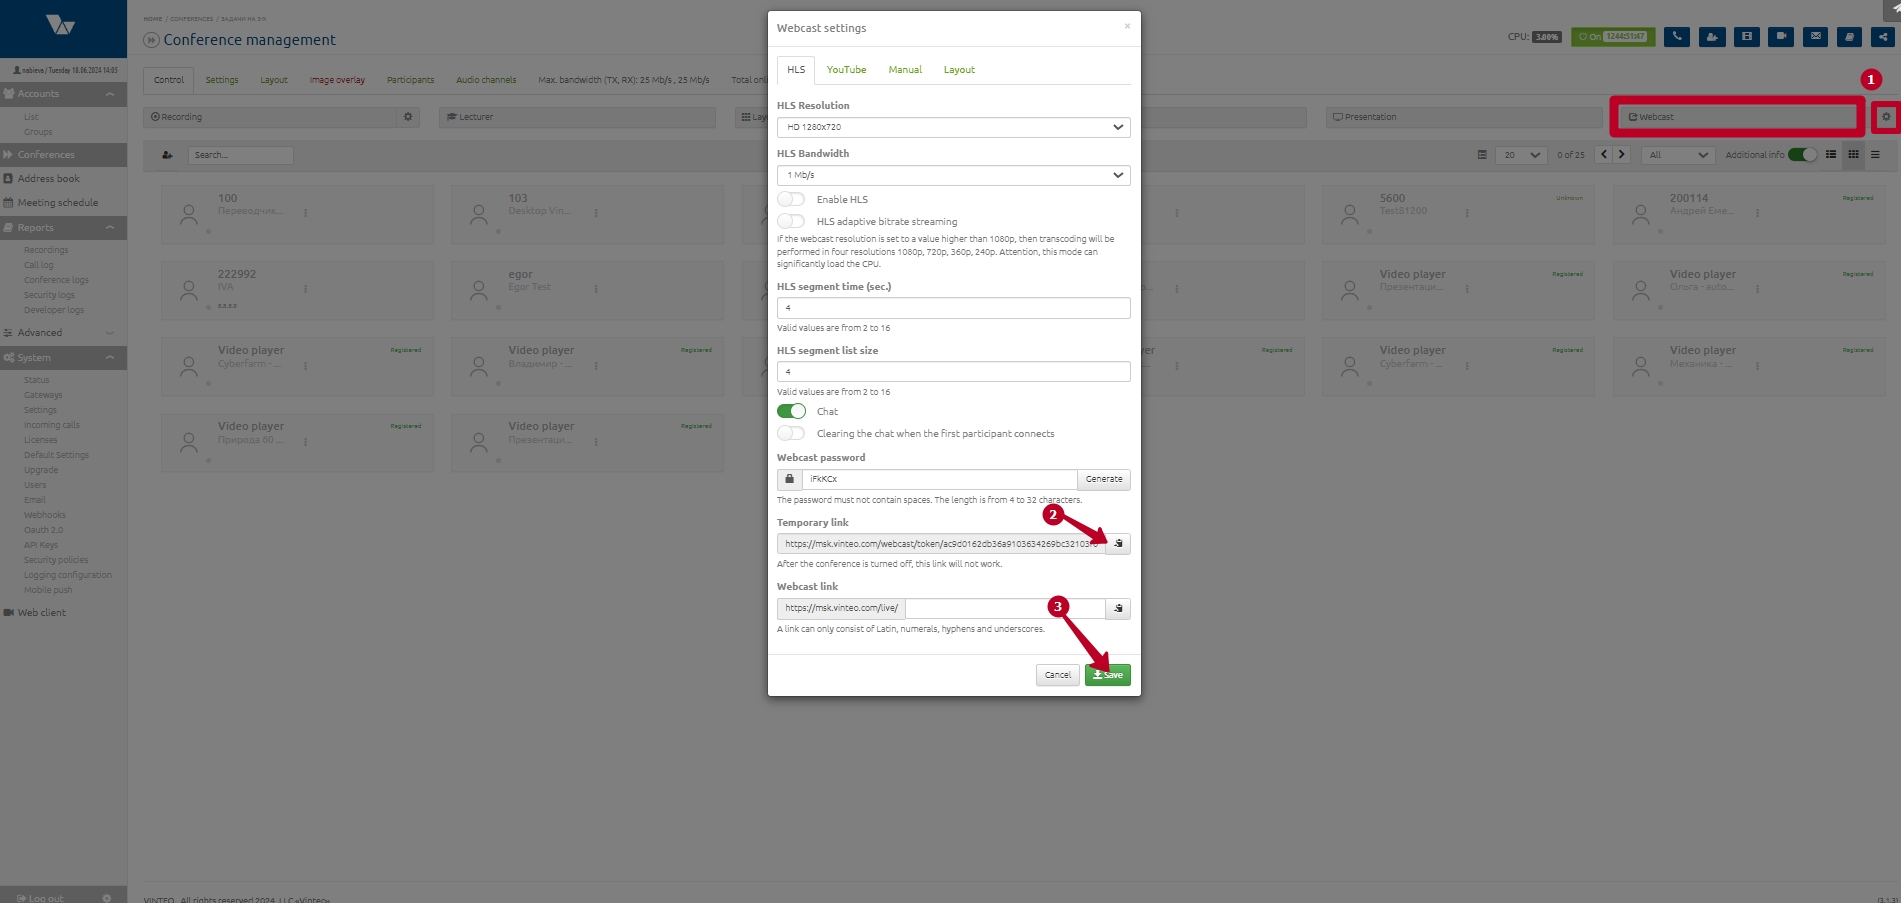
To test the Webcast feature follow these steps:
1. enter the webcast settings from the “Conference management” page;
2. copy the temporary broadcast link to the clipboard;
3. save the settings if you made changes;
4. turn on the broadcast; the color of key will change.
5. paste the copied link into the address bar of your browser and follow it; сlick on the screen or press the start broadcast button.
You will see the broadcast from the conference; the main controls for broadcast playback will open at the bottom of the window.
Accounts connection
Vinteo Desktop Account
To make a call to an open conference with the number “1000” specified above an authorized Vinteo Desktop client just needs to dial the same number in the dialing line. He can also call any authorized account via a point-to-point connection by dialing, for example, the number “101” assigned to a Polycom RPD account with H.323 type.
Polycom RealPresence Mobile Account
An authorised Polycom RPD account also only needs to dial the number of the conference or Vinteo Desktop account (100) created and make the call.
Calling accounts from a conference
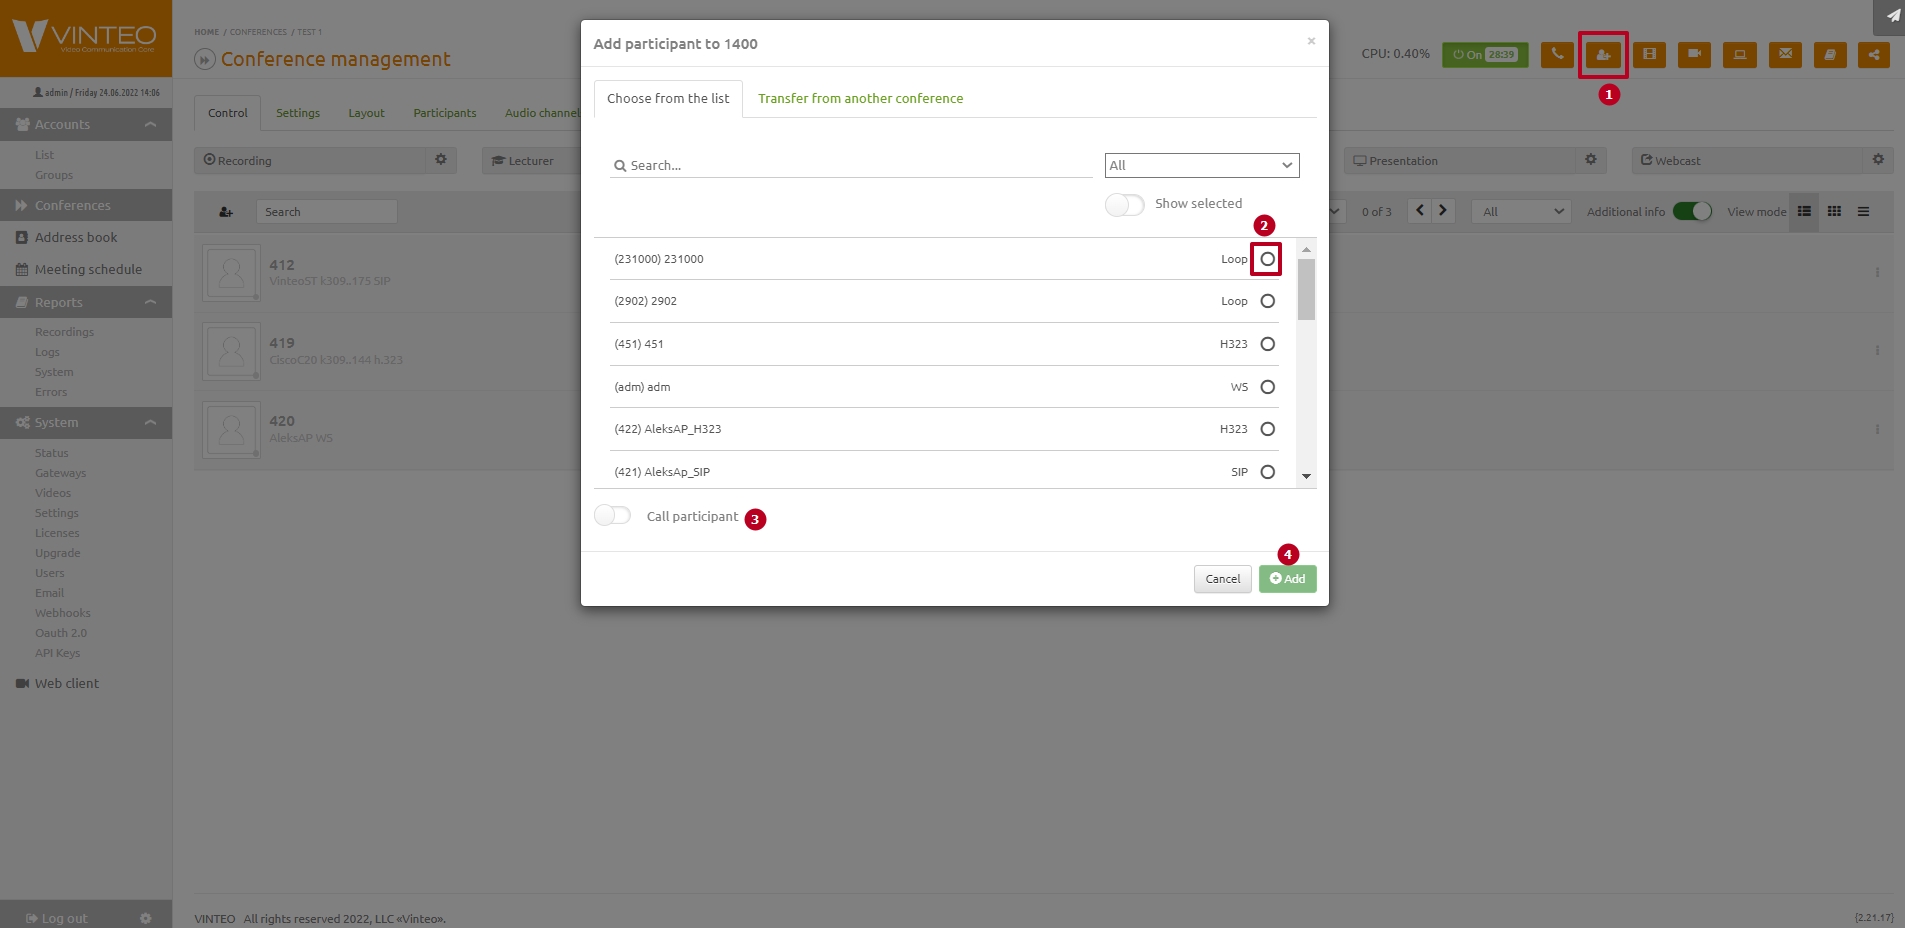
To call registered accounts from the server enter the created conference: "Home" => "Conferences" => line in the list with "(1000) Test".
- Press the "Add participant" button;
- Select the registered accounts "100" and "101" in the modal window;
- Activate the "Call participant" item;
- Press the "Add" button.
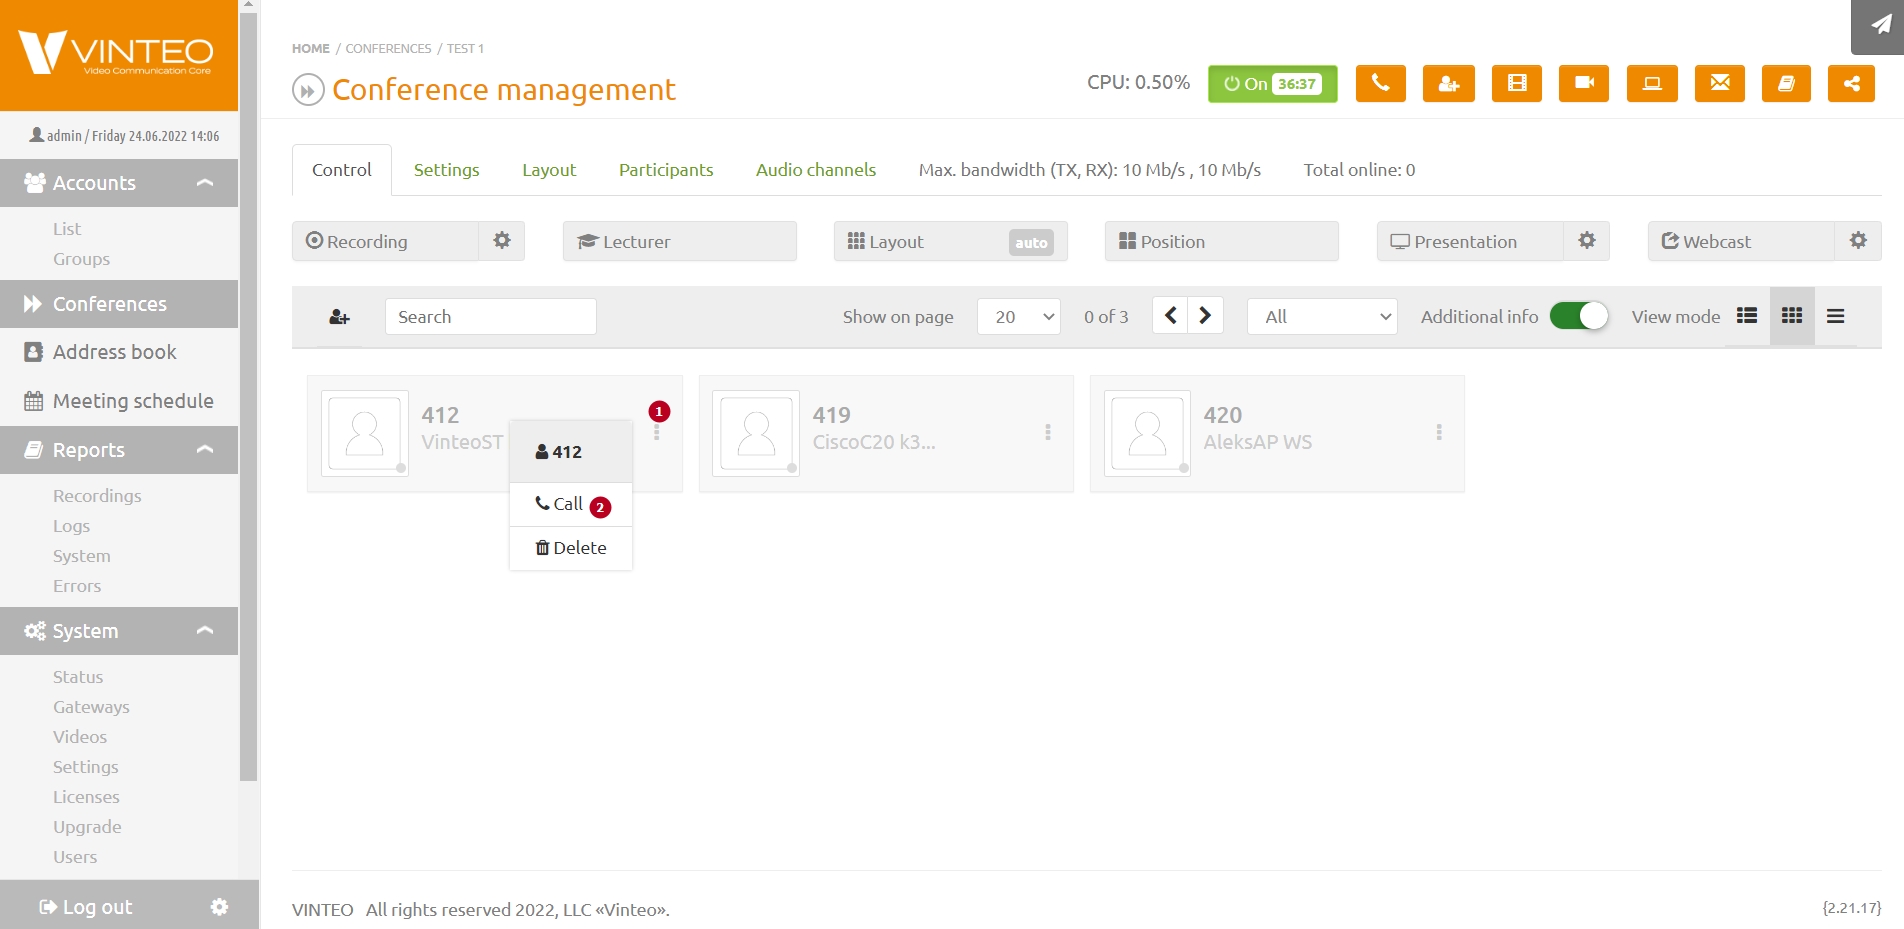
As the "Call participant" item has been enabled after clicking the "Add" button, they will be added to the invitee list and immediately called into the conference; if not enabled you will have to call them one by one from the invitee list via the participant management functionalit:
- Drop down the participant control panel;
- Call the participant.
Lecturer mode must be switched on as it is not active by default and participants can see all speakers including themselves in the layout.
Adding callers who are not invited
If the authorized accounts are called into a closed conference and they are not in the list of invited accounts you need to go to page "Conference management" to the "Management" tab. Perform the following actions:
- Open the pop-up window on the top right;
- Press the caller icon;
- Confirm the addition of the caller to the conference call
Working with the audio channel of the participants
To quickly mute a participant’s microphone double-press or click the left mouse button on it; the internal field of the active participants background will turn black.
Working with layouts
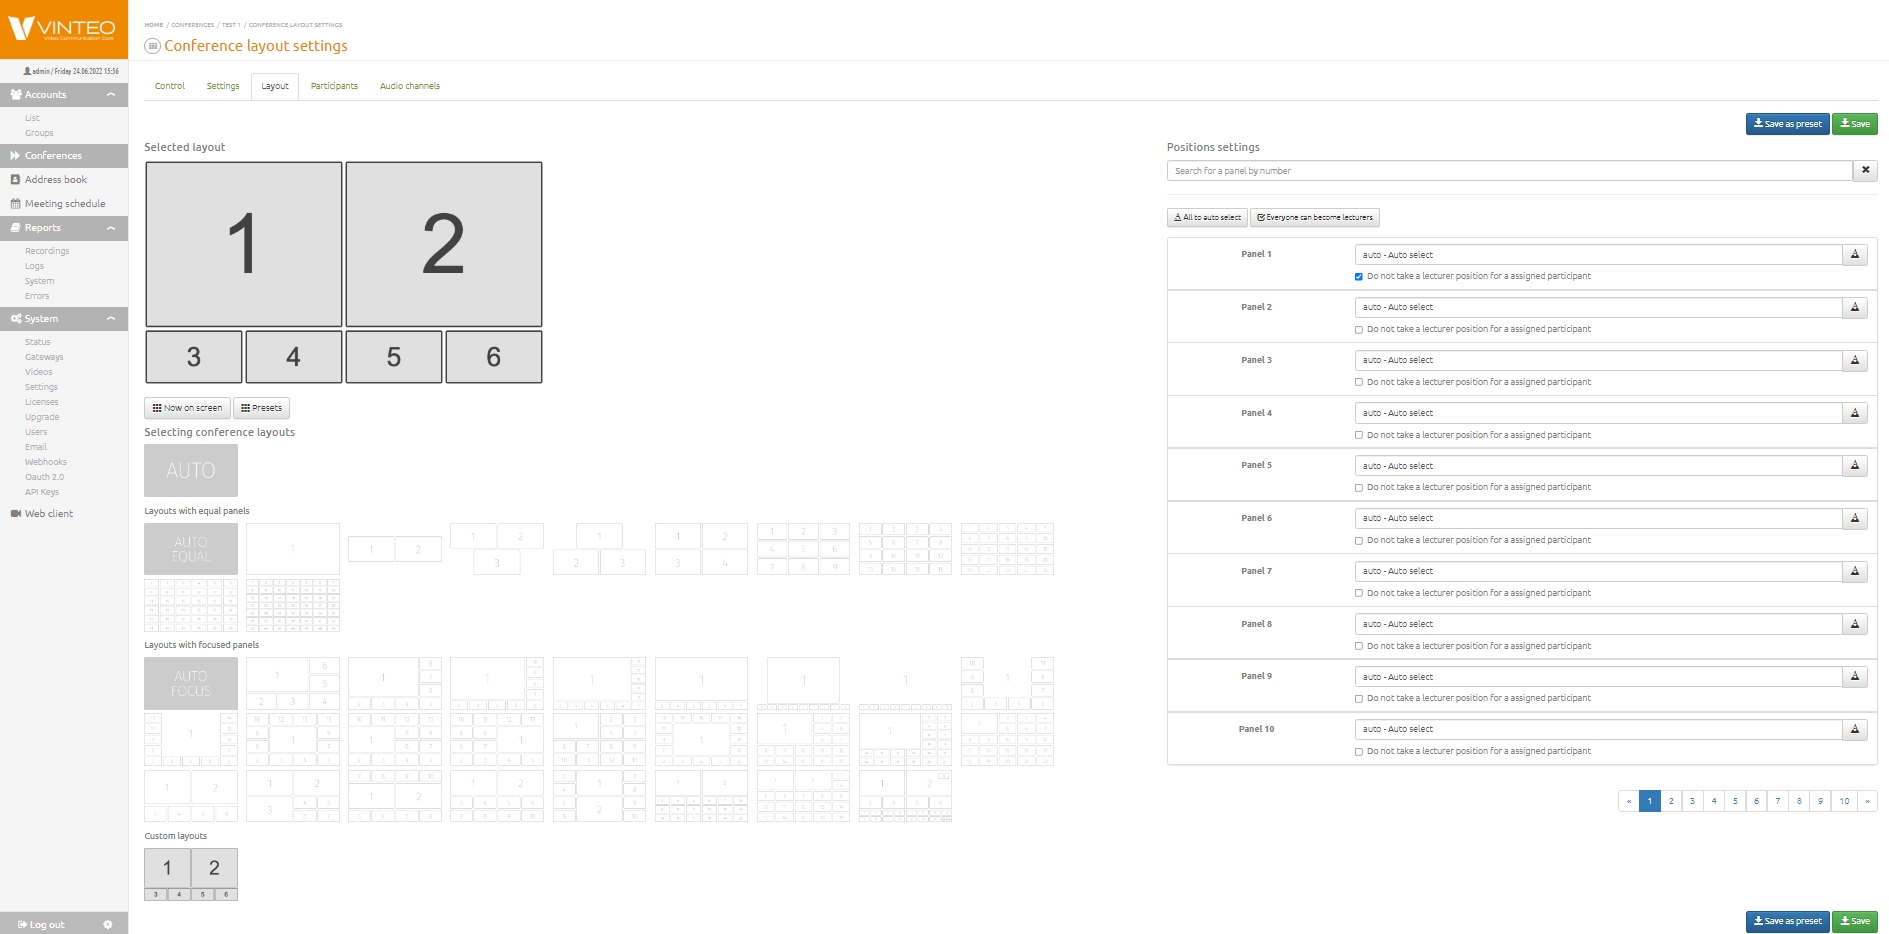
The general layouts for conference participants are managed from the "Layout" tab. This page allows you to configure the overall conference mosaic, select the desired layout, position the participants on the screen, define system positions for the lector or scrolling participants, etc.
Auto mode selects layouts from both layouts below as the conference fills up with participants.
Auto equal mode is the first type of layout that divides the overall screen into equally sized panels displaying the number of participants depending on the total number of participants in the conference. In this layout type, with the default settings, the participants taking the lector role remain in their positions, provided that the number of participants does not exceed the dimensionality of the layout. Auto focus" mode is the second type of layouts that allows participants to see the speaker in a larger panel in relation to others, automatically matching the layouts to the number of participants in the conference. Auto focus is enabled by default and uses both layouts as the conference fills up with participants.
The "Layouts" page displays the selected mosaic on the top left, below there are layouts templates available for selection. On the right side of the page are the panel assignment elements, the button to set all positions in auto and the position (panel) search field. To define the value of the panel, simply place the cursor in the field of the corresponding panel, after which a list of available values and participants will appear, in this list the connected participants are highlighted and sorted in green for easy selection. Field of the set in panel contains element of search which leaves in the list of accessible values, only those values which have partial or full coincidence, search occurs on number of the participant, on a name of the participant and on ip-address of the participant. After selecting a layout or defining a panel value, the "Save" button should be pressed to put the changes into effect.
Checking the operation of anonymous conferences
If the "Create anonymous rooms" function is active, perform the following actions:
1. Dial an arbitrary conference number from the software terminal of the first account, e.g. "4000". A connection to the anonymous conference number 4000 will be established; 2. Carry out the same actions from the terminal of the second account, as well as from the next necessary to check connection. All accounts who dialed "4000" will get into a conference with the same number which was created by the first account. Moderation and Webcasting of anonymous conferences is not possible.
Checking the operation of "Group Calls"
"Group Calls" are only available to authorised WS accounts with the right to this action, via the Vinteo Desktop application.
- Add callers with numbers 101 and 102 to the VD record book;
- Select the numeric keypad icon in the sidebar navigator;
- Click on "Group Call";
- Tick the checkboxes of the participants created in point "1". Participants who are ready to make the call will be marked with a green dot;
- click "Call";
- A temporary type conference will be created on the server (marked with a clock icon in the "Type" column) with an available number selected from the pool of numbers for the conference, and the selected participants will be invited there;
- The initiator of this conference has moderator rights and will have access to the participant control panel in the VD application. In addition to the basic controls there, the moderator can also grant or delegate moderation rights to other participants;
- The last moderator concludes the conference.
Vinteo mobile client setting up
Our mobile app for smartphones and tablets is available at the AppStore and Play Market. After installing it, let's set it up: The "Calls" page is the home page of the app. This is where your call history records will be displayed.
- Launch the application and open the settings.
- Note the two items: "Display name setting" and "Server settings".
- Edit your profile details and save by pressing the "Done" button.
- Perform the server settings and save by pressing the "Done" button.
- Check the "Status" and return to the "Calls" page (handset icon).
- On the "Calls" page, press the numeric keypad icon
- Enter conference number 1000 or caller 100 and press the call button. The # is followed by the conference PIN if the conference is private.
- Accept the agreement to allow access to the audio.
- Accept the agreement to give access to the video.
- By default, the microphone and video from the participant are disabled.
- Switch on the microphone and video, check incoming/outgoing audio and video.
- End the call.
RealPresence Mobile client setting up
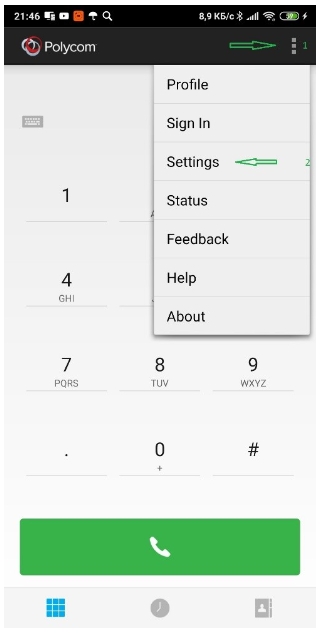
Let's set up the Polycom mobile client available on Play Market and AppStore as RealPresence Mobile. Here are the settings for the Android OS. After installing the software on the smartphone, proceed to its settings.
- Open the list of functions;
- Select "Settings";
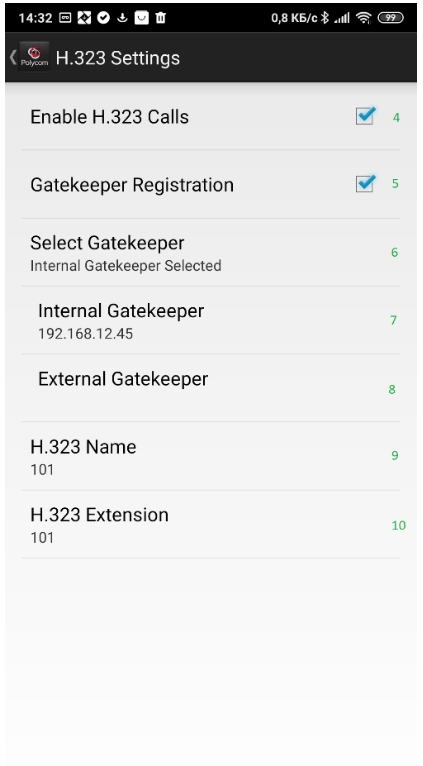
- Select "H.323 settings";
- Enable H323 call type;
- Enable gatekeeper registration;
- Here you can choose between the internal IP address of the GK and the external one, provided the server has a second interface with access to the external network, their addresses are entered below.
- Internal GK server address;
- GK server's external address;
- Number of the account;
- Also enter the number of the Account.
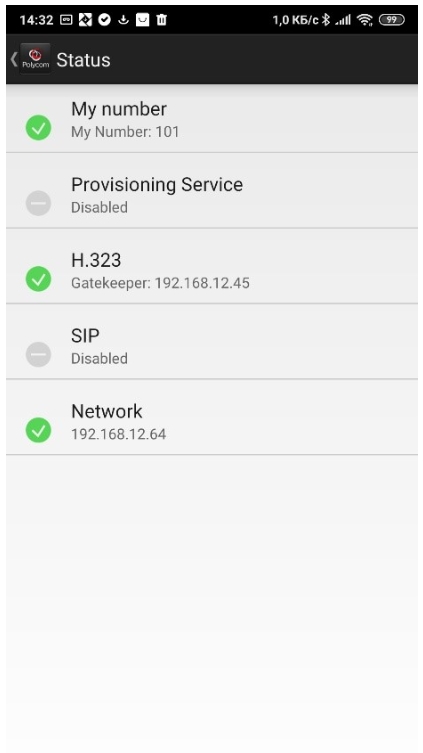
This is what the "Status" page should look like for a GK H.323 authorised Account.
