Conference management web page: различия между версиями
Alina (обсуждение | вклад) |
Alina (обсуждение | вклад) |
||
| Строка 230: | Строка 230: | ||
''Layout'' is the tab where you can edit the participant layout. | ''Layout'' is the tab where you can edit the participant layout. | ||
| + | |||
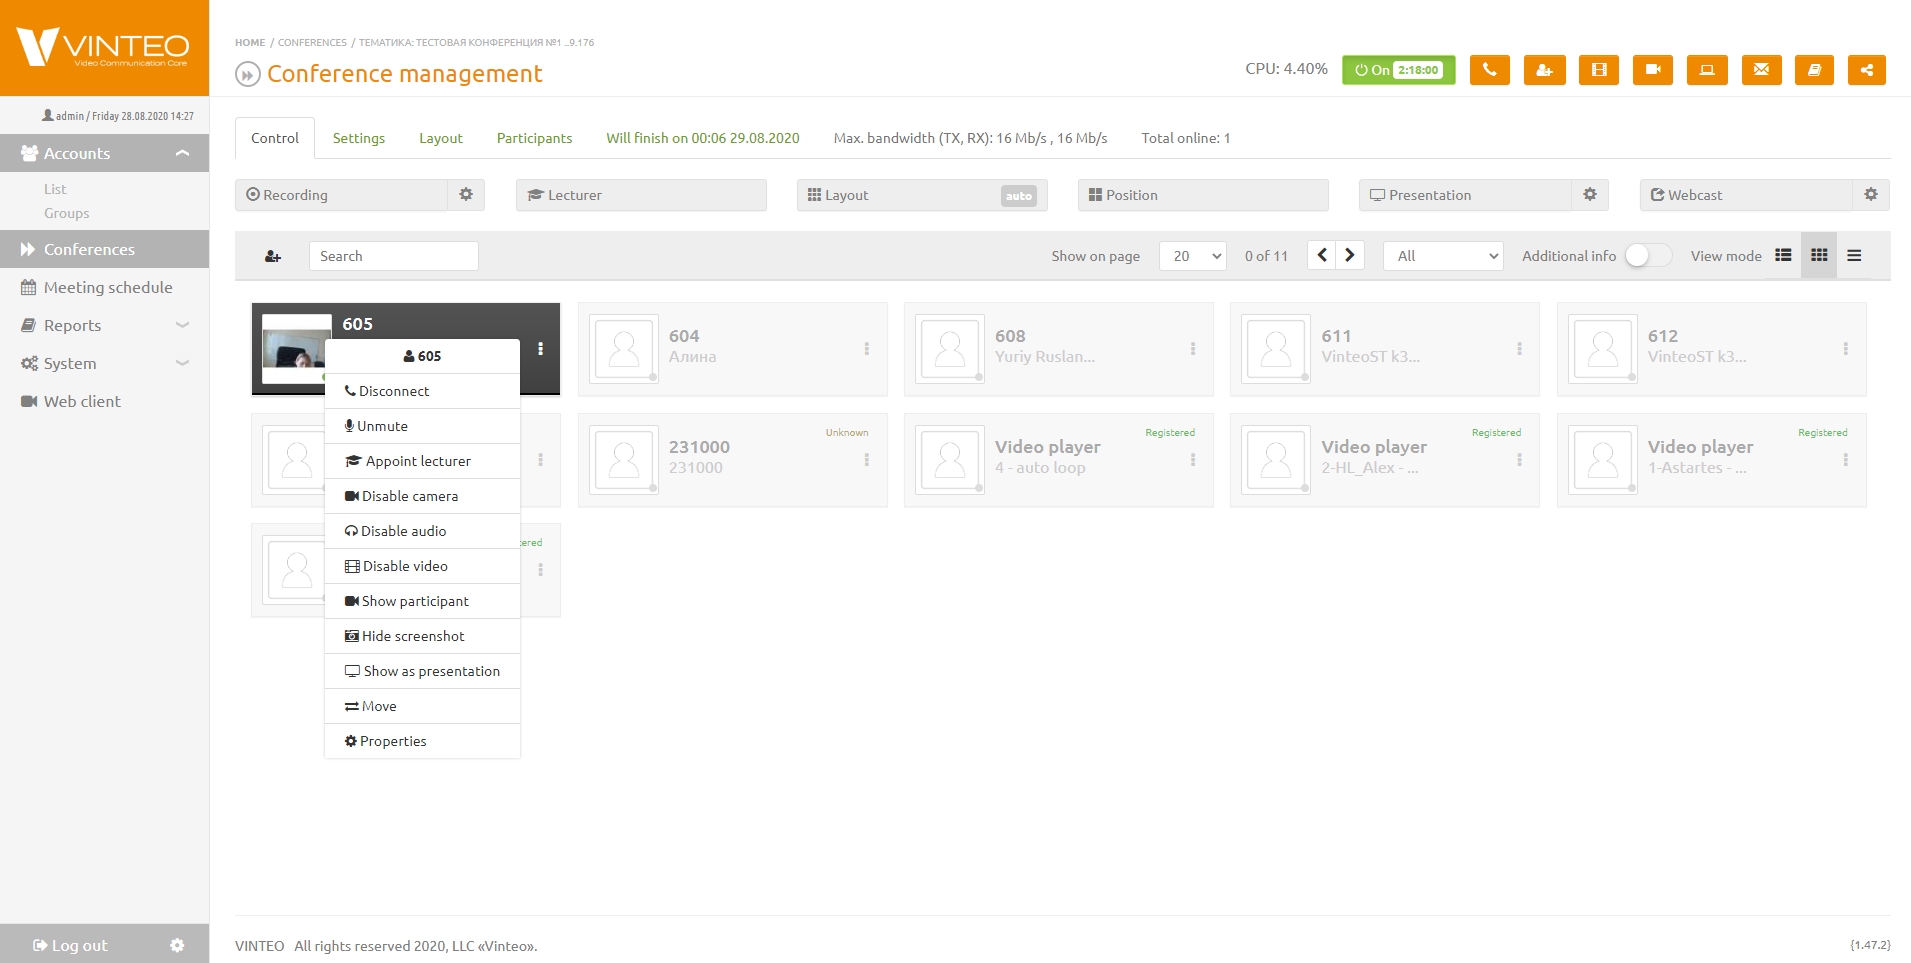
| + | When the participant status is active. | ||
| + | [[Файл:Conference management - Vinteo.jpg|800px|безрамки|центр|Conference management Participant list active]] | ||
Версия 11:39, 1 сентября 2020
English / General Description / Web interface for configuration and management / Conference management web page
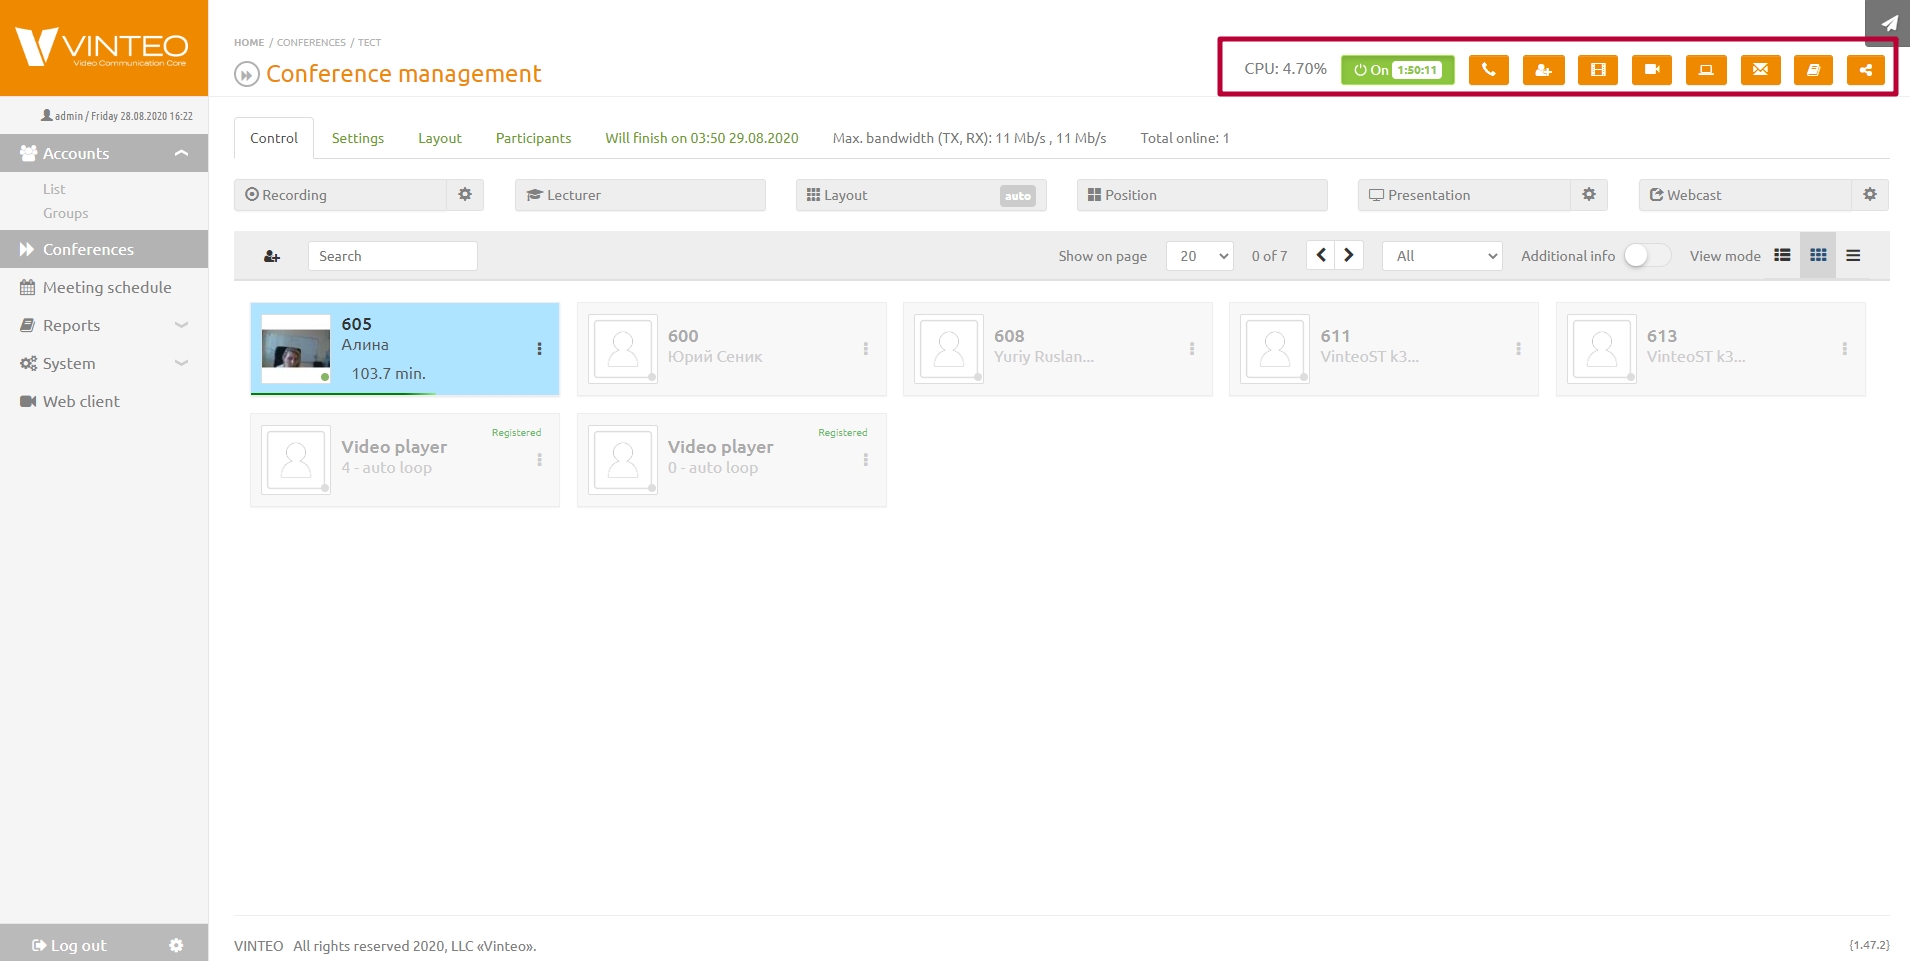
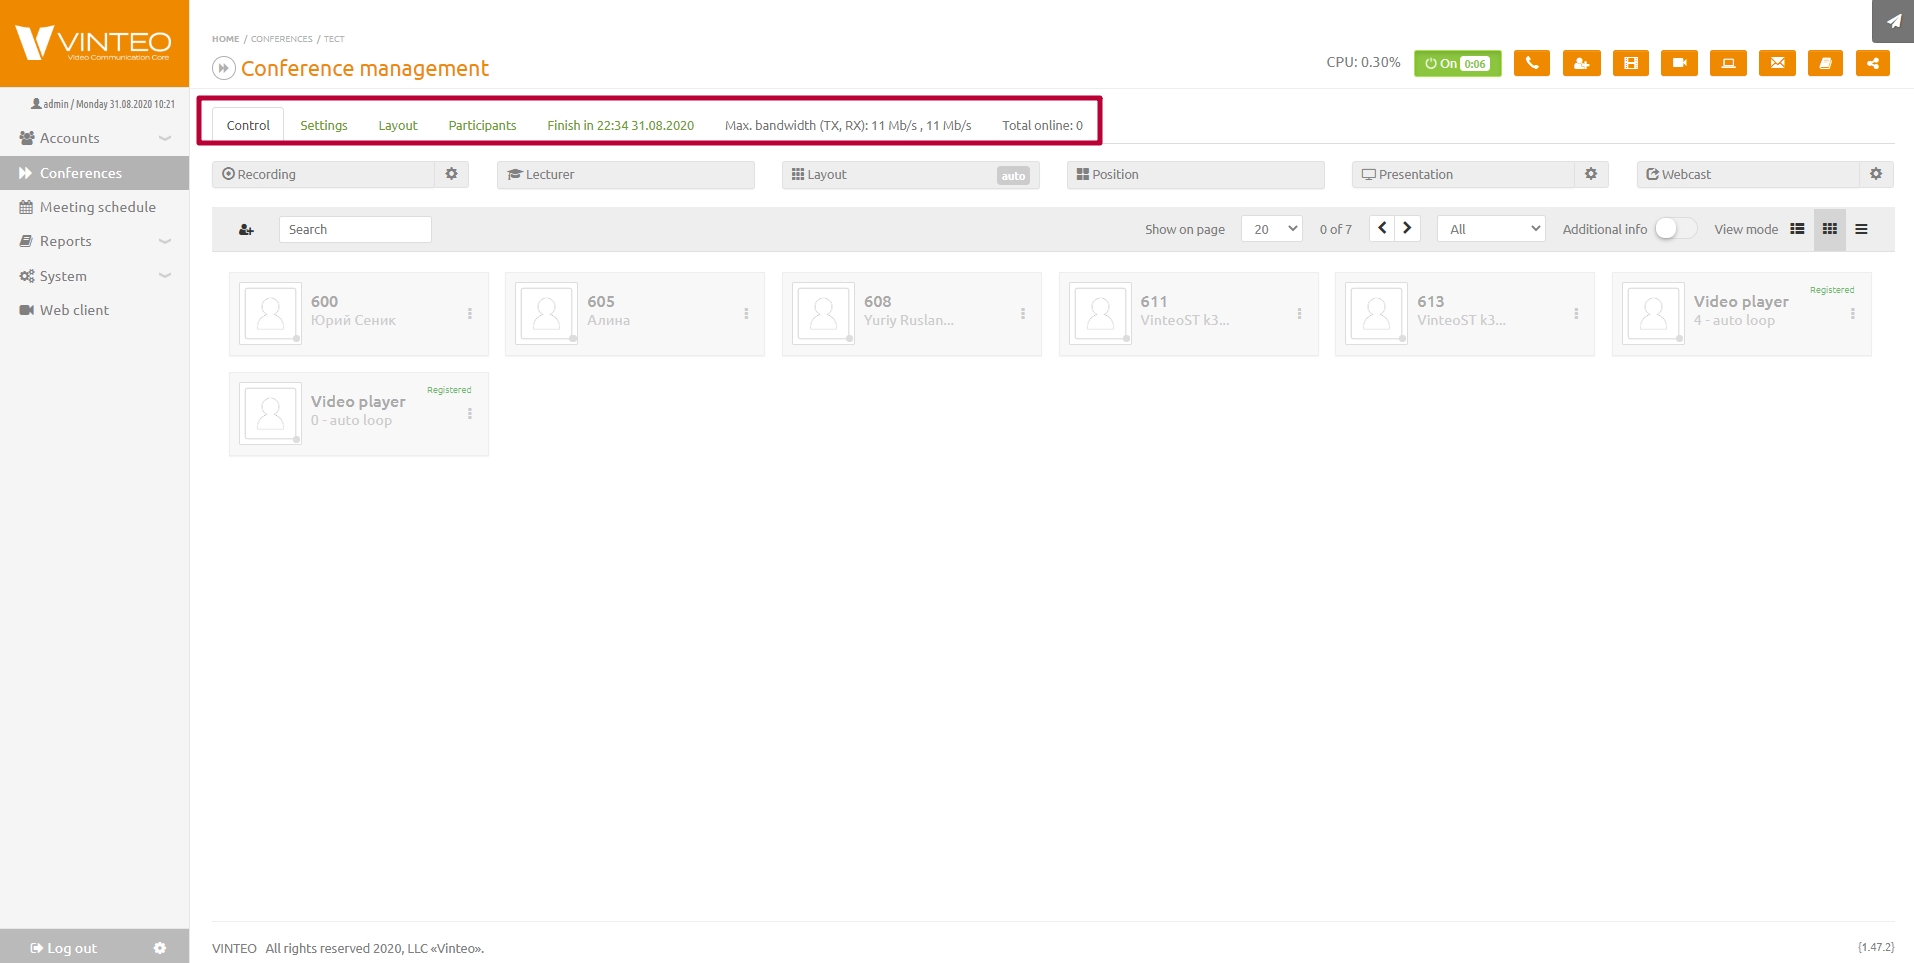
The page is visually divided into three parts:
- Information part
2.Navigation part
3.Main part
Содержание
The information part
The information part is located in the upper right corner of the page. The information part displays the current conference status, CPU load and conference time. The information part provides access to some functions.
The Dialing
The Dialing function allows you to call a subscriber by IP address or SIP / H.323 URI address, select the resolution of the connected participant, channel width and the number of frames per second. The account you dial will be connected until the end of the call and will not be saved in the list of conference participants.
Add participant
The Add participant function allows you to create a new participant, select an existing participant, move a participant or add a previously created group of participants.
To create a new account, only the main account settings are used: Type, ID, Name, Password and IP address. The account can be dialed as a participant by clicking the Add button.
To add a created account, you can use the Search string and choose the required account. You can dial an account as a participant by clicking the Add button.
To transfer account from another active conference choose the conference from the list. Then choose the participant from the list and click the Add button. The participant will be added automatically.
To add a group of accounts choose from the Group list several accounts and click the Add button. Participants will be dial automatically.
Player
The Player function allows you to add previously downloaded videos. Choose the file you need from the Videos dropdown list. Switch to on the Auto repeat enable function if you need and click the Add button. If you do not switch on the Auto repeat enable function a video will play until the end and it will be set off from the conference.
Video stream
The Video stream function allows you to add a video from different sources by HTTP and RTSP protocols. To add a video, enter a description in the Stream description string, enter the stream address in the Video stream URL string and click the Add button.
For example, to connect streaming video from a CCTV Beward camera, you need to enter an address in the following format.
rtsp://XXX.XXX.XXX.XXX:YYY/user&password&channel1&stream
- ХХХ.ХХХ.ХХХ.ХХХ is a device network address.
- YYY is the port of the RTSP stream specified in the device configuration (default: 554).
- user is an administrative user of the device with the right to view the stream.
- user is an administrative user of the device with the right to view the stream.
- password is the password of the administrative user of the device.
- video stream is the digital number of the stream. If your device has more than one stream (0 = main stream).
Message
The Messages function allows you to show a message on the screen. Enter a text of the message in the field. Choose how many seconds to display this message. Click the Send button. The message will be shown to all conference participants.
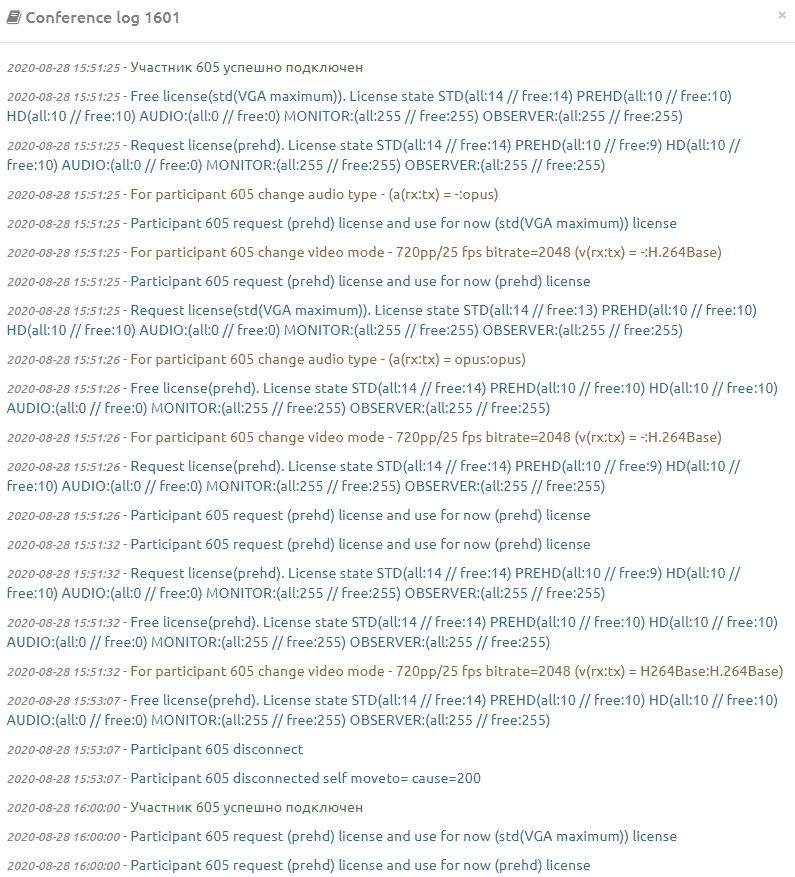
Conference log
Conference log function allows you to view all actions and calls of participants and open the modal window with logs of the conference.
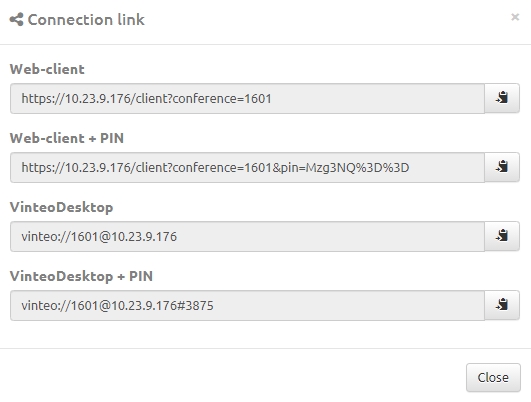
Connection link
Connection link function open the modal window with fields which has links to the web client and links for dialing Vinteo Desktop with and without pin code. The moderator may send the link to the participant of the conference in the manual mode. Links with pin code use for the connection to the conference without the proceed of the authorization or entering the pin code manually.
English / General Description / Web interface for configuration and management / Navigation part
Navigation part is located under the Information part. Navigation part allows you to go to Settings, Layout and Participants tabs. The Navigation part displays the maximum channel width, the number of connected conference participants and the duration of the conference, if you specified it.
Main part
English / General Description / Web interface for configuration and management / Main part
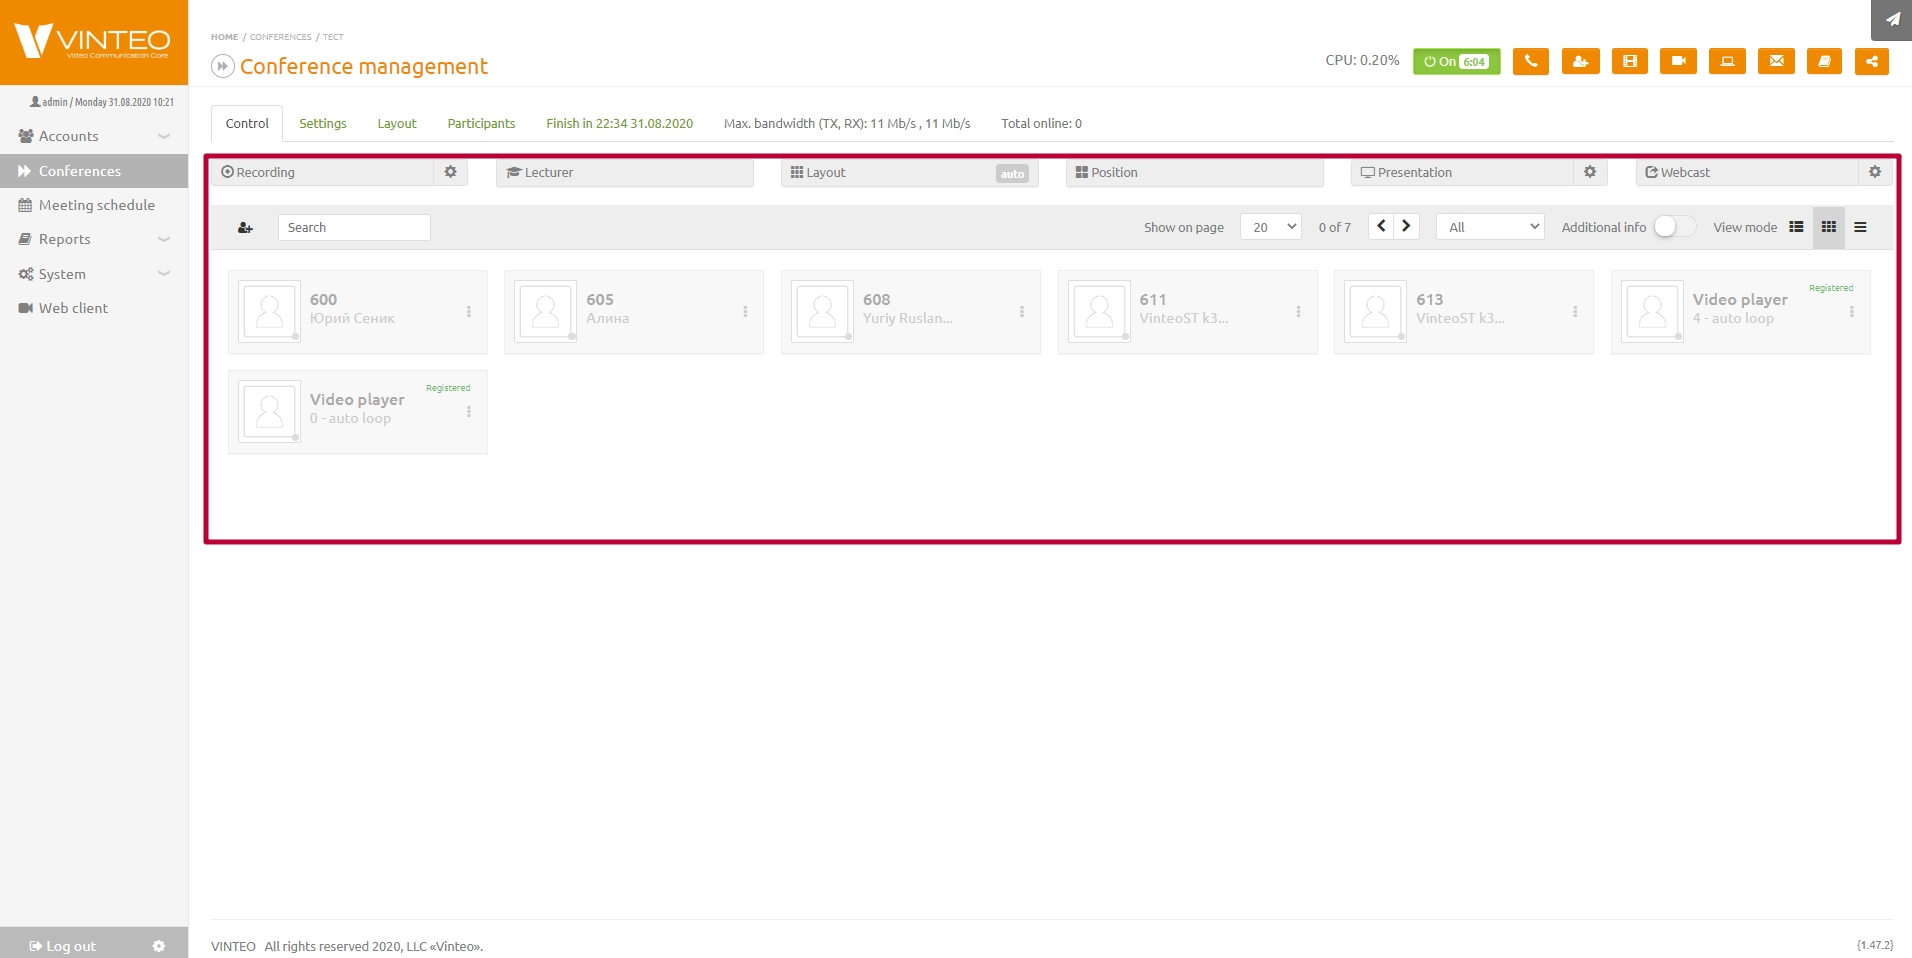
Main part is located under the Navigation part and allows you to see the list of participants, the date, conference ending time and make quick settings for such functions as:
- Recording
- Lecturer
- Layout
- Position
- Presentation
- Web cast
Recording
Recording button is divided into two parts. Its left part switches on/off the record of the conference. Its right side allows you to open the modal window with recording settings. Click on the Recording button and the conference will be recorded with the default settings. The next time the conference is turned on, the recording will be done again.
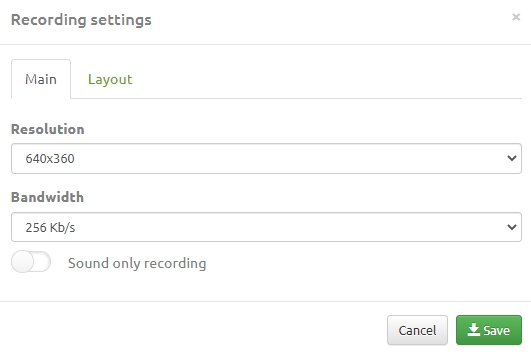
In the main recording settings, you can change:
Resolution
The Resolution string displays the default value set in the settings of the conference itself.
Bandwidth
The string in which you can specify an upper record speed threshold
Sound only recording allows you to choose whether to record audio and video stream or record only audio stream.
Note: Initially, both video and audio are recorded, and only after the end of the recording when saving the selected audio only recording option is applied.
In the Layout tab you can change the way of its order with Use the selected layout of the conference checkbox or with Use the general layout of the conference checkbox you can leave the automatic distribution of participants without affecting the conference layout.
A list of available layouts is found in Appendix 1 1 of this manual.
Lecturer
The Lecturer button controls the switch of the ‘Video-selector’ mode. The identificator of the current participant defined as a lecturer will appear on the button when the ‘Video-selector’ mode is enabled.
Layout
Layout button controls of the view of mosaic and number of participants displayed at the same time.
Position
The Position button opens a modal window with an image of the selected numbered layout and an up-to-date list of participants occupying the corresponding positions. The layout changes online when participants move in the layout.
Presentation
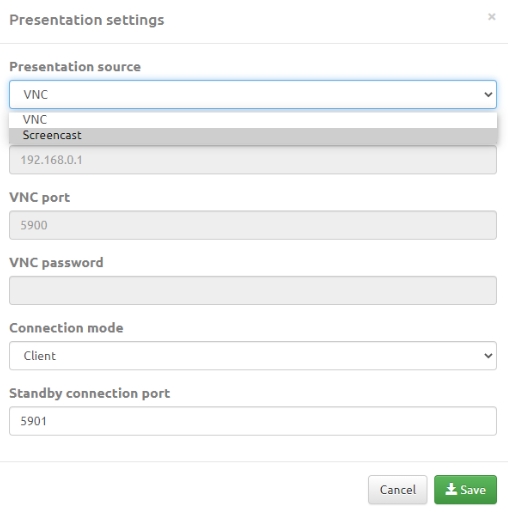
The Presentation button is divided into two parts. The left one enables / disables the video stream with the presentation. The right side of the button gives access to the settings for selecting the presentation source and changing settings. There are two available presentation sources: the default VNC and the Vinteo Scteencast app.
VNC
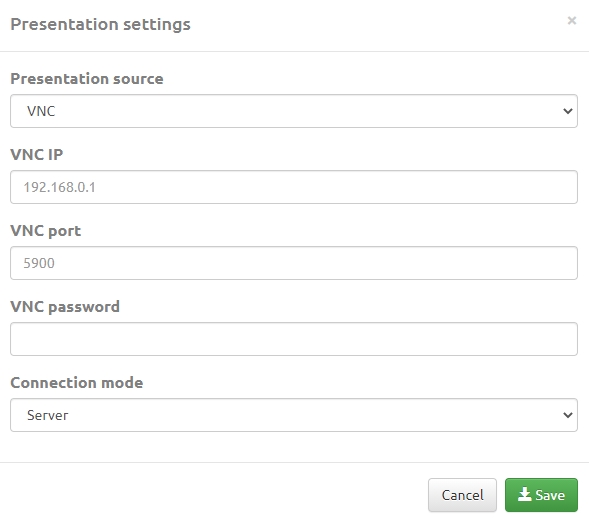
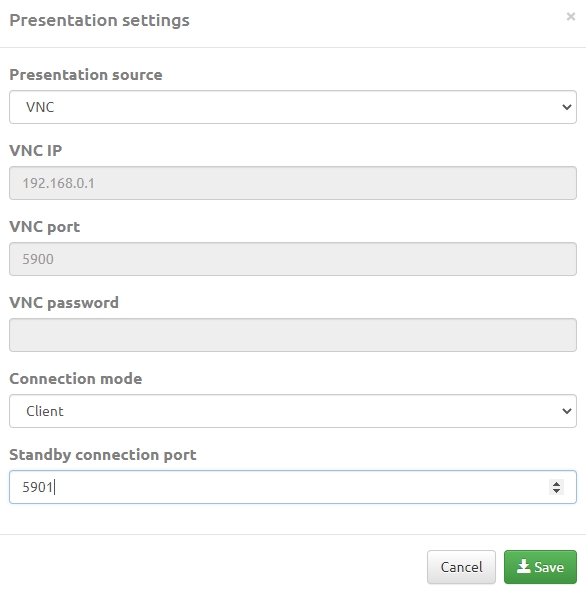
There are two operating modes available in VNC settings: these are VNC Server and VNC Client. Settings for VNC Server connection mode.
Presentation source is a button with which you can select VNC protocol or video stream from VINTEO Screencast program.
The VNC IP string requires an IPv4 address.
In the VNC port string, you need to specify the port on which the remote server recognizes incoming connections.
In the VNC password string, you need to enter the password from the remote VNC server.
Connection mode is a button that allows you to change the following settings when ‘Client’ is selected.
Standby connection port is a string in which you need to specify the port on which you want to listen for incoming connections.
Screencast
When you select a Screencast presentation source, the server waits for the Screencast application to connect to the conference. If the link with the Screencast is established, the 'monitor' image on the Presentation button will change color to green.
Then when the Presentation button will press the Screencast application will require permission to demonstrate the selected presentation source. If an account has selected the Auto answer on request item in the Vinteo Screencast program in the connection settings and has not canceled the request, then in 5 seconds the application will start showing the presentation.
Web cast settings
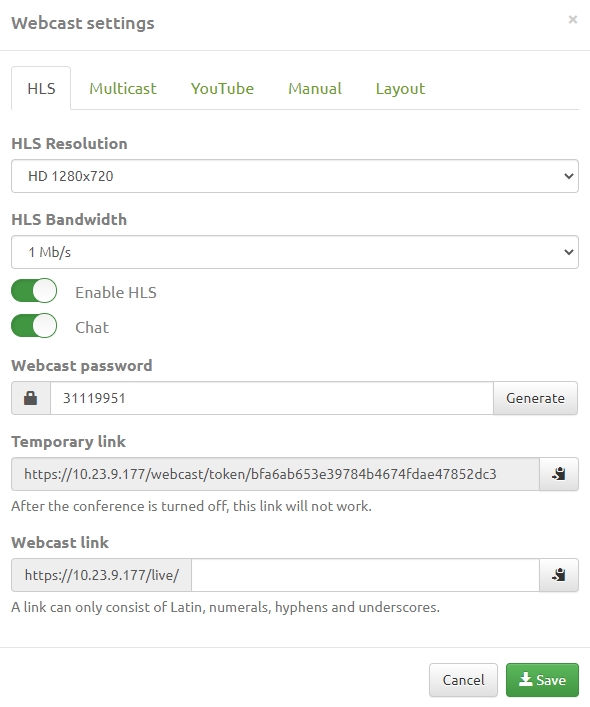
In the modal Webcast settings you can change:
- HLS Resolution is a button in the drop-down list of which you can choose the broadcast resolution
- HLS Bandwidth is a button in the drop-down list of which you can choose the broadcast bandwidth.
- Enable HLS is the toggle that enables / disables the use of HTTP based streaming media protocol.
- Chat is a toggle that turns on / off the display of text chat on the broadcast screen.
- Webcast password is the string in which you can specify a random password for protecting a broadcast from unauthorized view.
- Temporary link is a string with a link where the broadcast containing the access key is available. The listener can take part in the correspondence if he entered a name / nickname and if the Chat switch is on.
- Webcast link is the permanent link for the webcast which edit by moderator/administrator. Only Latin, digits, hyphens and underscores can be specified in the Webcast link string.
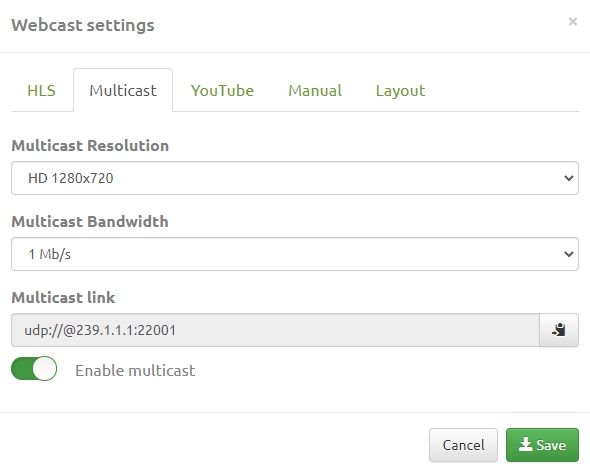
Multicast tab allows you to change:
- Multicast Resolution is the button with dropdown list in which you can choose the bandwidth broadcast resolution.
- Multicast Bandwidth is the button with dropdown list in which you can choose the broadcast bandwidth.
- Enable multicast is the toggle enable/disable broadcast bandwidth.
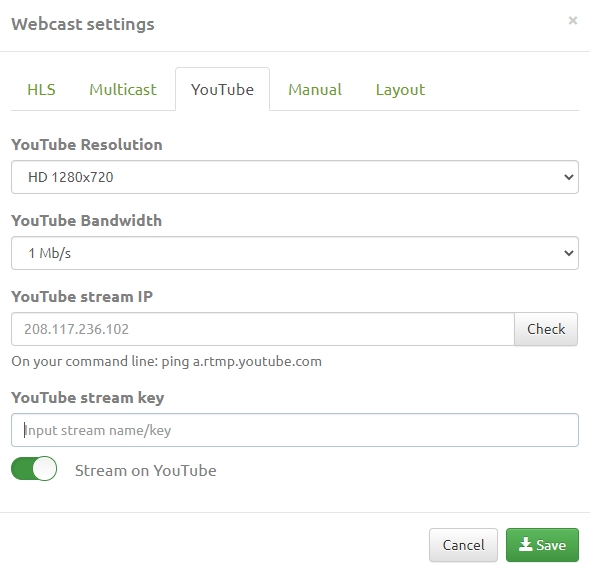
YouTube tab allows you to change:
- YouTube Resolution is the button in with dropdown list in which you can choose a resolution in a broadcast bandwidth transmission.
- YouTube Bandwidth is the button in with dropdown list in which you can choose a broadcast bandwidth.
- YouTube stream IP is the string in which you can specify the RTPM address server.
- YouTube stream key is the string for specifying the settings of a video coder key.
- Stream on YouTube is the toggle enable/disable a broadcast on YouTube.
To get the RTMP server address and channel key, follow the link on the YouTube Dashboard and get the key and YouTube broadcast address. On the Position tab, you can change the location of the participants for recording as you want or leave the layout in auto mode.
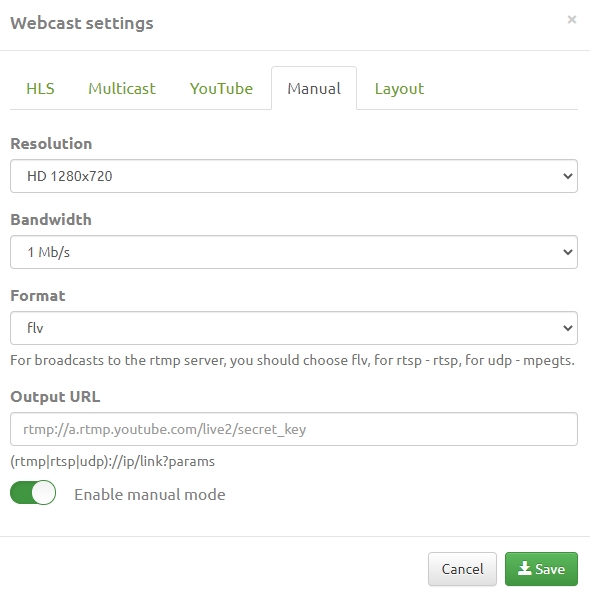
Manual tab allows you to change:
- Resolution is the button with dropdown list in which you can choose a broadcast resolution.
- Bandwidth is the button with dropdown list in which you can choose a broadcast bandwidth.
- Format is the string with dropdown where you can select flv for rtmp server, for rtsp server you need to select rtsp and for udp server you need to select mpegts.
- Output URL is the string in which you can specify a receiving server address.
Layout tab allows you to change:
- Use the selected layout of the conference is the checkbox which you can choose if you want to use the selected layout.
- Use the general layout of the conference is the checkbox which you can choose if you want to use the general layout of the conference.
The list of available layouts is found in Appendix 1 of this manual.
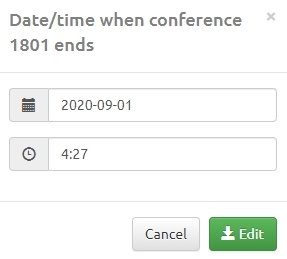
End time of the conference
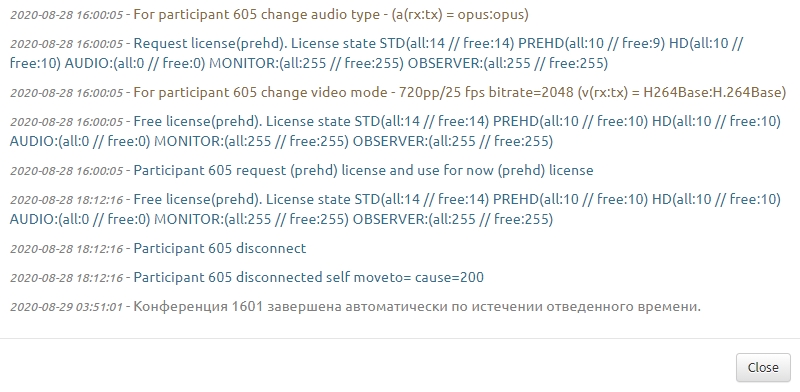
The end time of the conference is set at the planning stage of the conference start or during the conference. To change the time of the end of the conference you need to click on the Will finish on [Date], [Time] tab.
Specify a new date and time of ending the current conference in the modal window. Click the Edit button.
Accounts list and DTMF
The accounts list is divided into a list settings menu in which you can add a participant and change the display quantity of participants. You can also set a filtering of participants by their statuses and change list display mode. Changed settings are displayed in real time.
- The choosing of the Call item of the list call the participant of the conference.
- Send invitation to the participant.
- Delete participants to choose this item from the list.
- Participant settings are available with click on his avatar.
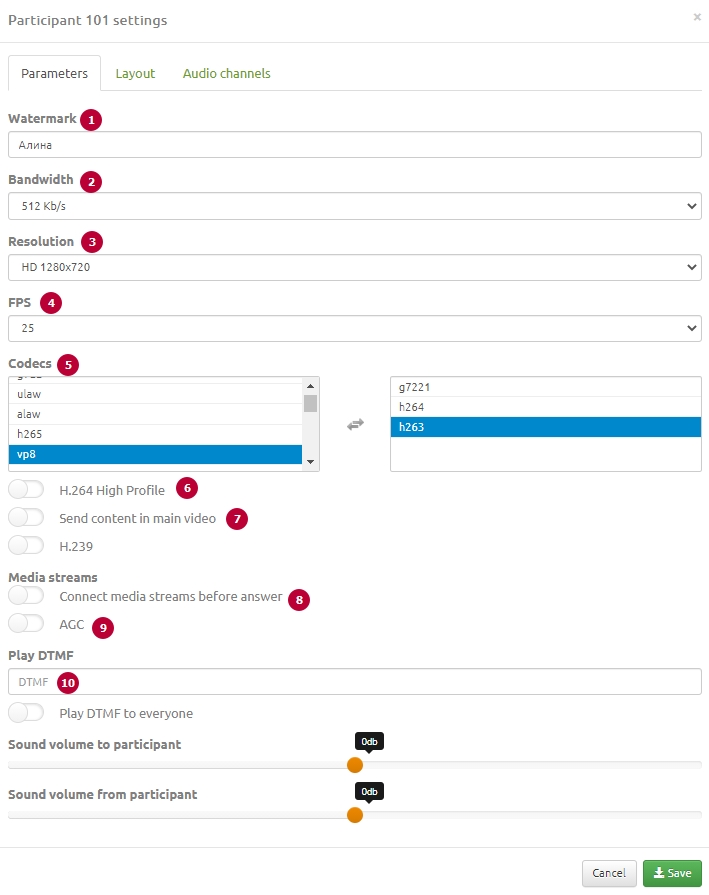
All settings in this modal window will be correct for this participant only in this conference except for the settings of codecs and connection modes (items 5,6,7,8).
- Watermark - редактируется текущая подпись участника;
2.Bandwidth button allows you to choose bandwidth for the participant.
3.Resolution button allows you to choose a maximum resolution for the participant.
4.FPS is the button with a dropdown list that allows you to choose a number of frames per second.
5. Codecs is a block with a list of codecs allowed for a participant. If the list is empty, then all codecs from the list on the left are allowed.
6. H.264 High Profile is a switch to enable H.264 codec support for Polycom terminals.
7. ‘Send content in main’ video is a switch for subscribers who do not have H.323 installed.
8. 'Connect media streams before answer' is a switch for the server and terminal to transmit information about the codecs used before the subscriber picks up the phone.
9. AGC is the automatic gain control of a sound on the server.
10. Play DTMF string where you can edit before calling the participant to the conference, dialing format ppp1234 #, where p is the delay before dialing DTMF, after going off-hook, equal to 1s.
Layout is the tab where you can edit the participant layout.
When the participant status is active.
