Main functions of the application in standby mode: различия между версиями
Alina (обсуждение | вклад) |
Alina (обсуждение | вклад) |
||
| (не показано 27 промежуточных версий этого же участника) | |||
| Строка 1: | Строка 1: | ||
| + | = Main functions of the application in standby mode = | ||
| + | |||
The application window in standby mode can be divided into the following areas: | The application window in standby mode can be divided into the following areas: | ||
[[Файл:VD 4.0.1 in standby mode.jpg|800px|безрамки|центр|VD 4.0.1 in standby mode]] | [[Файл:VD 4.0.1 in standby mode.jpg|800px|безрамки|центр|VD 4.0.1 in standby mode]] | ||
| Строка 28: | Строка 30: | ||
* orange is an account not connected, without registration. | * orange is an account not connected, without registration. | ||
| − | 5. the panel with widgets and various functions that allow you to quickly organize a conference and view information about calls; | + | <span id = 'Meeting widgets'>5. the panel with widgets and various functions that allow you to quickly organize a conference and view information about calls;</span> |
6. "Join the meeting" is the button that allows you to join a conference by number, name or link; | 6. "Join the meeting" is the button that allows you to join a conference by number, name or link; | ||
| − | 7. " | + | 7. "Start a meeting" is the button that allows you to create conference rooms and invite other participants with the ability to select the date, time and duration; |
| − | 8. " | + | 8. "Schedule a meeting" is the functionality for scheduling conferences; <span id = 'M_c'>A meeting scheduled by mistake can be cancelled in the scheduling window.</span> |
| + | [[Файл:Vinteo Desktop v4.1.0 Eng.jpg|800px|безрамки|центр|Vinteo Desktop v4.1.0 Eng]] | ||
| − | 9. " | + | 9. "Devices settings" is the button for quick access to settings: user, connection, devices as well as additional settings; |
| − | " | + | <span id = 'My meetings widgets'>10. "My meetings" is the widget that allows you to connect to conferences in which the user is a participant or moderator; all scheduled conferences are also displayed;</span> |
| − | + | <span id = 'Cancellation conf'>A scheduled conference can be cancelled by calling the additional menu and pressing the button with the function to cancel a scheduled conference.</span> | |
| + | [[Файл:Vinteo Desktop v4.1.0 Eng 2.jpg|800px|безрамки|центр|Vinteo Desktop v4.1.0 Eng 2]] | ||
| − | " | + | 11. <span id = 'CallHistory'>"Call history" is the widget with information about calls and the ability to make a call as well as share a link to a conference; when you click on the link it is copied.</span id> |
Next the function of the side navigation panel buttons from top to bottom will observe at. | Next the function of the side navigation panel buttons from top to bottom will observe at. | ||
| − | = "Dialing" button = | + | == "Dialing" button == |
When you click the “Dialing” button the functional panel for dialing and calling an account (account name from LDAP), servers and conference room is displayed. | When you click the “Dialing” button the functional panel for dialing and calling an account (account name from LDAP), servers and conference room is displayed. | ||
| Строка 65: | Строка 69: | ||
Condition for activating the functionality: on the server in the accounts editing window on the “Extended” tab the “Allow to make group calls” switch must be activated. | Condition for activating the functionality: on the server in the accounts editing window on the “Extended” tab the “Allow to make group calls” switch must be activated. | ||
| − | == Point-to-point call == | + | === Point-to-point call === |
To organize a point-to-point call you need to: | To organize a point-to-point call you need to: | ||
| Строка 82: | Строка 86: | ||
Another way is to reflect the contact in the account’s main settings on the server using the "Reflect in Address book" toggle. This way the contact will be available in the Vinteo Desktop contact book. | Another way is to reflect the contact in the account’s main settings on the server using the "Reflect in Address book" toggle. This way the contact will be available in the Vinteo Desktop contact book. | ||
| − | = “Call history” button = | + | == “Call history” button == |
When you click the "Call history" button the functional panel with call history (last 10 calls) and the search field is displayed. There is also the scrolling area at the bottom of which there is the "Show more" button which opens several more previous history entries. When you click on an entry in the history the selected number is called again. | When you click the "Call history" button the functional panel with call history (last 10 calls) and the search field is displayed. There is also the scrolling area at the bottom of which there is the "Show more" button which opens several more previous history entries. When you click on an entry in the history the selected number is called again. | ||
| Строка 101: | Строка 105: | ||
The "Contacts" and "Groups" tabs contain local contacts that the account records and manages himself. Added contacts are sorted automatically in alphabetical order from top to bottom. Display priority depending on the characters used to create the contact: symbols, numbers, Latin, Cyrillic. | The "Contacts" and "Groups" tabs contain local contacts that the account records and manages himself. Added contacts are sorted automatically in alphabetical order from top to bottom. Display priority depending on the characters used to create the contact: symbols, numbers, Latin, Cyrillic. | ||
| + | |||
| + | When you hover the cursor over a contact additional information appears provided that on the server in the Address book in the contact editing window it is contained in the "Other information" field. | ||
| + | |||
| + | The "Favorites" tab contains favorite contacts from the Address book. | ||
| + | |||
| + | If account registration is enabled in the connection settings the contacts list is synchronized with the account on the server and stored on it. If registration is disabled the contact list is stored locally in Vinteo Desktop on this computer. | ||
| + | |||
| + | '''Contacts editing''' | ||
| + | |||
| + | When you hover over a contact you can edit it by clicking the button with the "pencil" icon. You can delete contacts by clicking on the trash can to the right of the contact. | ||
| + | |||
| + | Above the contact list there is the filter for quick search. | ||
| + | [[Файл:Vinteo Desktop v4.0.2 Contact editing.jpg|800px|безрамки|центр|Vinteo Desktop v4.0.2 Contact editing]] | ||
| + | |||
| + | '''Contacts adding''' | ||
| + | |||
| + | The adding contacts button is located at the top of the function bar | ||
| + | [[Файл:Vinteo Desktop v4.0.2 Contact adding.jpg|800px|безрамки|центр|Vinteo Desktop v4.0.2 Contact adding]] | ||
| + | To add contacts in the form that appears and click the “Done” button. | ||
| + | |||
| + | '''Contacts groups''' | ||
| + | |||
| + | Contacts groups are formed in the same way as adding contacts with the only difference that you need to click the "Add group" button. | ||
| + | |||
| + | 1. indicate the name of the group; | ||
| + | |||
| + | 2. select contacts that will be included in the group; | ||
| + | |||
| + | 3. on the tab at the top click the “Done” button. | ||
| + | |||
| + | The created group will appear in the address book at the top. | ||
| + | |||
| + | '''Call a participant from the contact group''' | ||
| + | |||
| + | To call a conference participant from the contact group you need to go to the “Groups” tab and select a participant in the desired group click on it the call will be sent. | ||
| + | |||
| + | '''Favorite contacts''' | ||
| + | |||
| + | Each contact you select can be transferred to the favorites category which can provide quick access and search. To classify a contact as a favorite click the contact edit button (to the right of the contact) mark this contact as a favorite and click the “Done” button. | ||
| + | |||
| + | '''Moderator leaving an active conference''' | ||
| + | |||
| + | If a moderator leaves an active conference and when clicks the end conference button the window is displayed in which you can select one of the actions: | ||
| + | * "End the conference for everyone"; | ||
| + | * "Leave the conference" - the conference will not be completed. | ||
| + | |||
| + | If the moderator leaves the conference simultaneously with an incoming call the window is displayed in which you can choose one of three options: | ||
| + | |||
| + | * "Reply and leave the conference"; | ||
| + | * "Reply and end the conference"; | ||
| + | * "Reject". | ||
| + | |||
| + | Condition for the functionality work: the presence of a moderator and at least one participant in the conference. | ||
| + | |||
| + | '''Contacts export and import''' | ||
| + | |||
| + | Exporting and importing the address book to a file for backup and transferring to another workplace can be done by clicking the appropriate buttons as shown in the figure below. | ||
| + | [[Файл:Vinteo Desktop v4.0.2 Import Export contacts.jpg|800px|безрамки|центр|Vinteo Desktop v4.0.2 Import Export contacts]] | ||
| + | |||
| + | '''Saving a contact with a PIN code''' | ||
| + | |||
| + | You can save a conference number with a PIN code in your contacts book so you can enter the conference without entering it. This may be necessary when the participant is not added to the conference as an account but the conference is regular. The participant have not to remember the PIN code and entry into the conference will be faster since it does not need to be entered before each conference. | ||
| + | |||
| + | To save a contact with a PIN code enter the conference number or its name then # and the PIN code of this conference; the contact entered in this way will be saved and later the participant will be able to find it in the contact book. | ||
| + | [[Файл:Vinteo Desktop v4.0.2 Contact with PIN.jpg|800px|безрамки|центр|Vinteo Desktop v4.0.2 Contact with PIN]] | ||
| + | |||
| + | == “Settings” button == | ||
| + | |||
| + | When you click the "Settings" button four tabs are displayed on the function panel: “User settings”, “Configuring the connection”, “Configuring devices” and “Additional settings”. | ||
| + | |||
| + | The initial setting was performed during registration. If you need to change the current camera or resolution settings this can be done on the “Configuring devices” tab. | ||
| + | [[Файл:Vinteo Desktop v4.0.2 Settings.jpg|800px|безрамки|центр|Vinteo Desktop v4.0.2 Settings]] | ||
Версия 12:30, 24 октября 2024
Содержание
Main functions of the application in standby mode
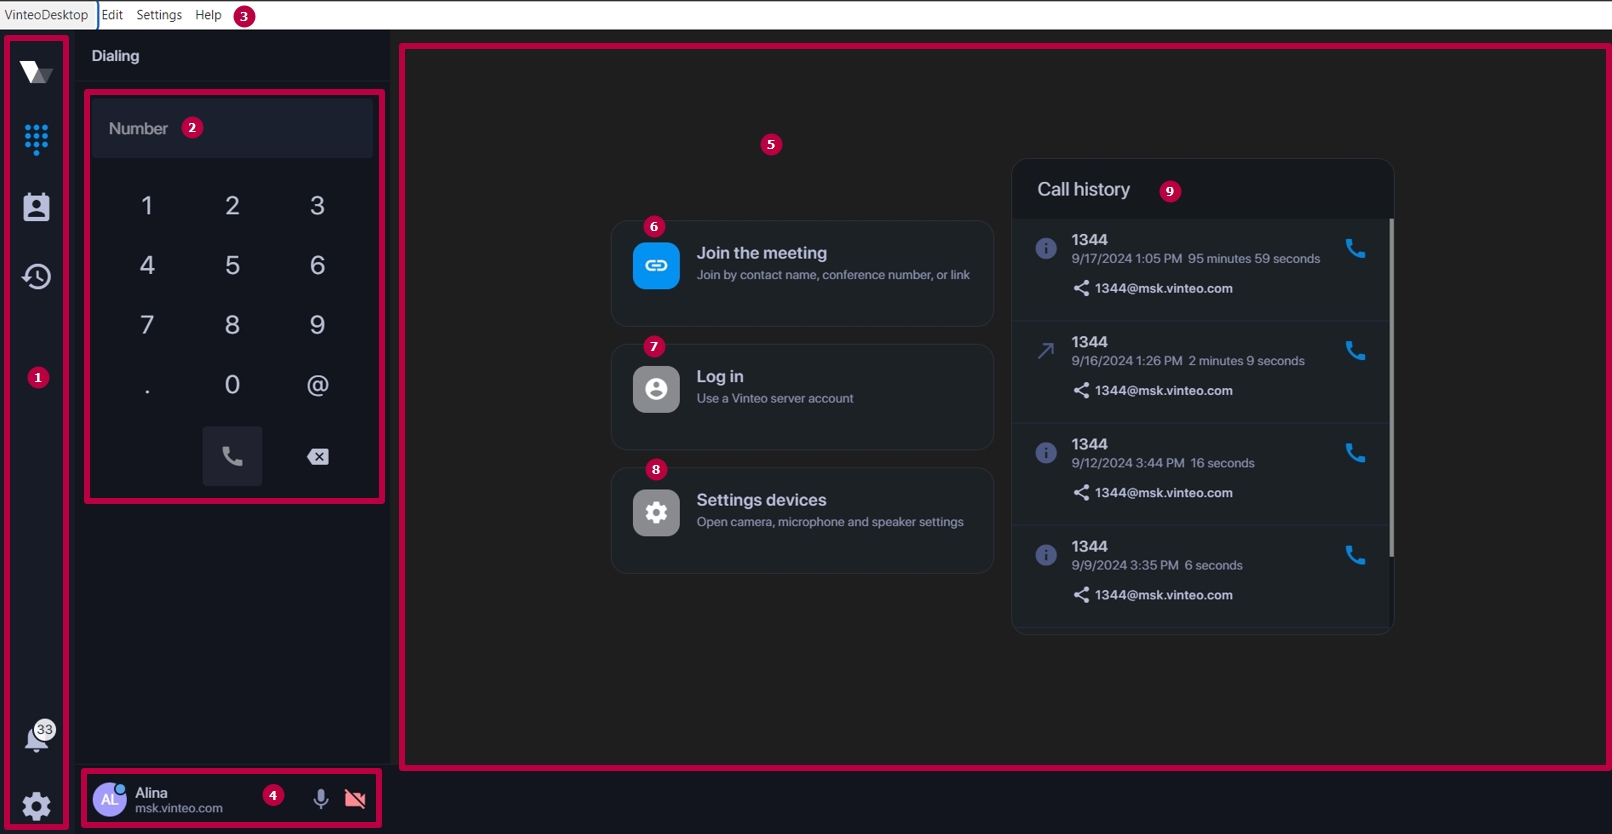
The application window in standby mode can be divided into the following areas:
1. navigation bar with buttons;
2. functional panel;
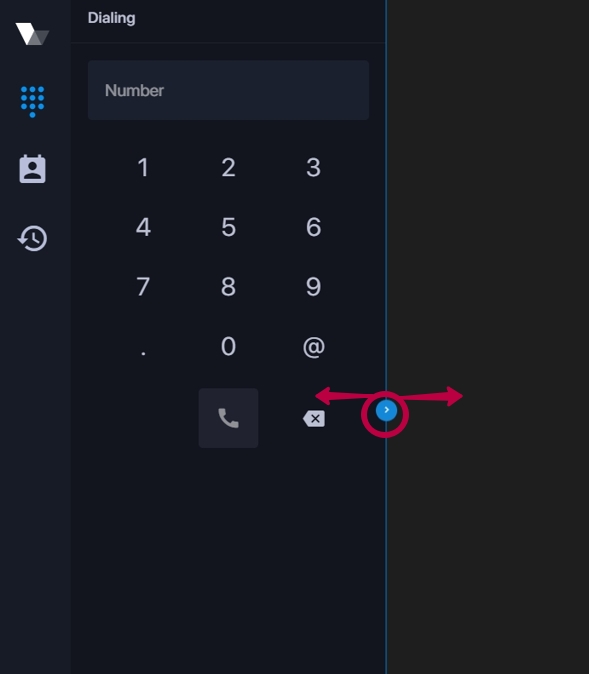
You can expand the function bar by pulling the blue pointer to the right (as shown in the figure).
system menu which is displayed by pressing the Alt key and contains the following sections:
- Vinteo Desktop:
- “Quit” - closes the application;
- “Edit”:
- “Cut”
- “Copy”
- “Paste”
- “Select all”
- "Settings":
- “Language” is the button that serves to select the localization language (English, Russian, German, French, Spanish, Chinese);
- "Help" is the button that opens the window with the list of all updates;
4. the bar with information about the currently configured connection to the server, the account's name, his number and server address, an avatar containing a status indicator, as well as the camera and microphone on/off buttons.
Status indicator
- blue is currently in the conference; anonymous participant;
- green is an account registered on the server;
- red is an account not registered on the server;
- orange is an account not connected, without registration.
5. the panel with widgets and various functions that allow you to quickly organize a conference and view information about calls;
6. "Join the meeting" is the button that allows you to join a conference by number, name or link;
7. "Start a meeting" is the button that allows you to create conference rooms and invite other participants with the ability to select the date, time and duration;
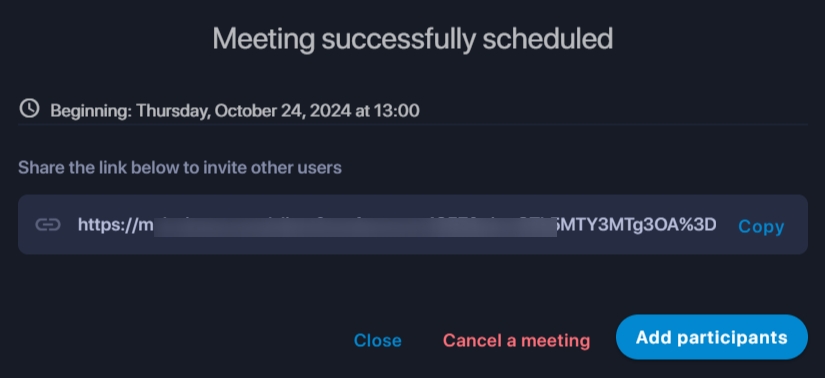
8. "Schedule a meeting" is the functionality for scheduling conferences; A meeting scheduled by mistake can be cancelled in the scheduling window.
9. "Devices settings" is the button for quick access to settings: user, connection, devices as well as additional settings;
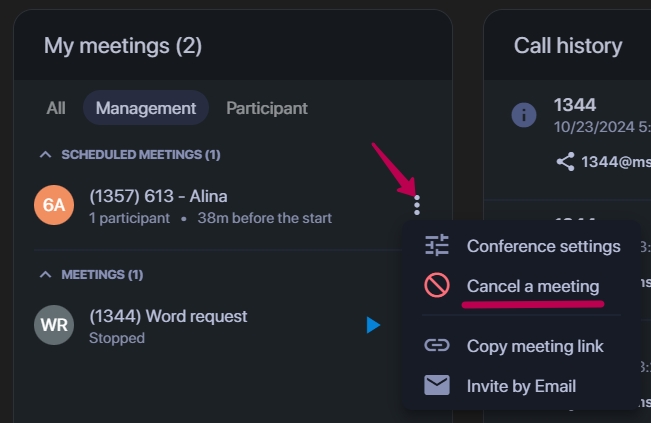
10. "My meetings" is the widget that allows you to connect to conferences in which the user is a participant or moderator; all scheduled conferences are also displayed;
A scheduled conference can be cancelled by calling the additional menu and pressing the button with the function to cancel a scheduled conference.
11. "Call history" is the widget with information about calls and the ability to make a call as well as share a link to a conference; when you click on the link it is copied.
Next the function of the side navigation panel buttons from top to bottom will observe at.
"Dialing" button
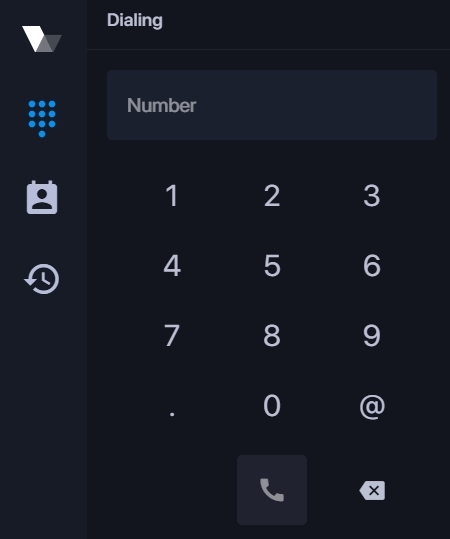
When you click the “Dialing” button the functional panel for dialing and calling an account (account name from LDAP), servers and conference room is displayed.
You can enter the number using the keyboard or using the on-screen buttons. Calls can be made to the following directions:
- account number (for example, 100);
- conference number (for example, 1000 or 1000#1234 where "1234" is the PIN code of close conference);
- server address (for example, krd.vinteo.com);
- number@address of the server (for example, 1000@krd.vinteo.com or 1000@krd.vinteo.com#1234).
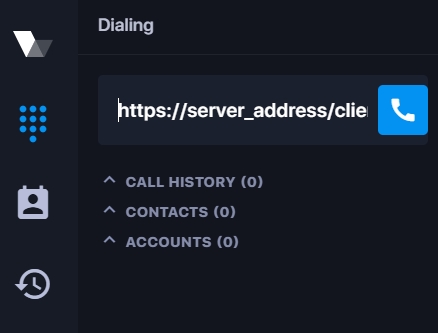
You can also insert links like https://server_address/client?conference=conference_number in the dialing field.
Group calls
To make a group call click the "Group calls" button at the top of the panel. Mark several accounts and click the "Call" button. The functionality allows you to schedule a call by selecting a date and time and set the duration of the conference. There is also the participants search bar in the address book.
Condition for activating the functionality: on the server in the accounts editing window on the “Extended” tab the “Allow to make group calls” switch must be activated.
Point-to-point call
To organize a point-to-point call you need to:
1. create two accounts on the server;
2. turn on the “Allow to make group calls” toggle in the account’s “Extended” settings;
3. be registered in Vinteo Desktop or in the web client;
4. dial the account's number.
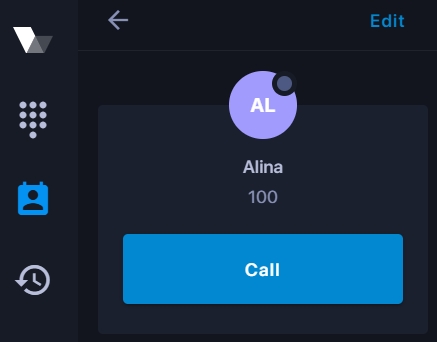
You can also add an account to your contact book and dial a number from your contact list by clicking on it. The account call window will appear.
Another way is to reflect the contact in the account’s main settings on the server using the "Reflect in Address book" toggle. This way the contact will be available in the Vinteo Desktop contact book.
“Call history” button
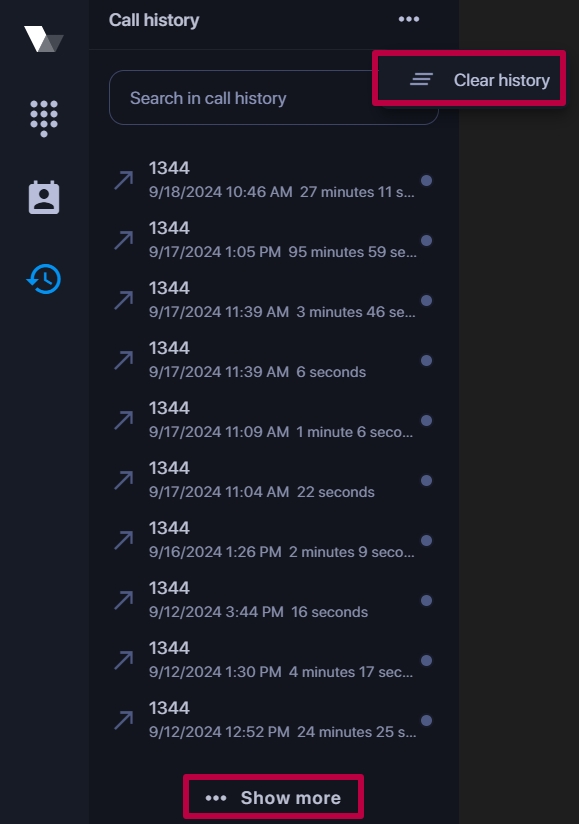
When you click the "Call history" button the functional panel with call history (last 10 calls) and the search field is displayed. There is also the scrolling area at the bottom of which there is the "Show more" button which opens several more previous history entries. When you click on an entry in the history the selected number is called again.
Call history can be cleared by clicking the "Clear history" button at the top of the function panel.
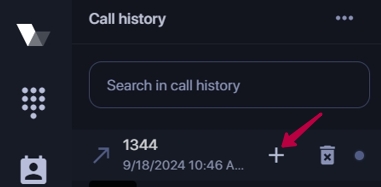
Adding contacts from call history
To add contacts from call history click the "+" button on the right in the call history line. The button will become visible when you hover over it.
In the "New contact" window that opens you must enter the contact's name and click the "Done" button.
“Address directory” button
When you click the “Address directory” button the navigation bar displays three tabs: "Accounts", "Contacts", and "Groups". The last tab will not be displayed if the participant is not registered on the server (anonymous). There are also two categories: "Favorites" and "All contacts".
The "Accounts" tab contains contacts reflected from the server Address book managed by the server administrator.
The "Contacts" and "Groups" tabs contain local contacts that the account records and manages himself. Added contacts are sorted automatically in alphabetical order from top to bottom. Display priority depending on the characters used to create the contact: symbols, numbers, Latin, Cyrillic.
When you hover the cursor over a contact additional information appears provided that on the server in the Address book in the contact editing window it is contained in the "Other information" field.
The "Favorites" tab contains favorite contacts from the Address book.
If account registration is enabled in the connection settings the contacts list is synchronized with the account on the server and stored on it. If registration is disabled the contact list is stored locally in Vinteo Desktop on this computer.
Contacts editing
When you hover over a contact you can edit it by clicking the button with the "pencil" icon. You can delete contacts by clicking on the trash can to the right of the contact.
Above the contact list there is the filter for quick search.
Contacts adding
The adding contacts button is located at the top of the function bar
To add contacts in the form that appears and click the “Done” button.
Contacts groups
Contacts groups are formed in the same way as adding contacts with the only difference that you need to click the "Add group" button.
1. indicate the name of the group;
2. select contacts that will be included in the group;
3. on the tab at the top click the “Done” button.
The created group will appear in the address book at the top.
Call a participant from the contact group
To call a conference participant from the contact group you need to go to the “Groups” tab and select a participant in the desired group click on it the call will be sent.
Favorite contacts
Each contact you select can be transferred to the favorites category which can provide quick access and search. To classify a contact as a favorite click the contact edit button (to the right of the contact) mark this contact as a favorite and click the “Done” button.
Moderator leaving an active conference
If a moderator leaves an active conference and when clicks the end conference button the window is displayed in which you can select one of the actions:
- "End the conference for everyone";
- "Leave the conference" - the conference will not be completed.
If the moderator leaves the conference simultaneously with an incoming call the window is displayed in which you can choose one of three options:
- "Reply and leave the conference";
- "Reply and end the conference";
- "Reject".
Condition for the functionality work: the presence of a moderator and at least one participant in the conference.
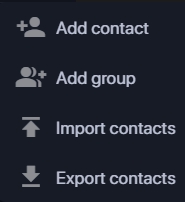
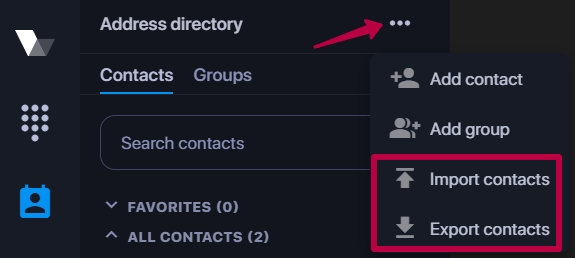
Contacts export and import
Exporting and importing the address book to a file for backup and transferring to another workplace can be done by clicking the appropriate buttons as shown in the figure below.
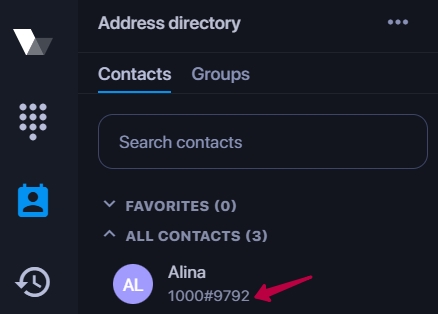
Saving a contact with a PIN code
You can save a conference number with a PIN code in your contacts book so you can enter the conference without entering it. This may be necessary when the participant is not added to the conference as an account but the conference is regular. The participant have not to remember the PIN code and entry into the conference will be faster since it does not need to be entered before each conference.
To save a contact with a PIN code enter the conference number or its name then # and the PIN code of this conference; the contact entered in this way will be saved and later the participant will be able to find it in the contact book.
“Settings” button
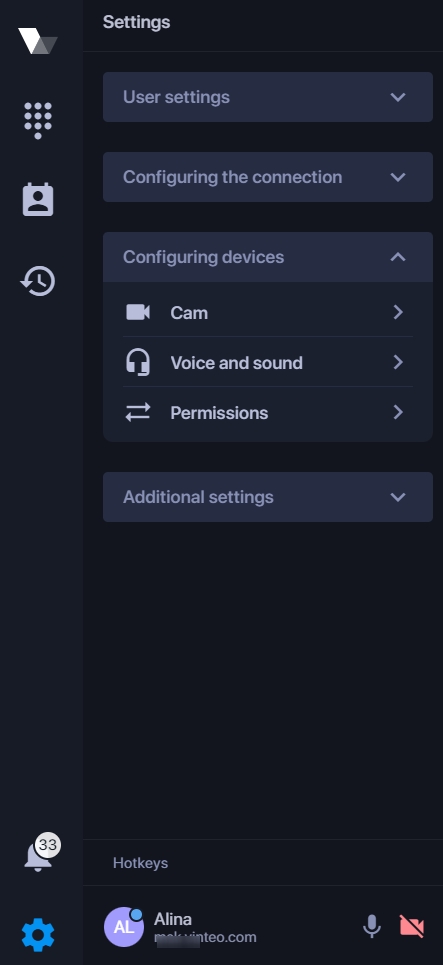
When you click the "Settings" button four tabs are displayed on the function panel: “User settings”, “Configuring the connection”, “Configuring devices” and “Additional settings”.
The initial setting was performed during registration. If you need to change the current camera or resolution settings this can be done on the “Configuring devices” tab.
