Checking network bandwidth using iPerf3: различия между версиями
Alina (обсуждение | вклад) |
Alina (обсуждение | вклад) |
||
| (не показано 8 промежуточных версий этого же участника) | |||
| Строка 8: | Строка 8: | ||
3. click the "Upload" button. the message will appear: “Attention! The configuration downloaded successfully and installed. The system will start within 5 minutes”; | 3. click the "Upload" button. the message will appear: “Attention! The configuration downloaded successfully and installed. The system will start within 5 minutes”; | ||
| + | [[Файл:Upgrade .jpg|800px|безрамки|центр|Upgrade ]] | ||
| + | 4. you need to wait until the settings are applied. To do this go to the "System" section in the "Status" subsection and wait until in the "Server uptime" item the system updates the work status from "System down" to "System uptime"; | ||
| + | |||
| + | 5. You can begin installing the utility on the client PC. | ||
| + | |||
| + | = Installing and running the utility = | ||
| + | |||
| + | 1. download and install the iPerf3 utility from the official website: https://iperf.fr/iperf-download.php/ | ||
| + | |||
| + | 2. unpack the files from the archive into a folder convenient for you. | ||
| + | |||
| + | 3. open the command line (Win+R keys) and enter cmd then press Enter in the window that appears (in all versions of Windows); then go to the folder with the unpacked iPerf3 files. | ||
| + | |||
| + | = Testing the channel from client to server = | ||
| + | |||
| + | To check the level of packet loss from the client to the server you need to run the test with the command: | ||
| + | |||
| + | iperf3 -c <server_ip> -u -w 1m -t 10 -l 1100 -b 1M | ||
| + | |||
| + | -с <server_ip> — key to run in client mode with specifying the server address; | ||
| + | |||
| + | -u — it is necessary to specify that the UDP protocol is used; | ||
| + | |||
| + | -w 1m — you must specify the iPerf3 buffer size; | ||
| + | |||
| + | -t 10 — you must specify the test time of 10 seconds; | ||
| + | |||
| + | -l 1100 — specify the packet length; set it to at least 28 bytes less than the MTU to prevent fragmentation. 1100 bytes is the average RTP packet size so we recommend this value; | ||
| + | |||
| + | -b 1M – indicate the required bitrate for the test (1 Mbit/sec). You can use modifiers: K – kilobyte, M – megabyte, G – gigabyte. | ||
| + | |||
| + | Information about other keys and parameters of the utility can be found here: https://iperf.fr/iperf-doc.php#3doc | ||
| + | |||
| + | The figure below shows the operation of the iPerf utility. | ||
| + | [[Файл:IPerf.jpg|800px|безрамки|центр|IPerf]] | ||
| + | |||
| + | At the bottom of the list after the dotted line we will get the average test values: | ||
| + | # Interval - testing time period; | ||
| + | # Transfer - amount of data transferred; | ||
| + | # Bandwidth - bandwidth information; | ||
| + | # Lost/Total Datagrams - number of lost and transmitted packets. | ||
| + | We can conclude that 1.18 megabytes were transferred at a speed of 992 Kbps. The number of lost packets was 1 which amounted to 0.089% to relation to the 1127 sent packets. | ||
| + | |||
| + | = Testing the channel from server to client = | ||
| + | |||
| + | To test the incoming speed from the server to the client you need to add the -R (reverse mode) switch to the command: | ||
| + | iperf3 -c <server_ip> -u -w 1m -t 10 -l 1100 -b 5M -R | ||
| + | [[Файл:IPerf 2.jpg|800px|безрамки|центр|IPerf 2]] | ||
| + | At the bottom of the list after the dotted line we will get the average test values: | ||
| + | # Interval - testing time period; | ||
| + | # Transfer - amount of transferred data; | ||
| + | # Bandwidth - bandwidth information; | ||
| + | # Lost/Total Datagrams - number of lost and transmitted packets. | ||
| + | We can conclude that 5.96 megabytes were transferred at a speed of 4.99 Mbit/sec. The number of lost packets was 28 which amounted to 0.089% in relation to the 5683 sent packets. | ||
| + | |||
| + | = End work the iPerf3 utility on the server = | ||
| + | Stopping the iPerf utility on the server is done by completely rebooting the server operating system. | ||
| + | |||
| + | <font color = 'red'>Attention! During a server reboot all conferences and calls on the video conferencing server will be completed and the web interface will be unavailable for some time.</font> | ||
Текущая версия на 17:02, 1 октября 2024
iPerf3 is the console utility. You can measure with its help the maximum network throughput between the videoconferencing server and the client or conduct load testing of the communication channel to determine the level of losses. Before starting testing you need to run iPerf on the server. Special patch was developed for this.
Содержание
Installing the patch on the server
1. in the "System" server section go to the "Upgrade" subsection;
2. go to the “Settings” tab and by clicking the file selection button specify the path to the file with the patch. To receive the patch you must contact Vinteo technical support;
3. click the "Upload" button. the message will appear: “Attention! The configuration downloaded successfully and installed. The system will start within 5 minutes”;
4. you need to wait until the settings are applied. To do this go to the "System" section in the "Status" subsection and wait until in the "Server uptime" item the system updates the work status from "System down" to "System uptime";
5. You can begin installing the utility on the client PC.
Installing and running the utility
1. download and install the iPerf3 utility from the official website: https://iperf.fr/iperf-download.php/
2. unpack the files from the archive into a folder convenient for you.
3. open the command line (Win+R keys) and enter cmd then press Enter in the window that appears (in all versions of Windows); then go to the folder with the unpacked iPerf3 files.
Testing the channel from client to server
To check the level of packet loss from the client to the server you need to run the test with the command:
iperf3 -c <server_ip> -u -w 1m -t 10 -l 1100 -b 1M
-с <server_ip> — key to run in client mode with specifying the server address;
-u — it is necessary to specify that the UDP protocol is used;
-w 1m — you must specify the iPerf3 buffer size;
-t 10 — you must specify the test time of 10 seconds;
-l 1100 — specify the packet length; set it to at least 28 bytes less than the MTU to prevent fragmentation. 1100 bytes is the average RTP packet size so we recommend this value;
-b 1M – indicate the required bitrate for the test (1 Mbit/sec). You can use modifiers: K – kilobyte, M – megabyte, G – gigabyte.
Information about other keys and parameters of the utility can be found here: https://iperf.fr/iperf-doc.php#3doc
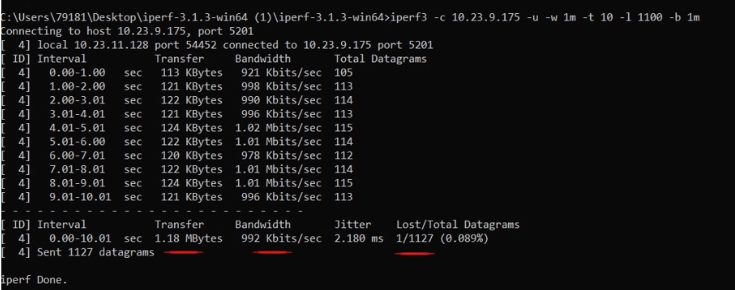
The figure below shows the operation of the iPerf utility.
At the bottom of the list after the dotted line we will get the average test values:
- Interval - testing time period;
- Transfer - amount of data transferred;
- Bandwidth - bandwidth information;
- Lost/Total Datagrams - number of lost and transmitted packets.
We can conclude that 1.18 megabytes were transferred at a speed of 992 Kbps. The number of lost packets was 1 which amounted to 0.089% to relation to the 1127 sent packets.
Testing the channel from server to client
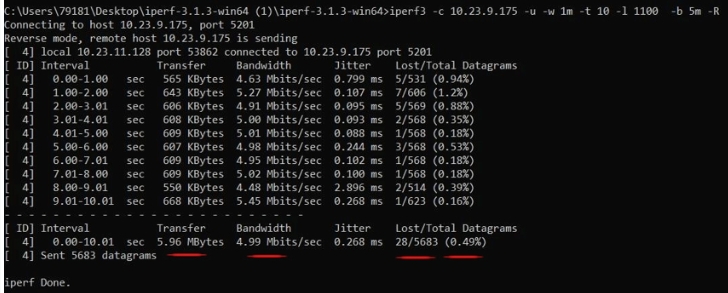
To test the incoming speed from the server to the client you need to add the -R (reverse mode) switch to the command:
iperf3 -c <server_ip> -u -w 1m -t 10 -l 1100 -b 5M -R
At the bottom of the list after the dotted line we will get the average test values:
- Interval - testing time period;
- Transfer - amount of transferred data;
- Bandwidth - bandwidth information;
- Lost/Total Datagrams - number of lost and transmitted packets.
We can conclude that 5.96 megabytes were transferred at a speed of 4.99 Mbit/sec. The number of lost packets was 28 which amounted to 0.089% in relation to the 5683 sent packets.
End work the iPerf3 utility on the server
Stopping the iPerf utility on the server is done by completely rebooting the server operating system.
Attention! During a server reboot all conferences and calls on the video conferencing server will be completed and the web interface will be unavailable for some time.


