List of server contacts and groups, creating and editing: различия между версиями
Alina (обсуждение | вклад) |
Alina (обсуждение | вклад) |
||
| Строка 8: | Строка 8: | ||
[[Файл:Vinteo Mobile Contacts 2.docx.png|800px|безрамки|центр|Vinteo Mobile Contacts 2.docx]] | [[Файл:Vinteo Mobile Contacts 2.docx.png|800px|безрамки|центр|Vinteo Mobile Contacts 2.docx]] | ||
3. It is possible to choose an option to create a contact or to create a group in the appeared list; | 3. It is possible to choose an option to create a contact or to create a group in the appeared list; | ||
| + | |||
4. Fill in the fields of the contact form; | 4. Fill in the fields of the contact form; | ||
| + | |||
5. To cancel the creation of a contact, click the Cancel button. To save the contact, click the Done button; | 5. To cancel the creation of a contact, click the Cancel button. To save the contact, click the Done button; | ||
| + | |||
6. To view the information, click on the link with the user's name; | 6. To view the information, click on the link with the user's name; | ||
| + | |||
7. The contact screen opens, where you can view the call history, groups of a membership, and delete the contact; | 7. The contact screen opens, where you can view the call history, groups of a membership, and delete the contact; | ||
| + | |||
8. Here you can change, delete a contact or call a user by clicking the appropriate button; | 8. Here you can change, delete a contact or call a user by clicking the appropriate button; | ||
| + | |||
9. Click the "Close" button to return to the previous screen; | 9. Click the "Close" button to return to the previous screen; | ||
| + | |||
10. Click the "Groups" and "Add" buttons on the "Groups" tab to create a group of contacts. Use the "+" button in the upper right corner for the further adding of groups; | 10. Click the "Groups" and "Add" buttons on the "Groups" tab to create a group of contacts. Use the "+" button in the upper right corner for the further adding of groups; | ||
| + | |||
11. Select "Add a group" in the appeared window; | 11. Select "Add a group" in the appeared window; | ||
| + | |||
12. The contact list opens. Mark contacts that need to be grouped with a check mark; | 12. The contact list opens. Mark contacts that need to be grouped with a check mark; | ||
| + | |||
13. Click the Cancel button to cancel the changes and to continue creating the group; | 13. Click the Cancel button to cancel the changes and to continue creating the group; | ||
| + | |||
14. After that, enter the name of the group and click "Done" to save the information; | 14. After that, enter the name of the group and click "Done" to save the information; | ||
| + | |||
15. Click the link to view the information about the group; | 15. Click the link to view the information about the group; | ||
| + | |||
16. It is possible to view the list of participants, add new users, change the name or delete the group on this screen. | 16. It is possible to view the list of participants, add new users, change the name or delete the group on this screen. | ||
Click the "Close" button to return to the previous page. | Click the "Close" button to return to the previous page. | ||
Текущая версия на 18:32, 16 августа 2024
Data is automatically sent to the VINTEO’s VC server and synchronized with the Mobile Client when a user (an authorized user) creates or edits contacts and groups in the VINTEO Mobile application every time the application is opened.
In order to create your own list of users (groups), you have to:
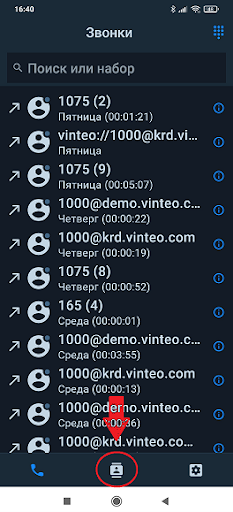
1. Go from the "Calls" tab to the "Contact/Groups" tab;
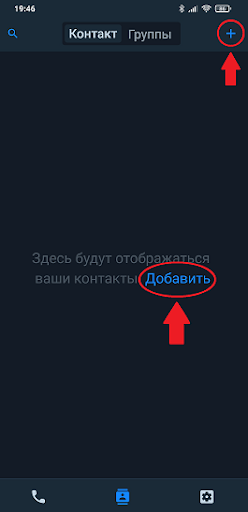
2. Click the "Add" button. The "+" button in the upper right part of the screen should be used for the further adding of contacts;
3. It is possible to choose an option to create a contact or to create a group in the appeared list;
4. Fill in the fields of the contact form;
5. To cancel the creation of a contact, click the Cancel button. To save the contact, click the Done button;
6. To view the information, click on the link with the user's name;
7. The contact screen opens, where you can view the call history, groups of a membership, and delete the contact;
8. Here you can change, delete a contact or call a user by clicking the appropriate button;
9. Click the "Close" button to return to the previous screen;
10. Click the "Groups" and "Add" buttons on the "Groups" tab to create a group of contacts. Use the "+" button in the upper right corner for the further adding of groups;
11. Select "Add a group" in the appeared window;
12. The contact list opens. Mark contacts that need to be grouped with a check mark;
13. Click the Cancel button to cancel the changes and to continue creating the group;
14. After that, enter the name of the group and click "Done" to save the information;
15. Click the link to view the information about the group;
16. It is possible to view the list of participants, add new users, change the name or delete the group on this screen.
Click the "Close" button to return to the previous page.

